Item complete details TDL

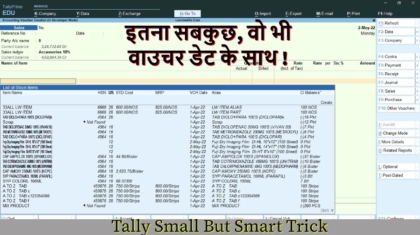
2022 Free Item complete details TDL for Tally Prime | Best free new Tally TDL to see Item All details | Item All in One details TDL

With the help of this fantastic item complete details TDL, we can see and export an item’s whole detail list. I thus gave it the name Item All in One details TDL. We can extract every item information, including godown and opening balance, using this Tally TDL.

Friends, if we keep track of stock goods in Tally, we occasionally need to update GST, HSN, or any other item-specific information. We go through each item one at a time, open it, and then edit the information. In order to track our operations, we also create MIS reports or stock summary reports. To view all of the item’s details in one location, this Tally TDL will be quite helpful.

This TDL code may be changed to suit our needs. Working with Tally Erp9 and Tally Prime is fairly straightforward, and we may add or delete other fields as needed. The best short tdl code to view item complete details.

Item complete details TDL

Also see best way to do e commerce entries without any error

Item complete details TDL Code:

[#Menu:Gateway of Tally]
	Add:Key Item:before:@@locQuit:Item Report:L:Display:Item Report
[Report: Item Report]
Title : "Learnwell Items"
Form : StockItem_LWR
[Form: StockItem_LWR]
Button : ExportButton
Background : @@SV_BALANCESHEET
Part : StockItem_LWRHeading, StockItem_LWRBody
Width : 100 % Page
Height : 100 % Page
Space Bottom : 0.50
Space Left : 0.50
Space Right : 0.50
Space Top : 0.50
Vertical Align : Center
Horizontal Align : Center

[Part: StockItem_LWRHeading]

Line:StockItem_LWRHeading

[Line: StockItem_LWRHeading]

Field: Name Field
Local: Field : Name Field : Set as : "Item All Detail"
Local: Field : Name Field : Style : Large Bold
Local: Field : Name Field : Align : Center
Local: Field : Name Field : Full Width : Yes
Local: Field : Name Field : Color : Blue
Local: Field : Name Field : Inactive : $$InExportMode
Local: Field : Name Field : Skip : Yes
Space Bottom : 0.25 cm

[Part: StockItem_LWRBody]

Line : StockItem_LWRTitle,StockItem_LWRDesc
Repeat : StockItem_LWRDesc : StockItemCollLW
Scroll : Both
Vertical : Yes
Common Border : yes
Float : No
Border : Thin Bottom


[Line: StockItem_LWRTitle]
Field : LWItemsrn, LWItemName
Right Field : LWItemAlias,LWItemPrn,LWItemGRP,LWItemCTGR,LWItemUOM
Right Field :LWItemHSN,LWItemRAte,LWItemCessRT,LWItemOPQ,LWItemOPR,LWItemOPAM,LWItemGod,LWItemGodQT,LWItemGodRT,LWItemGodAmt

Border : Totals

Local : Field : Default : Type : String
Local : Field : Default : Align : Center
Local : Field : Default : Border : Thin Left
Local : Field : Default : Style : Large Bold
Local : Field : Default : Skip : Yes
Local : Field : Default : Line : 2

Local : Field : LWItemsrn : Set as : $$LocaleString:"SL NO."
Local : Field : LWItemName : Set as : $$LocaleString:"Item Name"
Local : Field : LWItemAlias : Set as : $$LocaleString:"Item Alias"
Local : Field : LWItemPrn : Set as : $$LocaleString:"Part No."
Local : Field : LWItemGRP : Set as : $$LocaleString:"Stock Group"
Local : Field : LWItemCTGR : Set as : $$LocaleString:"Stock Category"
Local : Field : LWItemUOM : Set as : $$LocaleString:"UOM"
Local : Field : LWItemHSN : Set as : $$LocaleString:"HSN"
Local : Field : LWItemRAte : Set as : $$LocaleString:"IGST Rate"
Local : Field : LWItemCessRT : Set as : $$LocaleString:"Cess Rate"
Local : Field : LWItemGod : Set as : $$LocaleString:"Godown Name"
Local : Field : LWItemGodQT : Set as : $$LocaleString:"Quantity"
Local : Field : LWItemGodRT : Set as : $$LocaleString:"Rate"
Local : Field : LWItemGodAmt : Set as : $$LocaleString:"Amount"
Local : Field : LWItemOPQ: Set as : $$LocaleString:"Total Op Qty"
Local : Field : LWItemOPR: Set as : $$LocaleString:"Total Op Rate"
Local : Field : LWItemOPAM: Set as : $$LocaleString:"Total Op Value"

;;www.learnwells.com
[Line:StockItem_LWRDesc]
Field : LWItemsrn, LWItemName
Right Field : LWItemAlias,LWItemPrn,LWItemGRP,LWItemCTGR,LWItemUOM
Right Field :LWItemHSN,LWItemRAte,LWItemCessRT,LWItemOPQ,LWItemOPR,LWItemOPAM,LWItemGod,LWItemGodQT,LWItemGodRT,LWItemGodAmt
Local : Field : Default : Style : Normal
Explode : LedDup_LWRDescExp1
Border : Thin TopBottom
Option : Alter on Enter

[Part : LedDup_LWRDescExp1]
Line : LedDup_LWRDescExp1
Repeat : LedDup_LWRDescExp1:StockGodLW

[Line : LedDup_LWRDescExp1]
Field : LWItemsrn, LWItemName
Right Field : LWItemAlias,LWItemPrn,LWItemGRP,LWItemCTGR,LWItemUOM
Right Field :LWItemHSN,LWItemRAte,LWItemCessRT,LWItemOPQ,LWItemOPR,LWItemOPAM,LWItemGod,LWItemGodQT,LWItemGodRT,LWItemGodAmt
Local : Field : Default : Type : String
Local : Field : Default : Align : Center
Local : Field : Default : Border : Thin Left
Local : Field : Default : Line : 0
Local : Field : Default : Skip : Yes
Local : Field : LWItemsrn : Set as : ""
Local : Field : LWItemName : Set as : ""
Local : Field : LWItemAlias : Set as : ""
Local : Field : LWItemPrn : Set as : ""
Local : Field : LWItemGRP : Set as : ""
Local : Field : LWItemCTGR : Set as : ""
Local : Field : LWItemUOM : Set as : ""
Local : Field : LWItemHSN : Set as : ""
Local : Field : LWItemRAte : Set as : ""
Local : Field : LWItemCessRT : Set as : ""
Local : Field : LWItemGod : Set as : $GodownName
Local : Field : LWItemGodQT : Set as : $OpeningBalance
Local : Field : LWItemGodRT : Set as : $OpeningRate
Local : Field : LWItemGodAmt : Set as : $OpeningValue
Local : Field : LWItemOPQ : Set as : ""
Local : Field : LWItemOPR : Set as : ""
Local : Field : LWItemOPAM : Set as : ""
Empty : $$ExplodeOwner:#Stockitem_Godwon1=$GodownName
Option : Alter on Enter

[Field : LWItemsrn]
Use : Number Field
Set as : $$Line
Width : 8
Format : "NoZero"
Alter : StockItem
Invisible:$$InExportMode

[Field : LWItemName]
Use : Name Field
Set as : $Name
Full Width : Yes

[Field:LWItemAlias]
Use : Name Field
Set as : $OnlyAlias
width : 15

[Field:LWItemPrn]
Use : Name Field
Set as : $PartNo
width : 15
Align : Center

[Field : LWItemGRP]

Use : Name Field
Set as : $Parent
Width : 15

[Field:LWItemCTGR]
Use : Name Field
Set as : $Category
Width : 15

[Field:LWItemUOM]
Use : Name Field
Set as : $BaseUnits
width : 8
Align : Center

[Field: LWItemHSN]
Use : Name Field
Set as : If $$IsEmpty:##vGSTMstCode Then @lfFieldVal Else ##vGSTMstCode
lfFieldVal : If $$IsEmpty:$GSTDetails[Last].HSNCode Then "" Else $GSTDetails[Last].HSNCode
Width : 15
Align : Center

[Field: LWItemRAte]
USE:Simple Field
Set as:$(StockItem, $Name).GstDetails[Last].STATEWISEDETAILS[1].RateDetails[1, @@IsIGST].GSTRate
Width : 8
Style : Normal

[Field: LWItemCessRT]
USE:Simple Field
Set as:$(StockItem, $Name).GstDetails[Last].STATEWISEDETAILS[1].RateDetails[1, @@IsCess].CessRate
Width : 8
Style : Normal

[Field: LWItemGod]
Use : Name Field
Set as : ""
Width : 15

[Field: LWItemGodQT]
Use : Qty Primary Field
Set as : ""
Width : 15

[Field: LWItemGodRT]
Use : Rate Price Field
Set as : ""
Width : 15

[Field: LWItemGodAmt]
Use : Amount Field
Set as : ""
Width : 15
Border : Thin Right

[Field: LWItemOPQ]
Use : Simple Field
Set as :$OpeningBalance
Width : 15
Border : Thin Right
[Field: LWItemOPR]
Use : Simple Field
Set as :$OpeningRate
Width : 15
Border : Thin Right
[Field: LWItemOPAM]
Use : Simple Field
Set as :$OpeningValue
Width : 15
Border : Thin Right

[Collection : StockItemCollLW]
Title : "Stock Item"
Type : Stock Item
Child Of : ##ItemGroupTable
Belongs To : Yes

[Collection : StockGodLW]
Type : Batch
Child of : #LWItemName
Fetch : GodownName,Name,OpeningBalance
Fetch : OpeningValue, StkClBalance, TBalClosing, StkOpBalance, TBalOpening, TBalCredits, StkOutQty, StkInQty, TBalDebits
Fetch : ClosingRate,BSDebits,StockItemName, TBalNettCredits
Compute : IsEmptyObject : $$IsEmptyObject
Compute : IsWithItems : Yes
Compute : HasMfgDate : $$Owner:$HasMfgDate
Compute : IsPerishableOn: $$Owner:$IsPerishableOn
Sort : @@Default : $BatchName, $GodownName
Filter : IsNotThirdPartiesGodown

How to use Item All in One details TDL code:

HOW TO USE TDL CODE:
  • Copy above TDL code and make a text file.
  • Save text file then load in Tally Prime (Method provided below the code)
  • Now you will find item report tab in Tally main screen (Gateway of Tally).
  • Here you can see item all details with godown and opening etc.

This is best free TDL to have in your Tally . Must have TDL file for Tally ERP9 and Tally Prime that can use for lifetime. This free TDL Code will perfectly work with Tally Prime.

How to use Item All details TDL file video:

Watch above video to learn :

  • How to use TDL file in Tally Prime.
  • How to see item report in Tally.
  • More TDL files on youtube/learnwell
FOLLOW THE BELLOW INSTRUCTIONS TO LOAD TDL FILE IN TALLY:
  1. Make a Text file of above code
  2. Save it in to your computer
  3. Copy the text file path including Name and extension (as – C:\Users\HP\Desktop\rec\Item report.txt)
  4. Open Tally Prime Software
  5. Click on Help and click on TDL & Addon  (for Tally Prime)
  6. Press F4 (to open a Box)
  7. Set Load TDL file on Startup – Yes
  8. Paste The path in blank space
  9. Press enter and save
  10. Now your Item complete details TDL is ready to use
Best way to do E-Commerce Entries without any Error

Best way to do E-Commerce Entries without any Error | How to do proper Entry of Amazon, Flipkart, Meesho, Snapdeal, Myntra, Glowroad, Udaan etc. in Tally Prime and in Tally ERP9

In this post we will talk about Best way to do E-Commerce Entries without any Error. Friends, if our business is on an e-commerce platform, then sometimes we find it difficult to maintain books of our company because we are not able to take entries properly. If we are doing any business, then the most important thing is to enter it’s data and do it’s accounting time to time.

So if we maintain the data for accounting then the best software which is available in today’s date is Tally and it’s latest version right now Tally Prime is very updated as per GST norms. So as we increase our business, as our sales increase, we face problems in data entry because of too many transactions. And even if we done all data entry on time, still the biggest problem comes in GST, due to which we have to face more problems and are not able to file our GST return on time.

So today in this post I am going to tell you how we should enter e-commerce website data into Tally so that none of our errors come in GST. And how to do many entries in bulk and timely.

Best way to do E-Commerce Entries without any Error

Also read How to solve GST errors in Tally

Things to keep in mind when create entries in Tally.

  1. Proper Master Creation
  2. Proper Voucher Creation
  3. Match Bill wise Amount of Sale, Return, Receipt and Expense

Proper Master Creation:

Most important thing when doing entries in Tally to avoid any type errors is proper master creation.

In E-commerce entries we need to create Party Ledger, Sales Account Ledgers, GST ledgers, Bank Ledgers, Expense Ledgers, and also need to create Stock masters and there units.

Precautions for Party Ledger Master:

  • Set Country and State Name
  • Set GST Type Regular
  • Write correct GST Number even verify from GST Portal
  • Set E-Commerce operator – Yes in Set/Alter GST details

Precautions for Sales Account Ledgers and Income/Revenue ledgers:

  • Create Sales under group Sales Accounts
  • Create GST type wise like Sales @5% etc.
  • Set GST Applicable – Yes. If you want can put GST %.
  • Nature of Transaction always keep Not Applicable.
  • We create income or revenue ledgers when we collect any type of charges from customer in our invoice. Like Shipping charge, Gift wrap charge etc. In this keep same GST % of item and put in Indirect Incomes group and Nature of Transaction set to No.

Precautions for GST and TCS,TDS Ledgers:

  • You can create a single ledger of IGST, CGST and SGST. No need to create multiple ledgers or percentage wise ledgers because your GST will calculate on basis of Taxable Ledger (Sales or Purchase accounts) and Items. If you create multiple percentage wise GST Ledgers then also no problem.
  • Keep percentage of calculation zero, because already we have decided in Taxable Ledgers.
  • Choose Group – Duties & Taxes and Type of Tax – GST and Integrated Tax for IGST, Central Tax for CGST, State Tax for SGST.
  • In TCS, TDS ledgers select group Duties & Taxes and Type of Tax – Others

Precautions for Expense Ledgers:

  • Expense ledgers like Commission, Shipping Charge, or other expenses required when we take entry of 2A related vouchers.
  • Keep all in Indirect Expenses group
  • Set GST Applicable and GST % – 18%
  • If you have income ledger like compensation or offer amount etc. then group will be Indirect Incomes and no need to set GST %

Precautions for Stock item master:

  • First create Item unit like PCS, Nos etc with there UQC.
  • Set GST applicable in all items.
  • Set Item GST %
  • Put HSN code
  • Nature of Transaction set – Not Applicable

Proper Voucher Creation:

After creating all masters, we can take voucher entries.

In E-commerce voucher entries we need to create Sales, Credit Note, entries along with Receipt and Journal expenses.

Precautions for Voucher creation:

  • For any voucher keep voucher number less than 16 digit or keep same invoice number provided by e commerce platform.
  • Select Party name then fill party details properly like, buyer details with full GST details and State, Place of Supply. and Consignee details with full GST details and State.
  • Put e-commerce operator detail in consignee section of voucher.
  • For credit note keep voucher number and voucher date of sales invoice in original sale details section of credit note voucher (Go to more details in Tally sidebar to see original invoice details)
  • For Journal vouchers or Expense vouchers also fill e-commerce provider GST number and state to prevent error in GSTR2 (Go to more details in Tally side bar to see party details)

After doing all above things, if still face error in GST report read Fix GST errors post

Best way to do E-Commerce Entries without any Error in bulk, in Tally, in less time:

If you have lot’s of data to take entries then you can not do it manually. Always think smart and use bulk posting tools or Excel to Tally E-commerce Import tools.

With this e-commerce data entry software you can import your all data without any error.

Watch the below videos for more understanding about error free proper bulk entry of ecommerce data in tally :

How to do proper entry of Amazon MTR and Settlement:

How to do proper entry of Flipkart Sales, Credit note, and Settlements:

If you want more videos related to ecommerce data entry, please visit Learnwell channel in Youtube.

GST error in Tally

How to fix GST error in Tally | How to fix GSTR1, GSTR2, GSTR3B error in Tally | Taking care of which things does not cause error in GST | What are the things to keep in mind while doing master and voucher entry so that there will be no GST error

In this post we will see how to fix GST error in Tally. Friends, despite the fact that we all put in a lot of effort, oftentimes the results of that effort are not satisfactory or take a while to appear, which delays the completion of our task. In a similar vein, many times when we prepare our books in Tally owing to a GST error, we fail to file our return on time and have to deal with several issues. As you are aware, we are required to submit the GST accurately, on schedule, and without any mistakes.
Additionally, e-commerce-related businesses confront additional challenges.
In order to avoid errors in GST, whether it be GSTR1 or GSTR2 or GSTR3B, and to ensure that our job is finished on time, today we will learn what are the crucial considerations for any firm.

fix GST error in Tally : So the things we have to take care of at entry time can be divided into 2 parts:

  • Which things to keep in mind when create Masters.
  • Which things to keep in mind when create Vouchers.

Which things to keep in mind when create Masters:

When we create master, whether it is ledger master or stock master, we should take care of some things related to GST which are as follows:

Ledger Master Creation:

  • Things to do in Ledger Master Creation of Sundry Debtors and Sundry Creditors:
  • Things to do in Ledger Master Creation of Sales and Purchase Accounts:
  • Things to do in Ledger Master Creation of GST and TCS, TDS:
  • Things to do in Ledger Master Creation of Expense and Income Ledgers:

Things to do in Ledger Master Creation of Sundry Debtors and Sundry Creditors:

Do the below settings in Tally Ledger creation for normal debtors or creditors ledger and also for E commerce debtors.

  1. Set Country and State Name
  2. Set GST Type Regular or Consumer
  3. Write correct GST Number even verify from GST Portal
  4. For E commerce set E-Commerce operator – Yes in Set/Alter GST details

Tally Prime Chart of Accounts Best Usages

Things to do in Ledger Master Creation of Sales and Purchase Accounts:

Do the below settings in Tally Ledger creation for Sales or Purchase Accounts Ledger for with stock item and Without Stock Item.

  1. Create Sales or Purchase Ledger under group Sales Accounts or Purchase Accounts
  2. Sales or Purchase Ledger create GST type wise like Sales @5% etc., this will help to decide different GST percentage in Ledger. If maintain item wise sales only then can create only single Sales Accounts also because your GST percentage already in items GST. But creating different names according to GST percentage is good practice.
  3. If accounts maintain without item then keep different percentage ledgers and always put GST %, HSN.
  4. If accounts maintain with stock item then no need to put GST % and HSN etc in Ledger, Just set GST Applicable – Yes. If you want can put GST %.
  5. Nature of Transaction always keep Not Applicable. Because if you set it Applicable then you need to create two different ledgers – One for CGST and SGST and Second for IGST because you can only choose One nature of Transaction a Time.

Things to do in Ledger Master Creation of GST and TCS, TDS:

  1. You can create a single ledger of IGST, CGST and SGST. No need to create multiple ledgers or percentage wise ledgers because your GST will calculate on basis of Taxable Ledger (Sales or Purchase accounts) and Items. If you create multiple percentage wise GST Ledgers then also no problem.
  2. Keep percentage of calculation zero, because already we have decided in Taxable Ledgers.
  3. Choose Group – Duties & Taxes and Type of Tax – GST and Integrated Tax for IGST, Central Tax for CGST, State Tax for SGST.

Things to do in Ledger Master Creation of Expense and Income Ledgers:

  1. Create Ledgers under group Expense or income as per your requirement
  2. Set GST Applicable – Yes
  3. Set Type of Supply – Services
  4. Set GST Applicable – Yes
  5. Set HSN and GST percentage
  6. Set Nature of transaction – Not Applicable because of need to do IGST and CGST transaction for same ledger

Item Master Creation:

  • Unit Creation
  • Item Creation

Keep below things in mind when create Item master:

  • Fill item full GST details with HSN and GST percentage
  • Fill UQC name in Item Unit cretation
 

Which things to keep in mind when create Vouchers:

When we create master, whether it is Vouchers with Inventory or Vouchers without inventory we should take care of some things related to GST which are as follows:

Voucher Creation:

  • Things to do when create vouchers with Inventory
  • Things to do when create vouchers without Inventory

We need to care same things about vouchers with inventory or vouchers without inventory. Only difference is in inventory vouchers we add stock item in invoice that have GST details in Item master. And in without inventory vouchers we add only taxable ledger that have GST in it.

Other than this we can follow below things for both with inventory or without inventory vouchers to create a proper GST invoice or GST vouchers without any error:

  • For any voucher keep voucher number less than 16 digit
  • Select Party name then fill party details properly like, buyer details with full GST details and State, Place of Supply. and Consignee details with full GST details and State.
  • Can change consignee state etc. according to you need. Also change consignee state name for E commerce operator.
  • For credit note keep voucher number and voucher date of sales in original sale details (Go to more details in Tally sidebar to fill original invoice details
  • Sale for purchase voucher fill supplier invoice reference number and date.
  • For Journal vouchers or Income or Expense vouchers also fill party GST number and state to prevent error in GSTR2 (Go to more details in Tally side bar to fill party details)

After doing above settings and voucher entry your 99% GST related errors will be solved.

If also face below type errors in GST reports the follow below method to resolve it:

  • Mismatch due to ta amount modified in voucher – If amount mismatch is less than 1 rupee then select all transaction by pressing ctrl+space and use except as is button from Tally side bar. if amount is bigger then check GST value in voucher and correct it as per Taxable ledger GST percentage.
  • Information required for generating table wise details not provided – This error will come usually in Credit Note vouchers if you not fill Sales Voucher Number and Date in original invoice sale details. So fill Sales Voucher Number and Date in credit note invoice by clicking on More Details button provided in Tally side bar.
  • Nature of transaction, Taxable value, Rate of Tax modified in Voucher – For this type error remove nature of transaction from your Taxable ledger and save it. And check GST percentage in Taxable ledger and in Item and also check State and Place of Supply in Voucher.
  • UOM not mapped to UQC – This type error will come if not specify UQC in unit (Specify UQC in units like – PCS, Nos etc.)
  • Country, State, not specified – Fill buyer and consignee details with State, GST and Place of Supply in voucher entry.
  • Tax Rate, Tax type not specified – Fill Tax type in GST ledgers like, Integrated tax, State Tax, Central Tax etc.
  • Incorrect Tax type selected in Tax Ledger – In voucher select GST Ledger according to your party state and place of supply. If you select CGST, SGST ledgers in voucher instead of IGST ledger then this error will come.
  • Mismatch or incomplete HSN details – Fill HSN code in All taxable ledgers and Items.

After solving above errors you can file your GST without any worry.

Please share this post with your colleagues to help them also.

Check Spelling Instantly

Check Spelling Instantly | Spell Checking Excel VBA Code

In this blog we will create Check Spelling Instantly tool with Spell Checking Excel VBA Code. There are occasionally spelling errors in the ledgers we produce in Tally or in the many accounts and ledgers we have previously made in Tally. It will affect our clients if we provide ledgers with incorrect spelling. Always verify the spelling in our books if you wish to conduct business properly.
The same issues will arise in presentations and other office tasks as well. These kinds of spelling errors are often present in all of our work, including Excel and Word documents. Therefore, I have an unique spelling checker for your projects today. This Excel VBA function allows us to check for any typing or spelling errors in our work.
Also checkout Excel VBA search all

Check Spelling Instantly – Spell Checking Excel VBA Code: How to create VBA code for Spelling Check:

Turn on Excel’s developer if you wish to generate any VBA or macro files. Then use the Excel VBA Module to write your VBA code.

How to enable developer option of Excel:

To enable developer option of excel follow below steps:
1. Open Excel
2. On the File tab, go to Options > Customize Ribbon.
3. Under Customize the Ribbon and under Main Tabs, select the Developer check box.
To understand more, view the video up above.
After activating the developer tab, select Visual Basic from the developer tab in Excel. Additionally, you may construct a module in Visual Basic or open a sheet by clicking the sheet name.
Add the following VBA code to the module or to the visual basic sheet named:

VBA Code:

Sub checkspelling()
Dim sp As Range
For Each sp In ActiveSheet.UsedRange
If Not Application.checkspelling(word:=sp.Text) Then
sp.Interior.Color = vbRed
End If
Next sp
End Sub

After entering the aforementioned spelling checker code in the VBA module, save your excel file with the xlsb or xlsm extension.

A macro button in the sheet may also be used to use code immediately.

After completing the aforementioned steps, paste your data into an Excel sheet and use the button or VBA module to run a spelling checker.
It will be highlighted in red if you used incorrect spelling. Now you can change the incorrect spellings in all of your projects.
Our other website engage to tech
Prevent Master duplication TDL

Prevent Master duplication TDL | 2022 Best Tally Prime and Tally ERP9 TDL to Prevent Duplicate Ledger and Item

Prevent Master duplication TDL is must have Tally TDL for Tally Prime and Tally ERP9 to prevent master duplication.
With this Free Tally Prime TDL, we can add ledgers and item lists in our master creation screen that can be tracked by typing present names in Tally master.
Tally is a most usable business software in India because of it’s simplicity and reporting system. If you maintain your masters and vouchers correctly in Tally then it will become life saving tool for business. But sometime by mistake we create some duplicate masters with another name and by repeating this mistake we make our Tally Data a garbage and can not create a proper reports. So we need to avoid this type mistakes if we want to do proper accounting.
To avoid this type mistakes I have something special for our Tally. We can create a TDL to avoid master duplication so we can do all things in proper way.
So today in this post we will create a TDL for our Tally prime and also for Tally ERP9 to prevent duplicate masters. In this TDL we will add a Master list in Tally Master creation screen so when we go to create masters first we track the name of Ledger or Item that we want to create then after searching we can create unique masters.
 
In this code we do two steps – one for Ledger master and another for Item masters. Please watch above video to understand more about TDL code.
 

Prevent Master duplication TDL Code:

 
[#Part:MST Basic]
Option:LearnwellMaster:@@IfLedger
Option:LearnwellMaster2:@@IfItem
 
[!Part:LearnwellMaster]
Add:Line:At Beginning:LWMstLine
[Line:LWMstLine]
Field:ShortPrompt,LwmstF
Local:Field:ShortPrompt:info:”Master List”
Local:Field:ShortPrompt:Width:8% page
[Field:LwmstF]
use:Name Field
Table:LWCollectionLed, End of List
[Collection:LWCollectionLed]
Type:Ledger
Add:Format:$Name,20
Filter:IfLedger
Fetch:*.*
 
[!Part:LearnwellMaster2]
Add:Line:At Beginning:LWMstLine2
[Line:LWMstLine2]
Field:ShortPrompt,LwmstF2
Local:Field:ShortPrompt:info:”Master List”
Local:Field:ShortPrompt:Width:8% page
[Field:LwmstF2]
use:Name Field
Table:LWCollectionItem, End of List
[Collection:LWCollectionItem]
Type:Stockitem
Add:Format:$Name,25
Filter:IfItem
Fetch:*.*
 
[System:Formula]
IfLedger:$$IsLedger
IfItem:$$IsStockItem
 
HOW TO USE:
    1. Copy the above code and make a text file
    2. Load in Tally ERP9 or in Tally Prime (Method provided below)
3. Now go to generate Ledger or Item master
  4. There you will find ledger list or item list and can search the name before creating new master.
 

This is best free TDL to have in your Tally . Must have TDL file for Tally ERP9 and Tally Prime that can use for lifetime. 

This free TDL Code will perfectly work with Tally Prime.
Watch above video to learn :
1. How to add item master list and ledger master list table.
2. How to modify fields of master creation screen.
3. And Many More…….
HOW TO USE TDL CODE:
 
FOLLOW THE BELLOW INSTRUCTIONS TO LOAD TDL FILE IN TALLY:
 
1. Copy the code and make a text file.
2. Save into your computer.
3. Copy the text file path including Name and extension (as – C:UsersHPDesktoprecPreventDuplicateMaster.txt)
4. Open Tally ERP9  OR Tally Prime
5a. Press F12 and goto Product and Features (for Tally ERP9)
5b. Click on Help and click on TDL & Addon  (for Tally Prime)
5. Press F4 (to open a Box)
6. Load TDL file on Startup – Yes
7. Paste The path in blank space
8. Press enter and save 


Now your TDL is ready to use.
Our other website Engage to Tech
 
Data Analysis Tally Prime

Data Analysis Tally Prime | Best Reports of Tally Prime | Important reports without TDL

Data Analysis Tally Prime is the best report of Tally Prime without TDL. Friends we all use Tally because of it’s simplicity and powerful reporting modules. In this segment there is in Tally also have a most usable and powerful report that can fulfill our requirements. Today I told you about Data Analysis of Tally.
Data Analysis facilitates in conducting internal analysis and verification of the company’s financial data. Data Analysis will help in identifying exceptional areas and thereby ease the process of verification. With the help of Data analysis we can create our important MIS reports also.
 

How to view Data Analysis Tally Prime Report:

To view Data Analysis report in Tally Prime follow below any step:
 
1. Gateway of Tally > Display More Reports > Analysis & Verification > Data Analysis.
 
                                        or
 
2. Alternatively, press Alt+G (Go To) > type or select Data Analysis Reports > and press Enter.
 

The various tools available in TallyPrime for Data Analysis are:

  • Verification of Chart of Accounts – Drill down into this report will help to scrutinize the Chart of Accounts and compare this with previous year Chart of Accounts and suggest the necessary corrections if required.
  • Verification of Stock Items – Drill down into this report will help to scrutinize various Stock Items and compare the Stock Items list with the previous year. This will help in taking necessary decisions and provide necessary corrections.
  • Verification of Balances – Drill down into this report will help to scrutinize the difference in Opening Balances and transaction details during the selected year and suggest necessary corrections based on the exceptions highlighted. The user can also generate the ledger wise variance report for the Closing Balances.
  • Analytical Procedures – This report can be used to analyse the data based on various parameters (e.g. Group, Cost Centre etc.) by a detailed comparison mechanism available. The user can take of note areas where more attention is required.
  • Pending Documents – This report will display all the Pending Bills, Sales Orders, Purchase Orders and Receivables & Payables during the analysis year.
  • Periodic Payments and Receipts – This report provides the list of recurring Ledger Vouchers based on the Periodic Ledgers identified by the users.
  • Repeated Transactions – Drill down into this report will display the transactions for which the same amount is repeated more than once for each Ledger during the analysis year. The user can use this report to check the intentional errors while passing the entries.
  • Relative Size factor (RSF) – Drill down into this report will display the Relative Size Factor for each Ledger Voucher which is arrived by dividing the highest Voucher amount to the second-highest Voucher amount for the Ledger Vouchers.
  • Inter Bank Transactions – This report will display all the transactions carried out between the Banks during the analysis period
  • Cash Withdrawals/ Deposits to Bank – Drill down to this report will display the bank ledgers from which the cash is withdrawn or deposits are made. This report also displays the Total Amount of transaction and the Number of vouchers through which the withdrawal or deposits are made during the selected year.
  • Fixed Assets Analysis – This report provides the details of all the Fixed Assets possessed by the selected Company at the end of the analysis Year.
  • Transaction on holiday – Drill down to this report displays all the transactions recorded on Weekly Off or Declared Holidays in the analysis year.
  • Highest and Lowest Value Transactions – This report provides ledger wise Highest and Lowest value transactions carried out during the selected period along with Difference Range and Difference Range Percentage details.
  • Pending Advances – Drill down to this report will display the ledgers for which the advances made (Loan given) are pending during the analysis year.
  • Stale Cheque /Instruments – Drill down to this report will display the Bank Ledgers with stale cheque/ Instruments. This report also displays the Total amount and count of stale cheques/ Instruments.

For more details and clarity please watch above video.


Tally Prime TDL to Track Item Details

2022 Best Tally Prime TDL to Track Item Details | Item HSN, GST, Voucher Date, MRP, Sorted Closing, Standard Cost in Invoice Item List TDL

In this blog we will see about Tally Prime TDL to Track Item Details like HSN, GST, Voucher Date, MRP, Sorted Closing, Standard Cost in Invoice Item List.
If you want to do proper invoicing with stock items then you need to know everything about item details like Item HSN, GST, Voucher Date, MRP, Sorted Closing, Standard Cost etc. when create invoice.
Tally have best solution about this type invoicing with it’s TDL files.
So today we will create a TDL for Tally Prime and Tally ERP9 to see item all details, even also can see when you sale it last time with Voucher Date.
This is must have Tally TDL for Tally Prime and Tally ERP9 for invoicing.
With this Free Tally Prime TDL, we can add item additional details.
 

Tally Prime TDL to Track Item Details TDL Code:

 
[#Collection:VCH Stock Item Extract]
Add:Format:$Name,20
Add:SubTitle:$$LocaleString:”Item Name”,”HSN”,”GST%”,”STD Cost”,”MRP”,”VCH Date”,”Alias”,Cl Balance”
Add:Format:$GSTHSNCode
Add:Format:$GSTIGSTRate
Add:Format:$StandardCost
Add:Format:$MRPDetails[Last].MRPRateDetails[Last].MRPRate
Add:Format:$LastVoucherDate
Table Sort:$ClosingBalance
 
HOW TO USE :
    1. Copy the above code and make a text file
    2. Load in Tally ERP9 or in Tally Prime (Method provided below)
3. Go to generate invoice and select item.
     4. you will find item additional details and also can search item with any details.
 

This is best free TDL to have in your Tally . Must have TDL file for Tally ERP9 and Tally Prime that can use for lifetime. 

This free TDL Code will perfectly work with Tally Prime.
Watch above video to learn :
1. How to add item details in invoice.
2. How to modify fields of invoice in Tally.
3. And Many More…….
HOW TO USE TDL CODE:
 
FOLLOW THE BELLOW INSTRUCTIONS TO LOAD TDL FILE IN TALLY:
 
1. Copy the code and make a text file.
2. Save into your computer.
3. Copy the text file path including Name and extension (as – C:UsersHPDesktoprecParty Detail.txt)
4. Open Tally ERP9  OR Tally Prime
5a. Press F12 and goto Product and Features (for Tally ERP9)
5b. Click on Help and click on TDL & Addon  (for Tally Prime)
5. Press F4 (to open a Box)
6. Load TDL file on Startup – Yes
7. Paste The path in blank space
8. Press enter and save 


Now your TDL is ready to use.
Find more on Our Other Website Engage to Tech
Send whatsapp from Excel

Send Whatsapp from Excel | Excel to Whatsapp Sender | Send Unlimited Whatsapp from Excel | Whatsapp Message Sender | Send bulk Message from Excel to Whatsapp

In this blog we will talk about how to Send Whatsapp from Excel. Now we can send bulk messages in Whatsapp from Excel. Before using the code, you must see above video.
Friends nowadays whatsapp become popular everywhere, and also for business. We send lots of business related messages to our customers or office employees, like outstanding details, invoice details, address etc. Sometime we need to send bulk whataspp messages to multiple contact. To avoid this lengthy process we need to make a tool that can send bulk whatsapp.
Also checkout Check Spelling Instantly Excel VBA code
So lets create whatsapp sender in Excel VBA. Follow bellow steps to create whatsapp sender:
1. First of all open a Microsoft Excel File
2. Goto Developer Tab (If not enable developer tab in your Excel, watch above video)
3. Add a module to write codes.

Send Whatsapp from Excel Code:

 
Sub Whatsappmst()
On Error Resume Next
Dim rowsz As Long
rowsz = 1000
rowsz = Wapp.Cells.End(xlDown).Row
Dim z As Integer
For z = 2 To rowsz
Dim ie As Object
Set ie = CreateObject(“InternetExplorer.Application”)
If Wapp.Cells(z, 2) = vbNullString Then
Exit Sub
Else
ie.navigate “whatsapp://send?phone=” & Wapp.Cells(z, 2) & “&text=” & Wapp.Cells(z, 3)
Application.Wait Now() + TimeSerial(0, 0, 3)
SendKeys “~”, True
End If
Next z
End Sub
 
4. Paste above code in a VBA module
5. Create Some contacts and messsages in Excel
6. We can create Macro Button to send whatsapp messages. (Watch the above video)
Now our whatsapp sender is ready to use.
Find more on our other website Engage to Tech
Simple Way to Connect Goolge Sheet with Excel

Simple Way to Connect Goolge Sheet with Excel | Google Sheet to Microsoft Excel Live Data Connection | Excel Power BI to Connect Google Sheet

In this blogpost we will see how to Connect Goolge Sheet with Excel in a simple way. Friends when have multiple branches or have offices on different locations, or want to work multiple people on same project or sheet. Then we simply use google sheet. In single google sheet many people can work from different computers. But sometime we need to handle it with Microsoft Excel and want to create reports according to our need. Same we can set and import Google sheet data into excel. And also can excess it live.
So let’s see how can import google sheet data into Excel and use live.:

Connect Goolge Sheet with Excel:

1. Goto Google Sheet
 
2. Open Document That want to import in Excel
 
3. Click on Share
 
4. Choose anyone with the link and copy link:
5. Now Open Excel – Goto Data – New query – From Other Source – From Web
6. Paste URL that you copied from Google Sheet:
7. Now do some changes in URL:
    Example
        Copied URL from Google Sheet:
https://docs.google.com/spreadsheets/d/1HcvrFNi8hV0G_Rytj7fkjrYDUIIZsALvImSd7AcEg/edit?usp=sharing
        New URL after Changes:
 
https://docs.google.com/spreadsheets/d/1HcvrFNi8hV0G_Rytj7fkjrYDUIIZsALvImSd7AcEg/export?format=xlsx

(Changes : edit to export ,  usp to format, sharing to xlsx)

 
8. Click on Sheet and Click on Load

Wait for some time . Now our google sheet will be loaded in Excel

We can refresh to fetch new changes.
Watch the above video for more details.
Automatic Last Rate and Last Discount Ledger Wise and Item Wise

Automatic Last Rate and Last Discount Ledger Wise and Item Wise | 2022 Best Tally TDL | Best Free Tally Prime TDL

Remember, last time what discount you provided to customer and in which stock item; don’t worry this Automatic Last Rate and Last Discount Ledger Wise and Item Wise Tally TDL will help you. Sometime when we do accounting and create invoices of customer, there is lots of things to do in an invoice. We need to check customer all details like, there products, GST, Discount, Selling price, purchase price etc. When customer come to you and told that last time you provided this discount and product price was different, then you go to check there previous details and tell customer the truth that the price and discount was this. If we use Tally then these things become smooth, because of Tally TDL (Tally Definition Language). With TDL file we can fetch customer last purchase rate and item discounts. And at the same invoicing time we can check party last purchase rate and there discounts.

Automatic Last Rate and Last Discount Ledger Wise and Item Wise Tally Prime TDL:

So today have something special for your Tally. With this Tally TDL we can track customer or Ledger wise last rate and item discounts and can set it automatically in invoice. After adding this Automatic Last Rate and Last Discount Ledger Wise and Item Wise TDL we can solve all our problems related to customer.
If you use Tally Prime or Tally ERP9, this Automatic Last Rate and Last Discount Ledger Wise and Item Wise TDL will help to create invoice correctly . And always this will help to remember customer discounts and there item prices. 
This is must have Tally TDL for Tally Prime and Tally ERP9.
With this Free Tally Prime TDL, Now we can create invoice correctly without any fail.
 
HOW TO USE:
    1. Dowload TDL code with provided link
    2. Load in Tally ERP9 or in Tally Prime (Method provided below)
3. Go to generate invoice of any previous customer.
     4. you will find there last buying rate and last provided discount of any item.
 

This is best free TDL to have in your Tally . Must have TDL file for Tally ERP9 and Tally Prime that can use for lifetime. 

This free TDL Code will perfectly work with Tally Prime.
Watch above video to learn :
1. How to fetch last rate and last discount ledger wise
2. How to modify fields of invoice in Tally.
3. And Many More…….
HOW TO USE TDL CODE:
 
FOLLOW THE BELLOW INSTRUCTIONS TO LOAD TDL FILE IN TALLY:
 
1. Download TDL file with below Download button.
2. Save into your computer.
3. Copy the text file path including Name and extension (as – C:UsersHPDesktoprecParty Detail.txt)
4. Open Tally ERP9  OR Tally Prime
5a. Press F12 and goto Product and Features (for Tally ERP9)
5b. Click on Help and click on TDL & Addon  (for Tally Prime)
5. Press F4 (to open a Box)
6. Load TDL file on Startup – Yes
7. Paste The path in blank space
8. Press enter and save 


Now your TDL is ready to use.
Download TDL file with below download button

Our other Website Engage to Tech