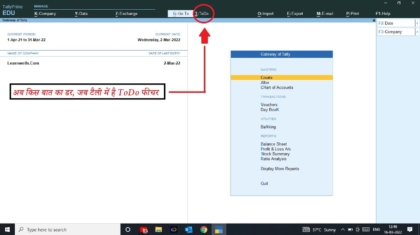
Voucher Cloning

Voucher Cloning | Free Tally TDL to Post bulk voucher by voucher cloning | 2022 Best Tally Prime and Tally ERP9 TDL

With this Free Tally TDL to Post bulk voucher by voucher cloning, we can do our entries fast. If you want to save time and labour, then this TDL is for your Tally. Yes! with this TDL file we can duplicate our vouchers by selecting multiple entries. We can clone our pre entered vouchers to do same type entries. Also we can set voucher automatic own voucher numbers in voucher type to auto numbering of vouchers.

Voucher Cloning TDL:

In this Tally Prime and Tally ERP TDL code we can add some additional fields or we can remove extra fields according to our need, and this will work perfectly with Tally Erp9 and Tally Prime. Best simple tdl code to create bulk vouchers.
 
HOW TO USE:
 
        1. Copy below TDL code and make a text file.
        2. Save text file then load in Tally ERP9 or in Tally Prime (Method provided below the code)                   3. Now go to daybook and select vouchers then press CTRL+A to create vouchers.
 

This is best free TDL to have in your Tally . Must have TDL file for Tally ERP9 and Tally Prime that can use for lifetime. 

This free TDL Code will perfectly work with Tally Prime.
Watch above video to learn :
1. How to add a Key and button, .
2. How to add walk collection and add function.
3. And Many More…….
TDL Code : 
 
 
[#Form:DayBook]
add:button:LearnWellBtn
[Button:LearnWellBtn]
title:”Voucher Cloning”
Key:Ctrl+V
Action:Call:LearnWellVC
 
[Function:LearnWellVC]
Variable:LWID:String
Object:Voucher:#VCHMasterId
 
01:WALK COLLECTION:LearnwellCloning
02:SET:LWID:”ID:”+$$String:$MasterId
03:Duplicate:Voucher
04:Trigger Key:Ctrl+A
05:END WALK
 
[Collection:LearnwellCloning]
DataSource:Report:Selected
Fetch:*.*
 
HOW TO USE ABOVE CODE:
 
FOLLOW THE BELLOW INSTRUCTIONS TO LOAD TDL FILE IN TALLY:
 
1. Copy the code and paste in a Text file.
2. Save the text file into your computer.
3. Copy the text file path including Name and extension (as – C:UsersHPDesktoprecParty Detail.txt)
4. Open Tally ERP9  OR Tally Prime
5a. Press F12 and goto Product and Features (for Tally ERP9)
5b. Click on Help and click on TDL & Addon  (for Tally Prime)
5. Press F4 (to open a Box)
6. Load TDL file on Startup – Yes
7. Paste The path in blank space
8. Press enter and save 


Now your TDL is ready to use.

TallyPrime Tutorials

#1 TallyPrime Tutorials | F12 Configurations from Gateway of Tally in Tally.ERP 9 vs TallyPrime

TallyPrime Tutorials : Comparative view of all Gateway of Tally > F12 configurations that exists in Tally.ERP 9 and their movements into different locations in TallyPrime.

TallyPrime Vs Tally ERP9 General:

Navigation/Option
Tally.ERP 9 TallyPrime 

Gateway of Tally > F12 > General > Country Details

  1. Use accounting terminology of 

F1 (Help) > Settings > Country

  1. Use Accounting Terminology of

Gateway of Tally > F12 > General > Naming Style

  1. Default appearance of names in reports
  2. Default appearance of stock item names in reports
  3. Default appearance of employee names in reports

F1 (Help) > Settings > Display

  1. Display name for Ledger and Group
  2. Display name for Stock Item
  3. Display name for Employee

Gateway of Tally > F12 > General > Format of Dates

  1. Short date format
  2. Separator between day, month and year

F1 (Help) > Settings > Country > Date and Number Format Enter

  1. Date entry format
  2. Separator between day, month and year

Gateway of Tally > F12 > General > Format of Numbers

  1. Character to use for decimal
  2. Separator to use for thousands

F1 (Help) > Settings > Country > Date and Number Format > Enter

  1. Deprecated in TallyPrime
  2. Separator to use for thousands

Gateway of Tally > F12 > General > Format of Numbers

  1. Add sign before currency/unit symbol

F1 (Help) > Settings > Display

  1. Add sign before currency/unit symbol

Note: Select Show More to see this configuration.

Gateway of Tally > F12 > General > Format of Numbers

  1. Show amount in millions

F1(Help)> Settings > Country > Date and Number Format

  1. Show Quantity and Number in millions

Gateway of Tally > F12 > General > Table Configuration

  1. In Vouchers, show only stock item names (without quantity)
  2. Use common table for TDS Helper
  3. Apply keyword filter to list of items
  4. Apply for all columns
  5. Show tables with masters only in current language

F1 (Help) > Settings > Display

  1. Display List of Stock Items without quantity in Vouchers
  2. Use common table for TDS Helper
  3. Search behaviour in table – First column of table
  4. Search behaviour in table – Across table
  5. List aliases for Master in

Note: Select Show More to see this configuration.

Gateway of Tally > F12 > General > Import/Export Configuration

  1. Ignore errors during data import
    (Application for importing voucher in XML format /SOAP request)
  2. Overwrite vouchers, instead of duplicating, during import
    (New vouchers are created if GUIDs do not match)

Alt+O (Import) > Configuration

  1. Ignore errors during import
  2. Overwrite voucher when a voucher with same GUID exists

Gateway of Tally > F12 > General > Import/Export Configuration

  1. Export base currency symbol along with amount
  2. Open file after export

Alt+E (Export) > Configuration

  1. Export base currency symbol along with amount
  2. Open file after export

Gateway of Tally > F12 > General > Other Options

  1. Show graphs in monthly reports
  2. Use separate menu for final A/c statements
  3. Enable sound notification for alerts
  4. Always show information panel

Alt+O (Import) > Settings > Display

  1. Show graphs in monthly Summaries
  2. Show Final Accounts menu in Gateway of Tally
  3. Enable sound
  4. Information panel is deprecated in TallyPrime. Instead, the product information is available in About Page.

Numeric Symbols

Navigation/Option
Tally.ERP 9 TallyPrime 

Gateway of Tally > F12 > Numeric Symbols > Symbols to use for Debit amount

  1. Symbol before number (prefix)
  2. Symbol after number (suffix)

F1 (Help) > Settings > Display > Format for Debit amount > Select Format from the list

  1. Symbol before number (prefix)
  2. Symbol after number (suffix)

Gateway of Tally > F12 > Numeric Symbols > Symbols to use for Credit amount

  1. Symbol before number (prefix)
  2. Symbol after number (suffix)

F1 (Help) > Settings > Display > Format for Credit amount > Select Format from the list

  1. Symbol before number (prefix)
  2. Symbol after number (suffix)

Accnts / Inventory Info

Navigation/Option
Tally.ERP 9 TallyPrime 

Gateway of Tally > F12 > Accnts / Inventory Info. > Master Configuration

  1. Provide aliases along with name
  2. Provide language aliases for name

Alt+G (Go To) > Create Master > Ledger > F12 (Configure)

  1. Provide aliases for Name
  2. Provide language aliases for Name

Gateway of Tally > F12 > Accnts / Inventory Info. > Accounts

  1. Provide advanced information in masters
  2. Provide addresses for ledger accounts
  3. Provide contact details
  4. Provide multiple addresses
  5. Add notes for ledger accounts
  6. Add description for ledger accounts

Alt+G (Go To) > Create Master > Ledger > F12 (Configure)

  1. Deprecated in TallyPrime
  2. Provide Mailing Details
  3. Provide Contact Details
  4. Deprecated in TallyPrime
  5. Provide Notes for Ledgers
  6. Provide Description for Ledgers

Note: Set Show more configurations to Yes, where needed.

Gateway of Tally > F12 > Accnts / Inventory Info. > Accounts > Inventory

  1. Allow advanced entries in masters
  2. Provide part numbers for stock items
  3. Add description for stock items
  4. Add remarks for stock items
  5. Use alternate units for stock items
  6. Enable standard rates for stock items
  7. Specify default ledger allocation for invoicing
  8. Enable component list details (Bill of Materials)
  9. Provide address for Godowns

Alt+G (Go To) > Create Master > Stock Item > F12 (Configure)

  1. Advance configuration are split into two:
    1. Use costing and Market valuation methods for stock items
    2. Set options for Stock item Behaviour
  2. Provide Part No. for Stock Items
  3. Provide Description for Stock Items
  4. Provide Notes for Stock Items
  5. Use Alternative Units
  6. Provide Standard Buying and Selling Rates
  7. Set default Accounting Allocations for Stock Items
    (in Invoice Mode)
  8. Set Components List (Bill of Materials) in Stock Items
  9. Use address for Godowns

Note: Set Show more configurations and Show all configurations to Yes, where needed.

Voucher Entry

Navigation/Option
Tally.ERP 9 TallyPrime 

Gateway of Tally > F12 > Voucher Entry > Accounts

  1. Skip Date field during creation for faster entry

Alt+G (Go To) > Create Voucher > F4 (Contra) > F12 (Configure)

  1. Skip the Date field during voucher creation

Note:

  • Set Show more configurations to Yes, if needed.
  • Enabling this configuration in one voucher will enable it for all other vouchers

Gateway of Tally > F12 > Voucher Entry > Accounts

  1. Use single entry mode for payment/receipt/contra vouchers
  2. Use payment/receipt as contra voucher
  1. Payment/Receipt/Contra > Ctrl+H (Change Mode) > Single Entry
  2. Related options, like bank ledgers, are available by default in the selection table. So, no configuration is available

Gateway of Tally > F12 > Voucher Entry > Accounts

  1. Use Cr/Dr instead of To/By during entry

Alt+G (Go To) > Create Voucher > F7 (Journal) > F12 (Configure)

  1. Use Cr/Dr instead of To/By during voucher entry

Note:

  • Enabling this configuration in one voucher will enable it for all other vouchers.
  • In case you unable to find this configuration in a voucher type, press Ctrl+H (Change Mode) > type or select As Voucher.

Gateway of Tally > F12 > Voucher Entry > Accounts

  1. Warn on negative cash balance

Alt+G (Go To) > Create Voucher > F4 (Contra) > F12 (Configure)

  1. Warn on negative Cash Balance

Note:

  • Set Show more configurations to Yes, where needed.
  • Enabling this configuration in one voucher will enable it for all other vouchers.

Gateway of Tally > F12 > Voucher Entry > Accounts

  1. Preallocate bills for payment/receipt/journal voucher

Alt+G (Go To) > Create Voucher > F7 (Journal) > F12 (Configure)

  1. Preallocate bills for Payment/Receipt/Journal Vouchers

Note: Enabling this configuration in one voucher will enable it for all other vouchers.

Invoice / Orders Entry

Navigation/Option
Tally.ERP 9 TallyPrime 

Gateway of Tally > F12 > Invoice/Orders Entry > General

  1. Enable supplementary details
    (Address details, despatch details, etc.)

Alt+G (Go To) > Create Voucher > F8 (Sales) / F9 (Purchase) > F12 (Configure)

  1. Provide Dispatch, Order, and Export details

Gateway of Tally > F12 > Invoice/Orders Entry > General

  1. Print default name and address of party

Alt+G (Go To) > Create Voucher > F8 (Sales)/F9 (Purchase) > Ctrl+P (Print)

  1. Show Name and Address from Party master

Gateway of Tally > F12 > Invoice / Orders Entry > General

  1. Allow separate buyer and consignee names

Alt+G (Go To) > Create Voucher > F8 (Sales) / F9 (Purchase) > Party Details > F12 (Configure)

  1. Allow separate Buyer and Consignee details

Gateway of Tally > F12 > Invoice / Orders Entry > General

  1. Allow modification of all fields during entry


Alt+G (Go To) > Create Voucher > F8 (Sales) / F9 (Purchase) > F12 (Configure)

  1. Modify all fields during voucher entry
    (applicable to non-taxation fields)

Gateway of Tally > F12 > Invoice / Orders Entry > General

  1. Allow ledgers grouped under provision

No option is available in TallyPrime. Ledgers created under provisions are available for Purchase, Purchase Order, and Receipt Note.

Select Show More while selecting Purchase Ledger during voucher entry.

Gateway of Tally > F12 > Invoice / Orders Entry > General

  1. Use common ledger account for item allocation
  2. Use defaults for bill allocations
  3. Provide additional descriptions for stock item name
  4. Provide additional descriptions for ledger name
    (for accounting invoice)

Alt+G (Go To) > Create Voucher > F8 (Sales) > F12 (Configure)

  1. Select common Ledger Account for Item Allocation
  2. Use default Bill-wise details for Bill Allocation
  3. Provide Additional Descriptions for Stock Items
  4. Provide Additional Descriptions for Ledgers

Gateway of Tally > F12 > Invoice / Orders Entry > General

  1. Consolidate stock items with same rates


Alt+G (Go To) > Create Voucher > F8 (Sales) > F12 (Configure)

  1. Consolidate Qty of Stock Items with same Rate

Note: Set Show more configurations and Show all configurations to Yes.

Gateway of Tally > F12 > Invoice / Orders Entry > General

  1. Show compound unit of item based on rate
  2. Show full details of compound unit

Alt+G (Go To) > Create Voucher > Alt+F7 (Stock Journal) > F12 (Configure)

  1. Show Compound Unit of Items based on Rate
  2. Show details of Compound Unit

Gateway of Tally > F12 > Invoice / Orders Entry > General

  1. Show turnover achieved with customer

Alt+G (Go To) > Create Voucher > Alt+F8 (Delivery Note) > F12 (Configure)

  1. Show Turnover from selected Party A/c

Note: Set Show more configurations to Yes.

Gateway of Tally > F12 > Invoice / Orders Entry > General

  1. Provide export shipping details

No separate configuration available. Options to enter Export shipping details appear when:
Alt+G (Go To) > Create Voucher > F8 (Sales) > F12 (Configure) > set Provide Dispatch, Order, and Export details to Yes.

Gateway of Tally > F12 > Invoice / Orders Entry > Exporters’ Options

  1. Provide marks and numbers/container no.
  2. Provide number and kind of packages

Alt+G (Go To) > Create Voucher > F8 (Sales) > F12 (Configure)

  1. Provide Marks or Container No.
  2. Provide No. of Packages

Note: Set Show more configurations to Yes.

Gateway of Tally > F12 > Invoice / Orders Entry > Inventory

  1. Warn on negative stock balance

Alt+G (Go To) > Create Voucher > Alt+F8 (Stock Journal) > F12 (Configure)

  1. Warn on negative Stock Balance

Gateway of Tally > F12 > Invoice / Orders Entry > Inventory

  1. Warn on duplicate order number

Alt+G (Go To) > Create Voucher > Ctrl+F8 (Sales Order) > F12 (Configure)

  1. Warn on duplicate Order No.

Gateway of Tally > F12 > Invoice / Orders Entry > Inventory

  1. Allow use of expired batches for all stock items
  2. Show batches with zero quantity

Alt+G (Go To) > Create Voucher > Alt+F8 (Stock Journal) > F12 (Configure)

  1. Use Expired Batches for Stock items
  2. Show Batches with Zero Quantity

Gateway of Tally > F12 > Invoice / Orders Entry > Inventory

  1. Provide complete accounting allocations in order/delivery note

Alt+G (Go To) > Create Voucher > Ctrl+F8 (Sales Order) > F12 (Configure)

  1. Provide Accounting Allocations in Order/Delivery Note

Note: Set Show more configurations to Yes.

Gateway of Tally > F12 > Invoice / Orders Entry > Statutory

  1. Calculate tax on current sub-total
    (else calculations are on inventory total only)
  2. Allow tax difference up to

Alt+G (Go To) > Create Voucher > F8 (Sales) > F12 (Configure)

  1. Calculate Tax on Current Subtotal
    (else calculations are on Inventory Total only)
  2. Allow Tax difference up to

Note: F11 > set Goods and Service Tax (GST) to Yes.

Gateway of Tally > F12 > Invoice / Orders Entry > POS

  1. Skip quantity during POS invoicing for faster entry
  2. Allow modification of rate field during POS invoicing
  3. Skip Discount field during POS invoicing for faster entry
  4. Enable entry of party details in POS invoice

Alt+G (Go To) > Create Voucher > F8 (POS Sales) > F12 (Configure)

  1. Skip the Quantity field during voucher entry
  2. Modify the Rate field during voucher entry
  3. Skip the Discount field during voucher entry
  4. Provide Party details in POS Invoice

Note: Create a voucher type POS Sales under Sales and set Use for POS invoicing to Yes.

Payroll Configuration

Navigation/Option
Tally.ERP 9 TallyPrime 

Gateway of Tally > F12 (Configure) > Payroll Configuration

  1. Add notes for employees
  2. Show statutory details
  3. Provide passport and visa details
  4. Provide contract details

Alt+G (Go To) > Create Master > Employee > F12 (Configure)

  1. Provide Notes for Employees
  2. Provide Statutory Details
  3. Provide Passport and Visa Details
  4. Provide Contract Details

Gateway of Tally > F12 (Configure) > Payroll Configuration

  1. Show resigned/retired employees
  2. Show employee display name

F1 (Help) > Settings > Display

  1. Show resigned/retired employees
  2. Display name for Employee

Banking Configuration

Navigation/Option
Tally.ERP 9 TallyPrime 

Gateway of Tally > F12 (Configure)

  1. Show all unreconciled transactions in BRS till date

Alt+G (Go To) > Bank Reconciliation > Ctrl+B (Basis of Values)

  1. Include all Unreconciled transactions till date

Gateway of Tally > F12 (Configure)

  1. Remove bank date on altering reconciled voucher (Bank ledger/amount/voucher type)

Alt+G (Go To) > Create Voucher > F4 (Contra) / F5 (Payment)/ F6 (Receipt) / F7 (Journal) > F12 (Configure)

  1. Remove Bank Date while altering Reconciled Voucher

Gateway of Tally > F12 (Configure)

  1. Location of new bank statements
  2. Location of imported bank statements
  3. Location of new intermediate files
  4. Location of imported intermediate files

Alt+O (Import) > Configuration > Banking

  1. Location of new bank statements
  2. Location of imported bank statements
  3. Location of new intermediate files
  4. Location of imported intermediate files

Note: Select Show More to see this configuration.

Gateway of Tally > F12 (Configure)

  1. Location of payment instructions
  2. Show details before export/upload
  3. Allow reset on the uploaded transactions

Alt+E (Export) > Configuration > Banking

  1. Location of payment instructions
  2. Show Payment Instruction details before Export/Upload
  3. Allow reset on Uploaded transactions

Note: Select Show More to see this configuration.

Printing

Navigation/Option
Tally.ERP 9 TallyPrime 

General

Gateway of Tally > F12 > Printing > Configuration

  1. Print date and time format
  2. Print on all pages of report
  3. Print date and time of voucher printing
  4. Print on all pages of voucher
  5. Print country with address
  6. Page margin on top

Alt+P (Print) > Configuration > Header Information

  1. Show date and time of reports
  2. Show date and time on all pages of Reports
  3. Show date and time of Voucher Printing
  4. Show date and time on all pages of Vouchers
  5. Print country with address
  6. Top Margin of Reports (in Inches)

Gateway of Tally > F12 > Printing > Configuration

  1. Stop printing vertical lines/borders
    (for faster printing on dot matrix printers)

Alt+P (Print) > Configuration > Quick/Dot Matrix Format Settings

  1. Stop printing vertical lines/borders

Note: Print Format should be Dot Matrix Format or Quick/Draft Format 

Gateway of Tally > F12 > Printing > Configuration

  1. Print using Greyscale on Black & White printers
    (for neat format only)

Alt+P (Print) > Configuration > Advanced Configurations

  1. Use Greyscale for printers with Black & White output

Note: Select Show More to see this configuration.

Gateway of Tally > F12 > Printing > Settings for Quick/Dot Matrix Format 

  1. Split long names into multiple lines
  2. Split long amounts/numbers into multiple lines
  3. Print party name and address from left margin in invoice

Alt+P (Print) > Configuration > Quick/Dot Matrix Format Settings

  1. Show long names in multiple lines when they exceed column width
  2. Show amounts/numbers in multiple lines when they exceed column width
  3. Show Party name and Address from Left Margin in invoice

Note: Print Format should be Dot Matrix Format or Quick/Draft Format

Purchase Transaction

Gateway of Tally > F12 > Printing > Purchase Transaction > Purchase Voucher / Invoice

  1. Title of document
  2. (for optional vouchers)
  3. Subtitle (if any)
  4. Height of normal invoice(inches)
  5. Simple/Voucher
  6. Width of normal invoice(inches)
  7. Simple/Voucher
  8. Margin on top (default 0.25)
  9. Simple/Voucher
  10. Margin on left (default 0.5)
  11. Simple/Voucher
  12. Print in simple format
  13. Print in voucher format
  14. Print space for Checked /Verified by details
  15. Print space for Prepared by details
  16. Print Company’s name for authorised signatory
  17. Print cost allocations in voucher format
  18. Print voucher reference
  19. Print order details
  20. Print terms of payment and delivery
  21. Print despatch details
  22. Print VAT analysis of items
  23. Print Company’s PAN / Income Tax No
  24. Print Company’s Tax Regn. Numbers
  25. Print Buyer’s Tax Regn. Number
  26. Print Buyer’s CST Regn. Number
  27. Print complete mailing details?
  28. Print Additional Description(s) for Item Name
  29. Print add. description(s) for ledger name
  30. Print Prepared/Verified initials
  31. Print Declaration
  32. Print Bill-wise Details
  33. Print serial number
  34. Print part number
  35. Print quantity column
  36. Print alternate quantity
  37. Print as separate column
  38. Print actual quantity column
  39. Print rate column
  40. Print discount column
  41. Print VAT% column?
  42. Print batch details
  43. Print godown name
  44. Print godown address
  45. Print rate of duty with items
  46. Print sub-totals after each line
  47. Print narration
  48. Print narration for each entry
  49. Print base currency symbol for total
  50. Format to use for ledger name?
  51. Method to use for Stock Item Name

Purchase Voucher > Ctrl+P (Print) > Configure

  1. Title
  2. Title (for optional vouchers)
  3. Sub Title (if any)
  4. Height of normal invoice (in Inches)
  5. Height of Simple invoice/Voucher format (in Inches)
  6. Width of normal invoice (in Inches)
  7. Width of Simple invoice/Voucher format (in Inches)
  8. Top Margin of normal invoice (in Inches)
  9. Top Margin of Simple invoice/Voucher format (in Inches)
  10. Left Margin of normal invoice (in Inches)
  11. Left Margin of Simple invoice/Voucher format (in Inches)
  12. Use Simple Invoice format
  13. Use Voucher format
  14. Show Checked by & Verified by
  15. Show Prepared by
  16. Show Company Name for Authorised Signatory
  17. Show Cost Allocations in Voucher format
  18. Show Reference No.
  19. Show Order details
  20. Show Terms of Payment and Delivery
  21. Show Dispatch details
  22. Show VAT Analysis
  23. Show PAN / Income Tax No.
  24. Show Tax Registration No. (TRN)
  25. Show Buyer’s GSTIN
  26. Show Supplier’s Tax Registration No. (TRN)
  27. Show Contact details
  28. Show Additional Descriptions for Stock Items
  29. Show Additional Descriptions for Ledgers
  30. Show Prepared by & Verified by
  31. Show Declaration
  32. Show Bill-wise details
  33. Show Serial No.
  34. Show Part No.
  35. Show Quantity
  36. Show Quantity with Alternate Unit
  37. Show Alternate Unit in separate column
  38. Show Actual Quantity
  39. Show Rate
  40. Show Discount %
  41. Show VAT Rate (in %)
  42. Show Batch details
  43. Show Godown Name
  44. Show Godown Address
  45. Show Rate of duty for Stock items
  46. Show Subtotals after each line
  47. Show Narration
  48. Show Narration for each entry
  49. Show Base Currency Symbol for Total
  50. Display name for Parties
  51. Display name for Stock Items

Gateway of Tally > F12 > Printing > Purchase Transaction > Purchase Voucher / Invoice

  1. Number of copies to print


Alt+P (Print) > Configuration > Set no. of copies for printing vouchers
  1. No. of copies for Purchase Invoice

Note: Select Show More to see this configuration.

Gateway of Tally > F12 > Printing > Purchase Transaction > Receipt Note

  1. Title of document
  2. (for optional vouchers)
  3. Subtitle (if any)
  4. Height of normal invoice(inches)
  5. Simple
  6. Width of normal invoice(inches)
  7. Simple
  8. Margin on top (default 0.25)
  9. Simple
  10. Margin on left (default 0.5)
  11. Simple
  12. Print in simple format
  13. Print voucher reference
  14. Print order details
  15. Print terms of payment and delivery
  16. Print despatch details
  17. Print Company GSTIN Numbers
  18. Print Supplier’s GSTIN Numbers
  19. Print State Name & State Code
  20. Print Company’s PAN / Income Tax No
  21. Print Company’s Tax Regn. Numbers
  22. Print complete mailing details?
  23. Print Address in a continuous line
  24. Print Additional Description(s) for Item Name
  25. Print add. description(s) for ledger name
  26. Print Prepared/Verified initials
  27. Print serial number
  28. Print part number
  29. Print quantity column
  30. Print alternate quantity
  31. Print as separate column
  32. Print actual quantity column
  33. Print rate column
  34. Print discount column
  35. Print VAT/CST % column ?
  36. Print Amount column
  37. Print godown name
  38. Print godown address
  39. Print rate of duty with items
  40. Print sub-totals after each line
  41. Print narration
  42. Print base currency symbol for total
  43. Format to use for ledger name?
  44. Method to use for Stock Item Name
  45. Jurisdiction

Purchase Voucher > Ctrl+P (Print) > Configure

  1. Title
  2. Title (for optional vouchers)
  3. Sub Title (if any)
  4. Height of normal invoice (in Inches)
  5. Height of Simple invoice (in Inches)
  6. Width of normal invoice (in Inches)
  7. Width of Simple invoice (in Inches)
  8. Top Margin of normal invoice (in Inches)
  9. Top Margin of Simple invoice (in Inches)
  10. Left Margin of normal invoice (in Inches)
  11. Left Margin of Simple invoice (in Inches)
  12. Use Simple Invoice format
  13. Show Reference No.
  14. Show Order details
  15. Show Terms of Payment and Delivery
  16. Show Dispatch details
  17. Show GSTIN
  18. Show Supplier’s GSTIN
  19. Show State Name & State Code
  20. Show PAN / Income Tax No.
  21. Show Tax Registration No. (TRN)
  22. Show Contact details
  23. Show Address in a continuous line
  24. Show Additional Descriptions for Stock Items
  25. Show Additional Descriptions for Ledgers
  26. Show Prepared by & Verified by
  27. Show Serial No.
  28. Show Part No.
  29. Show Quantity
  30. Show Quantity with Alternate Unit
  31. Show Alternate Unit in separate column
  32. Show Actual Quantity
  33. Show Rate
  34. Show Discount %
  35. Show VAT Rate (in %) / CST Rate (in %)
  36. Show Amount
  37. Show Godown Name
  38. Show Godown Address
  39. Show Rate of duty for Stock items
  40. Show Subtotals after each line
  41. Show Narration
  42. Show Base Currency Symbol for Total
  43. Display Name for Parties
  44. Display Name for Stock Items
  45. Jurisdiction

Gateway of Tally > F12 > Printing > Purchase Transaction > Receipt Note

  1. Number of copies to print


Alt+P (Print) > Configuration > Set no. of copies for printing vouchers
  1. No. of copies for Receipt Note

Note: Select Show More to see this configuration.

Gateway of Tally > F12 > Printing > Purchase Transaction > Purchase Order

  1. Title of document
  2. (for optional vouchers)
  3. Subtitle (if any)
  4. Height of normal Purchase Order(inches)
  5. Simple
  6. Width of normal Purchase Order (inches)
  7. Simple
  8. Margin on top (default 0.25)
  9. Simple
  10. Margin on left (default 0.5)
  11. Simple
  12. Print in simple format
  13. Print voucher reference
  14. Print terms of payment and delivery
  15. Print despatch details
  16. Print Company’s PAN / Income Tax No
  17. Print Company’s Tax Regn. Numbers
  18. Print Supplier’s PAN / Income Tax No
  19. Print complete mailing details?
  20. Print Address in a continuous line
  21. Print Additional Description(s) for Item Name
  22. Print add. description(s) for ledger name
  23. Print Prepared/Verified initials
  24. Print Declaration
  25. Print serial number
  26. Print part number
  27. Print quantity column
  28. Print alternate quantity
  29. Print as separate column
  30. Print actual quantity column
  31. Print rate column
  32. Print Amount column
  33. Print discount column
  34. Print VAT/CST % column ?
  35. Print Delivery Date/Batch Details
  36. Print godown name
  37. Print godown address
  38. Print rate of duty with items
  39. Print sub-totals after each line
  40. Print narration
  41. Print base currency symbol for total

Purchase Order > Ctrl+P (Print) > Configure

  1. Title
  2. Title (for optional vouchers)
  3. Sub Title (if any)
  4. Height of normal Purchase Order (in Inches)
  5. Height of simple Purchase Order (in Inches)
  6. Width of normal Purchase Order (in Inches)
  7. Width of simple Purchase Order (in Inches)
  8. Top Margin of normal Purchase Order (in Inches)
  9. Top Margin of Simple Purchase Order (in Inches)
  10. Left Margin of normal Purchase Order (in Inches)
  11. Left Margin of Simple Purchase Order (in Inches)
  12. Use Simple Invoice format
  13. Show Reference No.
  14. Show Terms of Payment and Delivery
  15. Show Dispatch details
  16. Show PAN / Income Tax No.
  17. Show Tax Registration No. (TRN)
  18. Show PAN / Income Tax No.
  19. Show Contact details
  20. Show Address in a continuous line
  21. Show Additional Descriptions for Stock Items
  22. Show Additional Descriptions for Ledgers
  23. Show Prepared by & Verified by
  24. Show Declaration
  25. Show Serial No.
  26. Show Part No.
  27. Show Quantity
  28. Show Quantity with Alternate Unit
  29. Show Alternate Unit in separate column
  30. Show Actual Quantity
  31. Show Rate
  32. Show Amount
  33. Show Discount %
  34. Show VAT Rate (in %) / CST Rate (in %)
  35. Show Delivery Date/Batch Details
  36. Show Godown Name
  37. Show Godown Address
  38. Show Rate of duty for Stock items
  39. Show Subtotals after each line
  40. Show Narration
  41. Show Base Currency Symbol for Total

Gateway of Tally > F12 > Printing > Purchase Transaction > Purchase Order

  1. Number of copies to print


Alt+P (Print) > Configuration > Set no. of copies for printing vouchers
  1. No. of copies for Purchase Order

Note: Select Show More to see this configuration.

Gateway of Tally > F12 > Printing > Purchase Transaction > Purchase Order > Statutory Details

  1. Print Company GSTIN Numbers
  2. Print Supplier’s GSTIN Numbers
  3. Print GST % column
  4. Print HSN/SAC column
  5. Print State Name & State Code
  6. Format to use for ledger name?
  7. Method to use for Stock Item Name
  8. Jurisdiction 

Purchase Order > Ctrl+P (Print) > Configure

  1. Show GSTIN
  2. Show Supplier’s  GSTIN
  3. Show GST Rate (in %)
  4. Show HSN/SAC
  5. Show State Name & State Code
  6. Display Name for Parties
  7. Display Name for Stock Items
  8. Jurisdiction

Payment Voucher

Gateway of Tally > F12 > Printing > Payment Voucher > Payment Print Configuration

  1. Height of Voucher
  2. Width of Voucher
  3. Margin on Top
  4. Margin on Left
  5. Payment Mode on top of voucher
  6. Print Bill-wise details
  7. Print Bill Due Date also
  8. Print Due Date with Credit Days
  9. Print Inventory Details
  10. Print Bank Transaction Details
  11. Print All Details
  12. Print Cost Centre/Employee Details
  13. Print for Cash/Bank Ledgers also
  14. Print space for Checked /Verified by details
  15. Print space for Prepared by details
  16. Print narration
  17. Print narration for each entry
  18. Print Amount in Foreign Currency
  19. Print Base Currency Symbol for Total
  20. Print mailing name instead of ledger name
  21. Format to use for ledger name

Payment Voucher > Ctrl+P (Print) > Configure

  1. Height of Voucher
  2. Width of Voucher
  3. Top Margin of Voucher
  4. Left Margin of Voucher
  5. Show Payment Mode on top of voucher
  6. Show Bill-wise details
  7. Show Due Date for Bills
  8. Show Due Date with Credit Days
  9. Show Inventory details
  10. Show Bank Transaction Details
  11. Show Additional Details
  12. Show Cost Centre/Employee Details
  13. For Cash/Bank Ledgers also
  14. Show checked by & verified by
  15. Show Prepared by
  16. Show Narration
  17. Show Narration for each entry
  18. Print Amount in Foreign Currency
  19. Show Base Currency Symbol for Total
  20. Show Mailing Name instead of Ledger Name
  21. Display Name for Ledgers

Gateway of Tally > F12 > Printing > Payment Voucher > Statutory Details

  1. Print GST Analysis of Items
  2. Print HSN/SAC details
  3. Print State name & State code
  4. Print Place of Supply

Payment Voucher > Ctrl+P (Print) > Configure

  1. Show GST Analysis
  2. Show HSN/SAC details
  3. Show State Name & State Code
  4. Show Place of Supply

Sales Transaction

Gateway of Tally > F12 (Configure) > Printing > Sales Transaction > Sales Invoice

  1. Title of document
  2. (for optional vouchers)
  3. Subtitle (if any)
  4. Height of normal invoice(inches)
  5. Simple
  6. Width of normal invoice(inches)
  7. Simple
  8. Margin on top (default 0.25)
  9. Simple
  10. Margin on left (default 0.5)
  11. Simple
  12. Print transporter’s copy
  13. Print in simple format
  14. Print voucher reference
  15. Print order details
  16. Print terms of payment and delivery
  17. Print despatch details
  18. Print TCS details
  19. Print VAT/CST analysis of items
  20. Print Company’s PAN / Income Tax No
  21. Print Party’s PAN / Income Tax No
  22. Print Company’s Tax Regn. Numbers
  23. Print Company GSTIN Numbers
  24. Print Buyer’s Tax Regn. Number
  25. Print complete mailing details?
  26. Print Buyer’s CST Regn. Number
  27. Print Buyers’s GSTIN Numbers
  28. Print Declaration
  29. Print Customer’s Signature
  30. Print Additional Description(s) for Item Name
  31. Print add. description(s) for ledger name
  32. Print Prepared/Verified initials
  33. Print Bill-wise Details
  34. Print serial number
  35. Print part number
  36. Print quantity column
  37. Print alternate quantity
  38. Print as separate column
  39. Print actual quantity column
  40. Print rate column
  41. Print discount column
  42. Print VAT/CST % column ?
  43. Print date and time
  44. Print batch details
  45. Print godown name
  46. Print godown address
  47. Print rate of duty with items
  48. Print sub-totals after each line
  49. Print narration
  50. Print narration for each entry
  51. Print Base Currency Symbol for Total
  52. Method to use for ledger name?
  53. Format to use for Stock Item
  54. Print Bank Details
  55. Jurisdiction


Sales Voucher > Ctrl+P (Print) > Configure

  1. Title
  2. Title (for optional vouchers)
  3. Sub Title (if any)
  4. Height of normal invoice (in Inches)
  5. Height of Simple invoice (in Inches)
  6. Width of normal invoice (in Inches)
  7. Width of Simple invoice (in Inches)
  8. Top Margin of normal invoice (in Inches)
  9. Top Margin of Simple invoice format (in Inches)
  10. Left Margin of normal invoice (in Inches)
  11. Left Margin of Simple invoice format (in Inches)
  12. Print Transporter’s Copy
  13. Use Simple Invoice format
  14. Show Reference No.
  15. Show Order details
  16. Show Terms of Payment and Delivery
  17. Show Dispatch details
  18. Show TCS details
  19. Show VAT/CST Analysis
  20. Show PAN / Income Tax No.
    Note: Appears under Company Details
  21. Show PAN / Income Tax No.
    Note: Appears under Party Details
  22. Show Tax Registration No. (TRN)
  23. Show GSTIN
  24. Show Buyer’s Tax Registration No.
  25. Show Contact details
  26. Show Buyer’s CST Registration No.
  27. Show Buyer’s GSTIN
  28. Show Declaration
  29. Show Customer’s Seal and Signature
  30. Show Additional Descriptions for Stock Items
  31. Show Additional Descriptions for Ledgers
  32. Show Prepared by & Verified by
  33. Show Bill-wise details
  34. Show Serial No.
  35. Show Part No.
  36. Show Quantity
  37. Show Quantity with Alternate Unit
  38. Show Alternate Unit in separate column
  39. Show Actual Quantity
  40. Show Rate
  41. Show Discount %
  42. Show VAT Rate (in %)/CST Rate (in %)
  43. Show Date and Time
  44. Show Batch details
  45. Show Godown Name
  46. Show Godown Address
  47. Show Rate of duty for Stock items
  48. Show Subtotals after each line
  49. Show Narration
  50. Show Narration for each entry
  51. Show Base Currency Symbol for Total
  52. Display name for Parties
  53. Display name for Stock Items
  54. Show Bank details
  55. Jurisdiction

Gateway of Tally > F12 (Configure) > Printing >Sales Transaction > Sales Invoice

  1. Number of copies to print


Alt+P (Print) > Configuration > Set no. of copies for printing vouchers
  1. No. of copies for Sales Invoice

Note: Select Show More to see this configuration.

Gateway of Tally > F12 (Configure) > Printing > Sales Transaction > POS Invoice > POS Invoice Print Configuration

  1. Title of document
  2. Format to use for Stock item
  3. Print Item name in one line
  4. Print serial number
  5. Print part number
  6. Print Quantity Units
  7. Print rate column
  8. Print rate units
  9. Print Discount as a column
  10. Print Additional Description(s) for Item Name
  11. Print batch details
  12. Print Mfg Date
  13. Print Expiry Date
  14. Print Card / Cheque No.
  15. Print whole Card Number
  16. Print VAT/CST Analysis of Items
  17. Print Service Tax Regn. Number
  18. Print Service Tax Rate breakup
  19. Print Service Category and Assessable Value
  20. Print narration
  21. Print base currency symbol for total
  22. Print Time in Invoice

POS Invoice > Ctrl+P (Print) > Configure

  1. Title
  2. Display Name for Stock Items
  3. Show Stock Item Name in a single line
  4. Show Serial No.
  5. Show Part No.
  6. Show Units with Quantity
  7. Show Rate
  8. Show Units with Rate
  9. Show Discount %
  10. Show Additional Descriptions for Stock Items
  11. Show Batch details
  12. Show Manufacturing Date
  13. Show Expiry Date
  14. Show Card/Cheque No.
  15. Show complete Card No.
  16. Show VAT/CST Analysis
  17. Show Service Tax Registration No.
  18. Show Service Tax Rate breakup
  19. Print Service Tax Category and Assessable Value
  20. Show Narration
  21. Show Base Currency Symbol for Total
  22. Show Time

Gateway of Tally > F12 (Configure) > Printing > Sales Transaction > POS Invoice > GST

  1. Print Company GSTIN Numbers
  2. Print Buyer’s GSTIN Numbers
  3. Print GST Analysis of Items
  4. Print GST % column
  5. Print HSN/SAC column

POS Invoice > Ctrl+P (Print) > Configure

  1. Show GSTIN
  2. Show Buyer’s GSTIN
  3. Show GST Analysis
  4. Show GST Rate (in %)
  5. Show HSN/SAC

Gateway of Tally > F12 (Configure) > Printing > Sales Transaction > Delivery Note

  1. Title of document
  2. (for optional vouchers)
  3. Subtitle (if any)
  4. Height of normal Delivery Note(inches)
  5. Simple
  6. Width of normal Delivery Note (inches)
  7. Simple
  8. Margin on top (default 0.25)
  9. Simple
  10. Margin on left (default 0.5)
  11. Simple
  12. Print transporter’s copy
  13. Print in simple format
  14. Print voucher reference
  15. Print order details
  16. Print terms of payment and delivery
  17. Print despatch details
  18. Print Company’s PAN / Income Tax No
  19. Print Party’s PAN / Income Tax No
  20. Print Company’s Tax Regn. Numbers
  21. Print Buyer’s Tax Regn. Number
  22. Print Buyer’s CST Regn. Number
  23. Print complete mailing details?
  24. Print Address in a continuous line
  25. Print Additional Description(s) for Item Name
  26. Print add. description(s) for ledger name
  27. Print Prepared/Verified initials
  28. Print Declaration
  29. Print serial number
  30. Print part number
  31. Print quantity column
  32. Print alternate quantity
  33. Print as separate column
  34. Print actual quantity column
  35. Print rate column
  36. Print discount column
  37. Print VAT/CST % column ?
  38. Print Amount Column
  39. Print batch details
  40. Print godown name
  41. Print godown address
  42. Print rate of duty with items
  43. Print sub-totals after each line
  44. Print narration
  45. Format to use for ledger name?
  46. Method to use for Stock Item Name
  47. Jurisdiction

Delivery Note > Ctrl+P (Print) > Configure

  1. Title
  2. Title (for optional vouchers)
  3. Sub Title (if any)
  4. Height of normal invoice (in Inches)
  5. Height of Simple invoice (in Inches)
  6. Width of normal invoice (in Inches)
  7. Width of Simple invoice (in Inches)
  8. Top Margin of normal invoice (in Inches)
  9. Top Margin of Simple invoice (in Inches)
  10. Left Margin of normal invoice (in Inches)
  11. Left Margin of Simple invoice (in Inches)
  12. Print Transporter’s Copy
  13. Use Simple format
  14. Show Reference No.
  15. Show Order details
  16. Show Terms of Payment and Delivery
  17. Show Dispatch details
  18. Show PAN / Income Tax No.
    Note: Appears under Company Details
  19. Show PAN / Income Tax No.
    Note: Appears under Party Details
  20. Show Tax Registration No. (TRN)
  21. Show Buyer’s Tax Registration No.
  22. Show Buyer’s CST Registration No.
  23. Show Contact details
  24. Print Address in a continuous line
  25. Show Additional Descriptions for Stock Items
  26. Show Additional Descriptions for Ledgers
  27. Show Prepared by & Verified by
  28. Show Declaration
  29. Show Serial No.
  30. Show Part No.
  31. Show Quantity
  32. Show Quantity with Alternate Unit
  33. Show Alternate Unit in separate column
  34. Show Actual Quantity
  35. Show Rate
  36. Show Discount %
  37. Show VAT (in %) /CST Rate (in %)
  38. Show Amount
  39. Show Batch details
  40. Show Godown Name
  41. Show Godown Address
  42. Show Rate of duty for Stock items
  43. Show Subtotals after each line
  44. Show Narration
  45. Display Name for Parties
  46. Display Name for Stock Items
  47. Jurisdiction

Gateway of Tally > F12 (Configure) > Printing > Sales Transaction > Delivery Note

  1. Number of copies to print


Alt+P (Print) > Configuration > Set no. of copies for printing vouchers
  1. No. of copies for Delivery Note

Note: Select Show More to see this configuration.

Gateway of Tally > F12 (Configure) > Printing > Sales Transaction > Sales Order / Quotation

  1. Title of document
  2. (for optional vouchers)
  3. Subtitle (if any)
  4. Height of normal Sales Order(inches)
  5. Simple
  6. Width of normal Sales Order (inches)
  7. Simple
  8. Margin on top (default 0.25)
  9. Simple
  10. Margin on left (default 0.5)
  11. Simple
  12. Print in simple format
  13. Print voucher reference
  14. Print terms of payment and delivery
  15. Print despatch details
  16. Print Company’s PAN / Income Tax No
  17. Print Company’s Tax Regn. Numbers
  18. Print Party’s PAN / Income Tax No
  19. Print complete mailing details?
  20. Prit Address in a continuous line
  21. Print Additional Description(s) for Item Name
  22. Print add. description(s) for ledger name
  23. Print Prepared/Verified initials
  24. Print Declaration
  25. Print serial number
  26. Print part number
  27. Print quantity column
  28. Print alternate quantity
  29. Print as separate column
  30. Print actual quantity column
  31. Print rate column
  32. Print discount column
  33. Print VAT/CST % column ?
  34. Print Amount column
  35. Print Delivery Date/Batch Details
  36. Print godown name
  37. Print godown address
  38. Print rate of duty with items
  39. Print sub-totals after each line
  40. Print narration
  41. Print base currency symbol for total

Sales Order > Ctrl+P (Print) > Configure

  1. Title
  2. Title (for optional vouchers)
  3. Sub Title (if any)
  4. Height of normal Sales Order (in Inches)
  5. Height of simple Sales Order (in Inches)
  6. Width of normal Sales Order (in Inches)
  7. Width of simple Sales Order (in Inches)
  8. Top Margin of normal Sales Order (in Inches)
  9. Top Margin of Simple Sales Order (in Inches)
  10. Left Margin of normal Sales Order (in Inches)
  11. Left Margin of Simple Sales Order (in Inches)
  12. Use Simple Invoice format
  13. Show Reference No.
  14. Show Terms of Payment and Delivery
  15. Show Dispatch details
  16. Show PAN / Income Tax No.
    Note: Appears under Company Details
  17. Show Tax Registration No. (TRN)
  18. Show PAN / Income Tax No.
    Note: Appears under Party Details
  19. Show Contact details
  20. Show Address in a continuous line
  21. Show Additional Descriptions for Stock Items
  22. Show Additional Descriptions for Ledgers
  23. Show Prepared by & Verified by
  24. Show Declaration
  25. Show Serial No.
  26. Show Part No.
  27. Show Quantity
  28. Show Quantity with Alternate Unit
  29. Show Alternate Unit in separate column
  30. Show Actual Quantity
  31. Show Rate
  32. Show Discount %
  33. Show VAT Rate (in %) / CST Rate (in %)
  34. Show Amount
  35. Show Delivery Date/Batch Details
  36. Show Godown Name
  37. Show Godown Address
  38. Show Rate of duty for Stock items
  39. Show Subtotals after each line
  40. Show Narration
  41. Show Base Currency Symbol for Total

Gateway of Tally > F12 (Configure) > Printing > Sales Transaction > Sales Order / Quotation

  1. Number of copies to print


Alt+P (Print) > Configuration > Set no. of copies for printing vouchers
  1. No. of copies for Sales Order/Quotation

Note: Select Show More to see this configuration.

Gateway of Tally > F12 (Configure) > Printing > Sales Transaction > Sales Order/Quotation > Statutory Details

  1. Print Company GSTIN Numbers
  2. Print Buyer’s GSTIN Numbers
  3. Print GST % column
  4. Print HSN/SAC column
  5. Print State Name & State Code
  6. Format to use for ledger name?
  7. Method to use for Stock Item Name
  8. Print Bank Details
  9. Jurisdiction

Sales Order > Ctrl+P (Print) > Configure

  1. Show GSTIN
  2. Show Buyer’s GSTIN
  3. Show GST Rate (in %)
  4. Show HSN/SAC
  5. Show State Name & State Code
  6. Display Name for Parties
  7. Display Name for Stock Items
  8. Show Bank details
  9. Jurisdiction

Receipt Voucher

Gateway of Tally > F12 (Configure) > Printing > Receipt Voucher > Receipt Printing Configuration

  1. Height of Voucher
  2. Width of Voucher
  3. Margin on Top
  4. Margin on Left
  5. Receipt Mode on top of voucher
  6. Print Bill-wise details
  7. Print Bill Due Date also
  8. Print Due Date with Credit Days
  9. Print Inventory Details
  10. Print Bank Transaction Details
  11. Print All Details
  12. Print Cost Centre/Employee Details
  13. Print for Cash/Bank Ledgers also
  14. Print space for Checked /Verified by details
  15. Print space for Prepared by details
  16. Print Category & Assessable Value
  17. Print Abetment & Pure Agent Details
  18. Print Amount in Foreign Currency
  19. Print Base Currency Symbol for Total
  20. Print Mailing Name instead of Ledger name
  21. Format to use for ledger name
  22. Print narration
  23. Print narration for each entry

Receipt Voucher > Ctrl+P (Print) > Configure 

  1. Height of Receipt Voucher
  2. Width of Receipt Voucher
  3. Top Margin of Receipt Voucher
  4. Left Margin of Receipt Voucher
  5. Show Receipt Mode on top of voucher
  6. Show Bill-wise details
  7. Show Due Date for Bills
  8. Show Due Date with Credit Days
  9. Show Inventory details
  10. Show Bank Transaction Details
  11. Show Additional Details
  12. Show Cost Centre/Employee Details
  13. For Cash/Bank Ledgers also
  14. Show checked by & verified by
  15. Show Prepared by
  16. Show Service Tax Category & Assessable Value
  17. Show Abetment & Pure Agent Details
  18. Print Amount in Foreign Currency
  19. Show Base Currency Symbol for Total
  20. Show Mailing Name instead of Ledger Name
  21. Display Name for Ledgers
  22. Show Narration
  23. Show Narration for each entry
Gateway of Tally > F12 (Configure) > Printing > Receipt Voucher > Statutory Details

  1. Print GST Analysis of Items
  2. Print HSN/SAC details
  3. Print State name & State code
  4. Print Place of Supply

Receipt Voucher > Ctrl+P (Print) > Configure 

  1. Show GST Analysis
  2. Show HSN/SAC details
  3. Show State Name & State Code
  4. Show Place of Supply

Gateway of Tally > F12 (Configure) > Printing > Receipt Voucher > Formal Receipt Printing Configuration

  1. Height of receipt (in inches)
  2. Width of receipt (in inches)
  3. Margin on top (default 0.25)
  4. Print Company’s PAN/IT Number
  5. Print Bank Transaction Details
  6. Print All Details
  7. Print party address
  8. Print narration

Receipt Voucher > Ctrl+P (Print) > Configure 

  1. Height of formal Receipt (in inches)
  2. Width of formal Receipt (in inches)
  3. Top Margin of formal Receipt (default 0.25)
  4. Show Company’s PAN/Income Tax No.
  5. Show Bank Transaction Details
  6. Show Additional Details
  7. Show Party Address
  8. Show Narration

Journal / Contra

Gateway of Tally > F12 (Configure) > Printing > Journal / Contra

  1. Height of Voucher
  2. Width of Voucher
  3. Margin on Top (default 0.25)
  4. Margin on Left (default 0.75)
  5. Print Bill-wise details
  6. Print Bill Due Date also
  7. Print Due Date with Credit Days
  8. Print Inventory Details
  9. Print Bank Transaction Details
  10. Print All Details
  11. Print Cost Centre/Employee Details
  12. Print space for Checked /Verified by details
  13. Print space for Prepared by details
  14. Print narration
  15. Print narration for each entry
  16. Print base currency symbol for total
  17. Print Mailing Name instead of Ledger name
  18. Format to use for ledger name

Journal/Contra > Ctrl+P (Print) > Configure 

  1. Height Voucher (in Inches)
  2. Width Voucher (in Inches)
  3. Top Margin (in Inches)
  4. Left Margin (in Inches)
  5. Show Bill-wise details
  6. Show Due Date for Bills
  7. Show Due Date with Credit Days
  8. Show Inventory details
  9. Show Bank Transaction Details
  10. Show Additional Details
  11. Show Cost Centre/Employee Details
  12. Show checked by & verified by
  13. Show Prepared by
  14. Show Narration
  15. Show Narration for each entry
  16. Show Base Currency Symbol for Total
  17. Show Mailing Name instead of Ledger Name
  18. Display Name for Ledgers

Debit/Credit Note

Gateway of Tally > F12 (Configure) > Printing > Debit / Credit Note

  1. Height of Voucher
  2. Width of Voucher
  3. Margin on Top (default 0.25)
  4. Margin on Left (default 0.75)
  5. Print complete mailing details
  6. Print Address in a continuous line
  7. Print transporter’s copy
  8. Print full Ledger details
  9. Print Inventory details
  10. Print with narration
  11. Print narration for each entry
  12. Print Bill-wise details
  13. Print Bill Due Date also
  14. Print Cost Centre Details
  15. Print space for Checked /Verified by details
  16. Print space for Prepared by details
  17. Print Amount in Foreign Currency
  18. Print Base Currency Symbol for Total
  19. Print Company’s PAN / Income Tax No.
  20. Print Party’s PAN / Income Tax No.
  21. Print e-SUGAM No
  22. Print e-Way Bill No.

Debit Note / Credit Note > Ctrl+P (Print) > Configure

  1. Height Voucher (in Inches)
  2. Width Voucher (in Inches)
  3. Top Margin (in Inches)
  4. Left Margin (in Inches)
  5. Show Contact details
  6. Print Address in a continuous line
  7. Deprecated in TallyPrime
  8. Show complete Ledger details
  9. Show Inventory details
  10. Show Narration
  11. Show Narration for each entry
  12. Show Bill-wise details
  13. Show Due Date for Bills
  14. Show Cost Centre Details
  15. Show checked by & verified by
  16. Show Prepared by
  17. Print Amount in Foreign Currency
  18. Show Base Currency Symbol for Total
  19. Show PAN /Income Tax No.
  20. Show PAN /Income Tax No.
  21. Show e-SUGAM No
  22. Show e-Way Bill No.

Gateway of Tally > F12 (Configure) > Printing > Debit / Credit Note

  1. Number of copies to print


Alt+P (Print) > Configuration > Set no. of copies for printing vouchers
  1. No. of copies for Debit/Credit Note

Note: Select Show More to see this configuration.

Reminder Letter

Gateway of Tally > F12 (Configure) > Printing > Reminder Letter

  1. Margin on top (default 0.5 inch)
  2. Margin on left (default 0.5 inch)
  3. Information in first paragraph
  4. Information in second paragraph

Alt+G (Go To) > type or select Ledger Outstanding > select any ledger > Ctrl+P (Print) > Configure

  1. Top Margin (in Inches)
  2. Left Margin (in Inches) 
    Type of select Reminder Letter Information for following configuration
  3. Information in first paragraph
  4. Information in second paragraph

Note: Set Report Type as Reminder Letter 

Confirmation of Accounts

Gateway of Tally > F12 (Configure) > Printing > Confirmation of Accounts

  1. Margin on top (default 0.5 inch)
  2. Margin on left (default 0.5 inch)
  3. Information in first paragraph
  4. Information in second paragraph
  5. Sign-Off

Alt+G (Go To) > type or select Ledger Vouchers > select any ledger > Ctrl+P (Print) > Configure

  1. Top Margin (in Inches)
  2. Deprecated in TallyPrime
    Type of select Provide Confirmation Statement for following configuration
  3. Information in first paragraph
  4. Information in second paragraph
  5. Sign-Off

Note: Set Report Type as Confirmation of Accounts.
Select Show More to see this configuration.

Gateway of Tally > F12 (Configure) > Printing > select any voucher type or report for printing

  1. Print Company Logo

Alt+P (Print) > Configuration

  1. Show Company Logo

Payment Advice Configurations

Gateway of Tally > F12 (Configure) > Printing > Payment Advice Configurations > Printing

  1. Salutation
  2. Acknowledgement
  3. Signature on the Left
  4. Signature on the Right

Payment Voucher > Ctrl+P (Print) > Configure

  1. Salutation
  2. Acknowledgement
  3. Signature on the Left
  4. Signature on the Right

Note: Any Payment Voucher with Bank Ledger > set Print Payment Advice as Yes.

Gateway of Tally > F12 (Configure) > Printing > Payment Advice Configurations > E-Mailing

  1. Salutation
  2. Acknowledgement
  3. Signature on the Left
  4. Signature on the Right

Payment Voucher > Ctrl+M (E-mail) > Configure

  1. Salutation
  2. Acknowledgement
  3. Signature on the Left
  4. Signature on the Right

Note: Any Payment Voucher with Bank Ledger > set E-mail Payment Advice as Yes.

Payroll

Gateway of Tally > F12 (Configure) > Printing > Payroll

  1. Information in Payment Advice

Display More Reports > Payroll Reports > Payment Advice > Ctrl+P (Print) > Configure

  1. Information in Payment Advice

Gateway of Tally > F12 (Configure) > Printing > Payroll

  1. Payslip Note
  2. Payslip message

Alt+G (Go To) > type or select Single Pay Slip / Multi Pay Slip > select any Employee or Employee Group > Ctrl+P (Print) > Configure

  1. Payslip Note
  2. Payslip message

Note: Set the options Payslip Note & Payslip Message as Yes.

Advanced Configurations

Gateway of Tally > F12 (Configure) > Printing > Advanced Configurations

  1. Reduce space between address and item name/particulars
    (Enabling this option will not print the contact details of the party in pre-printer format.)
  2. Retrieve paper size for non-standard printers
  3. Enable bitmap mode of printing

Atl+P (Print) > Configuration > Show More

  1. Reduce space between Address and Name of items/Particulars
  2. Retrieve Paper Size for non-standard printers
  3. Use Bitmap Mode to print

E-mailing

Navigation/Option
Tally.ERP 9 TallyPrime 

Gateway of Tally > F12 (Configure) > E-mailing

  1. E-mail server
  2. Server address 
    (Name: Port, default port is 25)
  3. Use SSL
    (Select ‘Yes’ if you are using secured SMTP sever)
  4. Use SSL on standard port
    (Select ‘Yes’ if you are using SSL on default/standard SMTP port)
  5. From
  6. From e-mail ID
  7. Username for authentication
    (Optional : Password is skipped if username is blank)
  8. Show additional details for e-mail ID

Alt+M (E-mail) > Configuration Pre-defined E-mail Profile

  1. E-mail Server
  2. Server address
  3. Use SSL
    (Select ‘Yes’ if you are using secured SMTP sever)
  4. Use SSL/TLS on standard port
    (Select ‘Yes’ if you are using SSL on default/standard SMTP port)
  5. E-mail sender name
  6. E-mail from
  7. Username for authentication
  8. Show additional options

Note:

  • Enter a valid e-mail ID under E-mail from.
  • Set Show additional options to Yes.

Gateway of Tally > F12 (Configure) > E-mailing

  1. Password

Any voucher or report > Ctrl+M (E-mail) > M (E-mail)

  1. Password

Gateway of Tally > F12 (Configure) > E-mailing

  1. Format
  2. Page size
  3. Page Width, Height (in mms)
  4. Page Orientation

Any voucher or report > Ctrl+M (E-mail) > C (Configure)

  1. File Format
  2. Page Size
  3. Page Width, Height (in mms)
  4. Page Orientation

NotePage SizePage Width, Height, and Page Orientation will appear when File Format is set to JPEG or PDF.

Tally Prime Vs Tally ERP9 Data Configuration

Navigation/Option
Tally.ERP 9 TallyPrime 

Gateway of Tally > F12 (Configure) > Data Configuration

  1. Location of data files

Alt+Y (Data) > Data Path

  1. Company Data Path

Gateway of Tally > F12 (Configure) > Data Configuration

  1. Location of export files

Alt+E (Export) > Configuration

  1. Location of Import/Export Files

Gateway of Tally > F12 (Configure) > Data Configuration

  1. Load companies on startup
  2. Select companies to preload on startup
  3. Location of language files
  4. Location of configuration file

F1 (Help) > Settings > Startup

  1. Load companies on startup
  2. Companies to load
  3. Deprecated from TallyPrime. However, you can configure the ini file in the installation folder
  4. Deprecated from TallyPrime. However, you can configure the ini file in the installation folder

TallyPrime Vs Tally ERP9 Advanced Configuration

Navigation/Option
Tally.ERP 9 TallyPrime 

Gateway of Tally > F12 (Configure) > Data Configuration > Client/Server Configuration

  1. Tally.ERP 9 is acting as
  2. Enable ODBC server
  3. Port

Alt+(Exchange) > Data Synchronisation > Client/Server configuration

  1. TallyPrime acts as
  2. Enable ODBC
  3. Port

Gateway of Tally > F12 (Configure) > Data Configuration > Connection Configuration

  1. Connection timeout (in seconds)
  2. Connect to Tally.NET Server running on non HTTP port
    Set the above option to ‘Yes’ in case of following problems:
    1. Frequently getting disconnected from Tally.NET Server
    2. Error 16004 : Invalid once
  3. Use absolute URL for HTTP actions

F1 (Help) > Settings > Connectivity > Connectivity and timeout configuration

  1. Connection timeout (in seconds)
  2. Connect to Tally.NET Server running on non-HTTP port
  3. Use absolute URL for HTTP actions

Note: Select Show More to see this configuration.

Gateway of Tally > F12 (Configure) > Data Configuration > Log Configuration

  1. Enable Sync Logging (SockReg.log)
  2. Truncate previous log before Syncing

Alt+Z (Exchange) > Data Synchronisation.

  1. Enable Sync Logging (SockReq.log)
  2. Truncate Previous log before Syncing

Note: If you do not see these options, in the same menu, type or select Client/Server configuration > select TallyPrime acts asServer or Both. Accept the screen and restart TallyPrime on prompt.

Gateway of Tally > F12 (Configure) > Data Configuration > Log Configuration

  1. Enable HTTP log (tallyhttp.log)

F1 (Help) > Settings > Connectivity > Connectivity and timeout configuration

  1. Enable HTTP log (tallyhttp.log)

Note: Select Show More to see this configuration.

Gateway of Tally > F12 (Configure) > Data Configuration > Log Configuration

  1. Enable detailed log (tally.imp)

Alt+O (Import) > Configuration

  1. Enable detailed log (tally.imp)

Note: Select Show More to see this configuration.

Gateway of Tally > F12 (Configure) > Data Configuration > Tally.Server 9 Configuration

  1. Restrict memory usage for low memory environment
    (This may result in slower operations)
  2. Use additional memory for faster reporting

F1 (Help) > Settings > Startup > Cache size for accessing data from TallyPrime Server

  1. Data cache size
    Note: In TallyPrime, the earlier configurations have been merged into a single configuration. Based on the cache size selected, you can specify the Size in MB.

Gateway of Tally > F12 (Configure) > Data Configuration > Tally.NET Server Proxy Configuration

  1. Use proxy for connecting to Tally.NET server
  2. Specify URL/IP address and port for proxy server
  3. Authenticate proxy server
  4. Authentication type
  5. Username
  6. Password

F1 (Help) > Settings > Connectivity > Proxy Server configuration > For Connection to Online Access Services

  1. Use Proxy Server
  2. URL/IP address and port
  3. Authenticate Proxy Server
  4. Authentication type
  5. Username
  6. Password

Gateway of Tally > F12 (Configure) > Data Configuration > Gateway Proxy Configuration

  1. Use proxy server for connecting to gateway
  2. Specify URL/IP address and port for proxy server
  3. Authenticate proxy server
  4. Username
  5. Password
  6. Enable absolute URL
  7. Proxy server timeout after

F1 (Help) > Settings > Connectivity > Proxy Server configuration > For Connection to Tally Gateway Server

  1. Use Proxy Server
  2. URL/IP address and port
  3. Authenticate Proxy Server
  4. Username
  5. Password
  6. Enable absolute URL
  7. Proxy Server timeout

TallyPrime VS Tally ERP9 Product & Features

Navigation/Option
Tally.ERP 9 TallyPrime 

Gateway of Tally > F12 (Configure) > Product & Features > F12 (Configure)

  1. Show all releases
  2. Show product releases and TDL files/add-ons
  3. Show additional details
  4. Notify about new releases

F1 (Help) > Upgrade > F12 (Configure)

  1. Show all releases
  2. No option available. Information on product release and TDL/add-ons is available in About page. 
  3. No configuration available. All product information is available under F1 (Help) > About.
  4. No configuration available. All product information is available under F1 (Help) > About.

Gateway of Tally > F12 (Configure) > Product & Features > F4 (Manage Local TDL)

  1. Load TDL files on startup
  2. List of TDL files to preload on startup

F1 (Help) > TDL & Add-On > F4 (Manage Local TDLs)

  1. Load selected TDL files on startup
  2. The TDL File Name can be selected as per the file selection experience of TallyPrime.

TallyPrime VS Tally ERP9 Licensing

Navigation/Option
Tally.ERP 9 TallyPrime 

Gateway of Tally > F12 (Configure) > Licensing > Update License

  1. Administrator e-mail ID
  2. Tally.NET password

F1 (Help) > Settings > License > Manage License > F5 (Update)

  1. Tally.NET ID
  2. Tally.NET password
Gateway of Tally > F12 (Configure) > Licensing > Surrender License F1 (Help) > Settings > License > Manage License > Ctrl+F7 (Surrender)
Gateway of Tally > F12 (Configure) > Licensing > Renew TSS F1 (Help) > Settings > License > Manage License > F9 (Renew TSS)
Gateway of Tally > F12 (Configure) > Licensing > Configure Existing License F1 (Help) > Settings > License > Manage License > F4 (Use License from Network) > Configure License Manually

Also Checkout All new TallyPrime Pivot Report


Ledger wise monthly summary

Ledger wise monthly summary free Tally TDL | Best Tally Prime and Tally ERP 9 TDL to generate MIS reports | 2022 best free Tally TDL for Tally Prime

Ledger wise monthly summary will help to summarized all our sales. We all want to do business properly and generate reports as per requirements. With this free Tally Prime TDL and Tally ERP9 TDL we can generate ledger wise columnar monthly summary to create MIS reports and reconcile GST etc. Generate useful reports with this free Tally TDL file.

Ledger wise monthly summary:

In this Tally Prime and Tally ERP TDL we can add some additional fields or we can remove extra fields according to our need, and this will work perfectly with Tally Erp9 and Tally Prime. Best simple tdl code to generate MIS reports and GST monthly summary.
HOW TO USE:
    1. Dowload TDL code with provided link
    2. Load in Tally ERP9 or in Tally Prime (Method provided below)
3. Now an extra tab will appear in your Tally main screen (Gateway of Tally) 
 4. Go with the Monthly Summary Tab to see report.
         5. Change date to see the period wise reports.
 

This is best free TDL to have in your Tally . Must have TDL file for Tally ERP9 and Tally Prime that can use for lifetime. 

This free TDL Code will perfectly work with Tally Prime.
Watch above video to learn :
1. How to load TDL file in Tally.
2. How to see the period wise GST summary with all ledgers.
3. And Many More…….
HOW TO USE TDL CODE:
 
FOLLOW THE BELLOW INSTRUCTIONS TO LOAD TDL FILE IN TALLY:
 
1. Download TDL file with below Download button.
2. Save into your computer.
3. Copy the text file path including Name and extension (as – C:UsersHPDesktoprecParty Detail.txt)
4. Open Tally ERP9  OR Tally Prime
5a. Press F12 and goto Product and Features (for Tally ERP9)
5b. Click on Help and click on TDL & Addon  (for Tally Prime)
5. Press F4 (to open a Box)
6. Load TDL file on Startup – Yes
7. Paste The path in blank space
8. Press enter and save 


Now your TDL is ready to use.
Download TDL file with below download button
Add own field in GST section in Invoice Print

Add own field in GST section in Invoice Print | Free TDL code to Modify GST Invoice | 2022 Best Tally Prime and Tally ERP9 TDL to modify GST in Invoice

With this GST Invoice Modification TDL code Add own field in GST section in Invoice Print. Now provide colorful GST invoice to your customers with modification of GST fields. With this Tally TDL code we can customize GST section of Invoice. We can add own field in GST Summary of Invoice Printing and also can Change Title / Header name of GST section in invoice print with color and headings and border etc. With this TDL code we can add quantity summary and HSN code in Tally Invoice GST section.

Add own field in GST section in Invoice Print:

In this Tally Prime and Tally ERP TDL code we can add some additional fields or we can remove extra fields according to our need, and this will work perfectly with Tally Erp9 and Tally Prime. Best simple tdl code to customize GST fields of Invoice.
 
HOW TO USE:
 
    1. Copy below code and make a text file.
    2. Save text file then load in Tally ERP9 or in Tally Prime (Method provided below the code)3. Now go invoice print to see details.
 

This is best free TDL to have in your Tally . Must have TDL file for Tally ERP9 and Tally Prime that can use for lifetime. 

This free TDL Code will perfectly work with Tally Prime.
Watch above video to learn :
1. How to modify GST section of Invoice.
2. How to add color and own details in Tally invoice.
3. And Many More…….
TDL Code : 
 
 
[#Line:GST VCHGSTInvPrintBody]
Add:Right Field:Before:VCHGSTInvPrint TaxValue:LearnWellQTn
Local:Field:LearnWellQTn:Set As:$$Sprintf:”%s %s”:$LWQTN:$LWQTNUnit
[Field:LearnWellQTn]
Use:Name Field
Width:7
Align:Centre
 
[#Line:VCHGSTInvPrint Title1]
Local:field:LearnWellQTn:Set as:”Qty”
Local:field:LearnWellQTn:PrintBG:Blue
Local:field:LearnWellQTn:PrintFG:Red
Local:Field:VCHGSTInvPrint TaxValue:PrintBG:Yellow
Local:Field:VCHGSTInvPrint TaxValue:Info:GSTR
 
[#Line:VCHGSTInvPrint Title2]
Local:field:LearnWellQTn:Set as:”Total”
Local:field:LearnWellQTn:PrintBG:Blue
Local:Field:VCHGSTInvPrint TaxValue:PrintBG:Green
 
 
[#Line:GST VCHGSTInvPrint Total]
Local:field:LearnWellQTn:Set as:” “
 
[#Collection:GSTAnalysisPrintSummary]
Aggr Compute:LWQTN:Sum:$GSTItemActualQty
Compute:LWQTNUnit:$GSTStockItemUOM
 
HOW TO USE ABOVE CODE:
 
FOLLOW THE BELLOW INSTRUCTIONS TO LOAD TDL FILE IN TALLY:
 
1. Copy the code and paste in a Text file.
2. Save the text file into your computer.
3. Copy the text file path including Name and extension (as – C:UsersHPDesktoprecParty Detail.txt)
4. Open Tally ERP9  OR Tally Prime
5a. Press F12 and goto Product and Features (for Tally ERP9)
5b. Click on Help and click on TDL & Addon  (for Tally Prime)
5. Press F4 (to open a Box)
6. Load TDL file on Startup – Yes
7. Paste The path in blank space
8. Press enter and save 


Now your TDL is ready to use.

Excel to Tally Ecommerce

Excel2Tally-Ultimate_Ecommerce | Import E-Commerce Data into Tally and file GST on time | Best E commerce data import software

This is Excel to Tally Ultimate E commerce Automation to Import your E-Commerce Data Entry into Tally with Easy and quick way. With this software we can import Masters and Vouchers with every detail. It work perfectly with Tally ERP9 and Tally Prime. Support GST and Vat Entries. It holds below features that make it best Excel to Tally E-Commerce Data Import software :

  • Real time connection with Tally
  • Match Excel sheet Ledgers and Stock Items direct with Tally and generate uncreated masters list.
  • Direct One Click entry with excel ribbon feature.
  • Auto Calculation columns of Cell address, Round off, Taxable Value etc with Validate Button
  • Every time 25000 Entries with one click. Use lifetime and do unlimited entries.
  • Import All E-Commerce portal data with single sheet by data picking feature.
  • Direct Import button to choose E-Commerce portal files (Sales/settlement etc.) without any changes.
  • Small and supportive file, work with every version of Excel
  • Prevent Duplicate Entries. (Same voucher number entries will not done twice).
  • Auto track to support multiple item in single voucher entry.
  • Different Buttons (Clear, Import File, Validate, Post Master, Post Voucher including XML generation) in Excel Ribbon.
  • Most simple import process make it best in this segment.
 

Contains below Sheets to powerup Data Entry work:
VOUCHERS:
1. FULL DETAILED INVENTORY VOUCHERS. AND WITHOUT INVENTORY VOUCHERS IN SAME SHEET.
2. WITH CLEAR, IMPORT, VALIDATE, POST MASTER AND POST VOUCHER BUTTONS IN EXCEL RIBBON.
3. GET CSV, TEXT, EXCEL FORMATS DIRECTLY IN TO THE SHEET.
4. AUTO CALCULATION FIELDS TO RELATE VOUCHERS AND ITEMS.
5. SAME AMAZON, FLIPKART, MEESHO, GLOWROAD, SNAPDEAL, UDAAN, PAYTM, SIMSIM, MOGLIX, WMALL ETC SHEETS FORMAT INCLUDING OTHER ALL TYPE SUPPORTIVE FORMATS.
6. WITH TCS AND GST EFFECTS
7. NO BOUNDATION FOR DATES, USE LIFETIME
8. MANUAL AND AUTOMATIC VOUCHER NUMBER SUPPORT WITH REFERENCE NUMBER
9. DEBIT CREDIT WILL CALCULATE AUTOMATIC
10. ALL LEDGERS WITH SHIPPING, WRAP, DISCOUNT, GST ,TCS ETC.
11. PARTY STATE AND PLACE OF SUPPLY
12. SUPPORT BILLWISE DETAILS
13. GST DETAIL FOR CREDIT AND DEBIT NOTES
14. ALL MASTERS LIKE, LEDGER, STOCK, UNIT ETC. CREATE WITH VOUCHER SHEET.
15. NO MORE DUPLICATE VOUCHERS. ALWAYS CREATE UNIQUE VOUCHERS.

SETTLEMENT:
1. SPECIAL SETTLEMENT VOUCHER
2. WITH MULTIPLE REFERENCE ENTRY
3. DIRECET GET TEXT / CSV / EXCEL FILES INTO THE SHEET
4. AUTOMATIC CALCULATIONS AND SUMMURISED IN SAME SHEET
5. WITH CLEAR, IMPORT, VALIDATE, POST MASTER AND POST VOUCHER BUTTONS IN RIBBON.
6. SAME SETTLEMENT FORMATS AS DOWNLOADED FROM ECOMMERCE WEBSITE
7. POSTING BANK RECEIPT AND EXPENSES JOURNAL AT SAME TIME.
8. WITH GSTR 2A AND 3B EFFECT
9. MASTERS WILL CREATE WITH SAME SHEET AT ENTRY TIME
10. ALL TYPE ECOMMERCE DATA IMPORT WITH SAME SHEET.

BANK-VCH:
1. BANK IMPORT WITH SIMPLE BANK FORMAT
2. AUTOMATIC VOUCHER SELECTION
3. SEPARATE CONTRA VOUCHER TYPE
4. NO BOUNDATION FOR DATES, USE LIFETIME
5. ENTRIES DONE WITH RECONCILATION
6. DEBIT AND CREDIT LEDGER OPTION IN SAME COLUMN
7. SHEET HAS MACRO BUTTONS: MASTER CHECK, TALLY LEDGER ALTER, POST IN TALLY.

*SIMPLE AND FASTEST SHEET
*IMPORT ALL ECOMMERCE DATA WITH SINGLE SHEET
*UTILITY ALSO HAVE HELP SHEET, READ CAREFULLY BEFORE USE.
*EVERY BUTTON HAS HELP OPTION WITH IT. MOVE CURSOR ON BUTTONS TO GET HELP.

Watch the above video to how to use.
WEBSITE : www.Learnwells.com and https://e2t.in
EMAIL :Learnwells@outlook.com, admin@e2t.in
YOUTUBE : https://www.youtube.com/learnwell/c
FACEBOOK: https://www.facebook.com/learnswell/
CONTACT NO. +91-9131810293 (ASHISH SINGH)

Download with below button:

Bank Detail in Ledger Summary with Party GST and Mobile Number

Bank Detail in Ledger Summary with Party GST and Mobile Number | Best Free Tally Prime and Tally ERP9 TDL Code | 2021 Free TDL file for Tally

With this free Tally TDL add Bank Detail in Ledger Summary with Party GST and Mobile Number. Sometime our outstanding were increased and want to collect from customer, so we provide ledger summary to our customers. If you use Tally software to do accounting and generate ledger details of customer then you can modify your ledgers by adding your bank details and Party phone number and GST number with this simple Tally TDL code.
With this Tally TDL code we can add some extra fields like our bank details to collect payment timely and Party Mobile Number and GST Details in Ledger Account screen. And can provide a perfect ledger to our customers.

Bank Detail in Ledger Summary with Party GST and Mobile Number:

In this Tally Prime and Tally ERP TDL code we can add some additional fields or we can remove extra fields according to our need, and this will work perfectly with Tally Erp9 and Tally Prime. Best simple tdl code to customize Ledger account of Sundry Debtors and Creditors.
HOW TO USE:
 
    1. Copy below TDL code and make a text file.
    2. Save text file then load in Tally ERP9 or in Tally Prime (Method provided below the code)3. Now go for ledger account to see details.
 

This is best free TDL to have in your Tally . Must have TDL file for Tally ERP9 and Tally Prime that can use for lifetime. 

This free TDL Code will perfectly work with Tally Prime.
Watch above video to learn :
1. How to modify Ledger details.
2. How to add our own details.
3. And Many More…….
TDL Code : 
 
 
[#Form:Normal Ledger]
Add:Part:at end:LearnWellBank
[Part:LearnWellBank]
Add:Line:LearnWellBDL
[Line:LearnWellBDL]
Option:Small size line
Fields:Simple Field
Border:Thin box
Local:Style:Default:Bold:Yes
Local: Field:Simple Field:Set as:$$String:”Bank Detail: State bank of India, A/c No. 556445665456, IFSC:sbin004564, Branch: Delhi “
Local: Field:Simple Field:Full width:Yes
Local: Field:Simple Field:align:Center
Local: Field:Simple Field:Border:Thin Bottom
 
[#Part:DSP Report Title]
Add:Line: Before: DSP ReportPeriod:LearnWellMobGST
[Line:LearnWellMobGST]
Field:Short Prompt
Local: Field:Short Prompt:Set As:”GST No.: ” + $PartyGSTIN:Ledger:#LedgerName + ” , ” + “Mobile No.: ” + $LedgerMobile:Ledger:#LedgerName
Local: Field:Short Prompt:Full Width:Yes
Local: Field:Short Prompt:Align:Center
Local: Field:Short Prompt:Border:Thin Bottom
 
HOW TO USE ABOVE CODE:
 
FOLLOW THE BELLOW INSTRUCTIONS TO LOAD TDL FILE IN TALLY:
 
1. Copy the code and paste in a Text file.
2. Save the text file into your computer.
3. Copy the text file path including Name and extension (as – C:UsersHPDesktoprecParty Detail.txt)
4. Open Tally ERP9  OR Tally Prime
5a. Press F12 and goto Product and Features (for Tally ERP9)
5b. Click on Help and click on TDL & Addon  (for Tally Prime)
5. Press F4 (to open a Box)
6. Load TDL file on Startup – Yes
7. Paste The path in blank space
8. Press enter and save 


Now your TDL is ready to use.

Billing Type

Billing Type, Collection Type, Sales Person etc. in Voucher and Report of Tally | Add your own drop down list in Voucher and Report of Tally | 2021 Best Free Tally TDL Code

Billing Type, Collection Type, Sales Person etc. in Voucher and Report of Tally. If you use Tally for accounting purpose, then can do lots of things and generate reports according to your need. In this segment I have something special for your Tally Prime and Tally ERP9. Now we can add Billing Type, Collection Type, Sales Person etc. as a drop down list or table in Voucher screen and in ledger Report of Tally Prime and Tally ERP9.
With this Tally TDL code we can add some extra fields like Billing Type, sales person name, agent name, or any other details in voucher creation screen. And also can create a report of it. As example we can add billing type table like Cash, Cheque, UPI method etc in Sales Voucher to know how will collect payment of this sales invoice and also can generate a report of this. If we add some extra details in invoice, we must generate it’s MIS reports to manage all details smoothly. Yes! with this TDL code also we can generate reports, and all details can see in party Ledger summary.

Billing Type, Collection Type, Sales Person etc. in Voucher and Report of Tally:

In this Tally Prime and Tally ERP TDL code we can add some additional fields or we can remove extra fields according to our need, and this will work perfectly with Tally Erp9 and Tally Prime. Best simple tdl code to customize Voucher, Invoice and generate reports.
HOW TO USE:
 
    1. Copy below  code and make a text file.
    2. Save text file then load in Tally ERP9 or in Tally Prime (Method provided below the code)3. Now go to voucher to add some extra fields
4. Also can see Extra fields details in Party Ledger
 

This is best free TDL to have in your Tally . Must have TDL file for Tally ERP9 and Tally Prime that can use for lifetime. 

This free TDL Code will perfectly work with Tally Prime.
Watch above video to learn :
1. How to modify Voucher
2. How to Modify Invoice
3. How to Modify Ledger Summary
4. And Many More…….
TDL Code : 
 
 
[#Form:Voucher]
add:Top Part:Learnwellbilltype
[part:Learnwellbilltype]
line:LWbillType
[Line:LWbillType]
Field:LWBTfield
[Field:LWBTfield]
Use:Name Field
Storage:LWBillTstorage
Table:LWbillTable
Show Table:Always
skip:$$InAlterMode
Border:Thin Box
Width:3.2 cm
[Table:LWbillTable]
List:Cash,Credit,Cheque,UPI
[System:UDF]
LWBillTstorage:String:5001
 
[#Line:DSP VchAccTitles]
add:Right Field:Before:DSP VCHTypeTitle:LWBTSummaryT
[Field:LWBTSummaryT]
Use:Name Field
Set As:”Bill Type”
 
[#Line:DSP VchDetail]
add:Right Field:Before:DSP VCHType:LWBTSummaryD
[Field:LWBTSummaryD]
Use:Name Field
Set As:$LearnWellBTD
[#Collection:Vouchers of Ledger]
Compute:LearnWellBTD:$LWBillTstorage
 
HOW TO USE ABOVE CODE:
 
FOLLOW THE BELLOW INSTRUCTIONS TO LOAD TDL FILE IN TALLY:
 
1. Copy the code and paste in a Text file.
2. Save the text file into your computer.
3. Copy the text file path including Name and extension (as – C:UsersHPDesktoprecParty Detail.txt)
4. Open Tally ERP9  OR Tally Prime
5a. Press F12 and goto Product and Features (for Tally ERP9)
5b. Click on Help and click on TDL & Addon  (for Tally Prime)
5. Press F4 (to open a Box)
6. Load TDL file on Startup – Yes
7. Paste The path in blank space
8. Press enter and save 


Now your TDL is ready to use.

Free Excel to Tally Import Learnwell

Free Excel to Tally

Import your Excel files of Payment, Receipts in few seconds, with this free Excel to Tally Import web page.

Also checkout Excel to Tally Prime 3.0

Free Excel to Tally Import:

Watch Video carefully and Click on Click Here button. A new Excel to Tally webpage will be open. There you can fill your data and can Generate XML for Tally. It will support for Payment And Receipt Vouchers. This Excel to Tally XML generator create XML file very quickly.

Modify Print Option in Tally Prime

Modify Print Option in Tally Prime | Add Automatic Print preview, Change Copy Button, Change Printer Button | Add Logo in Print options in Tally Prime | 2021 best Tally Prime Free TDL Download

With this TDL Modify Print Option in Tally Prime. If you want to make Tally more efficiency and working fast, you must add TDL files in Tally. If want to Invoicing fast and take fast invoicing printing, you are in right place. Yes! Now we can modify print option of Tally Prime and Tally ERP9 with simple TDL code. We can add extra buttons like change copy button, change printer button and also can modify print settings of Tally. In this Free Tally TDL Code we will add logo instead of written text in print button options and also add some new buttons and modify it. This Tally TDL code also add logos in Tally EXPORT / IMPORT options.

Modify Print Option in Tally Prime:

With this Free Tally TDL  code we can add our own print options with logo in Tally print configuration. Print options can modify according to our need.In this Tally Prime and Tally ERP TDL code we can add some additional fields or we can remove extra fields according to our need, and this will work perfectly with Tally Erp9 and Tally Prime. Best simple tdl code to customize Printing options in Tally.
 
HOW TO USE TDL CODE IN TALLY PRIME AND IN TALLY ERP9:
 
    1. Copy below TDL code and make a text file.
    2. Save text file then load in Tally ERP9 or in Tally Prime (Method provided below the code)3. Now go to take invoice print or other reports print in Tally to see modifications.
 

This is best free TDL to have in your Tally . Must have TDL file for Tally ERP9 and Tally Prime that can use for lifetime. 

This free TDL Code will perfectly work with Tally Prime.
Watch above video to learn :
1. How to modify Print Options of Tally
2. How to add logo and extra buttons in Tally Print.
3. And Many More…….
Free TDL Code : 
 
 
[#Button: PrintExp Configure]
    Image               : ShowImageConfig
[Resource: ShowImageConfig]
    Source             :C:UsersHPDesktoplogoconfig.jpg
    Resource Type     : Jpeg
 
[#Button: PrintExp Preview]
    Image               : ShowImagePreview
[Resource: ShowImagePreview]
    Source             : C:UsersHPDesktoplogopreview.jpg
    Resource Type     : Jpeg
 
[#Button: SVPrintAction]
ActionEx : Set Var : Set : SVPreview : Yes
ActionEx : Form Accept : Form Accept
Image               : ShowImagePrint
[Resource: ShowImagePrint]
    Source             : C:UsersHPDesktoplogoprint.jpg
    Resource Type     : Jpeg
 
[#Part: Print Buttons]
        Add: Button: At End: Change Printer,Change Copies
[#Button: Change Printer]
    Use : InlineButton Template Large
    Title : $$LocaleString:”Printer”
    Space Left : 1.25% Screen
Image               : ChangePrinters
[Resource: ChangePrinters]
    Source             : C:UsersHPDesktoplogochangeprinter.jpg
    Resource Type     : Jpeg
 
[#Button: Change Copies]
Use : InlineButton Template Large
Title : $$LocaleString:”Copies”
Space Left : 1.25% Screen
Action : Execute : Vch Set Print Copies
Image               : CopiesPrint
[Resource: CopiesPrint]
    Source             : C:UsersHPDesktoplogocopies.jpg
    Resource Type     : Jpeg
* Change source image path as per your computer in above code.
 
HOW TO USE ABOVE TDL CODE:
 
FOLLOW THE BELLOW INSTRUCTIONS TO LOAD TDL FILE IN TALLY:
 
1. Copy the code and paste in a Text file.
2. Save the text file into your computer.
3. Copy the text file path including Name and extension (as – C:UsersHPDesktoprecPrint.txt)
4. Open Tally ERP9  OR Tally Prime
5a. Press F12 and goto Product and Features (for Tally ERP9)
5b. Click on Help and click on TDL & Addon  (for Tally Prime)
5. Press F4 (to open a Box)
6. Load TDL file on Startup – Yes
7. Paste The path in blank space
8. Press enter and save 


Now your TDL is ready to use.

Quick Entry posting TDL | Bulk Entry posting TDL | 2021 Best Tally TDL to post Bulk entries Quickly | Free Download Tally Prime and Tally ERP9 TDL file

With Quick Entry Posting TDL we can post entries quickly and right way. We all know how important is time. Everybody have less time and want to save time for other work. If we have enough time, we can do our work perfectly.
If we talk about tally entry posting system, first open voucher sheet then fill it and save, after that next voucher. But now with this Free Tally Bulk posting TDL file we can do entries easily with multi voucher at same time. In this we can fill voucher detail in a row one by one and save all voucher lists by once. 
 
Yes! bulk entry posting is possible with this free Tally TDL (Tally Definition Language) file. Now post bulk entries with oneclick.

Quick Entry posting TDL:

In this Tally Prime and Tally ERP TDL code we can add some additional fields or we can remove extra fields according to our need, and this will work perfectly with Tally Erp9 and Tally Prime. Best simple tdl code to generate MIS reports.
HOW TO USE:
    1. Dowload TDL code with provided link
    2. Load in Tally ERP9 or in Tally Prime (Method provided below)
3. Now an extra tab will appear in your Tally main screen (Gateway of Tally) 
    4. Go with the Quick Entry Tab to create bulk vouchers.
 

This is best free TDL to have in your Tally . Must have TDL file for Tally ERP9 and Tally Prime that can use for lifetime. 

This free TDL Code will perfectly work with Tally Prime.
Watch above video to learn :
1. How to load TDL file in Tally.
2. How to enter bulk vouchers
3. And Many More…….
HOW TO USE TDL CODE:
 
FOLLOW THE BELLOW INSTRUCTIONS TO LOAD TDL FILE IN TALLY:
 
1. Download TDL file with below Download button.
2. Save into your computer.
3. Copy the text file path including Name and extension (as – C:UsersHPDesktoprecParty Detail.txt)
4. Open Tally ERP9  OR Tally Prime
5a. Press F12 and goto Product and Features (for Tally ERP9)
5b. Click on Help and click on TDL & Addon  (for Tally Prime)
5. Press F4 (to open a Box)
6. Load TDL file on Startup – Yes
7. Paste The path in blank space
8. Press enter and save 


Now your TDL is ready to use.
Download TDL file with below download button