Now no one can delete entries. Yes in Tally sometime we delete entries by mistake and can not recover again if not have backup.
So in this post provided a simple TDL code to Prevent deletion. With this TDL when we delete any entries, delete will not work. if want to delete you need to remove tdl file from your Tally.
In this Tally Prime and Tally ERP TDL code we can add some additional fields or we can remove extra fields according to our need, and this will work perfectly with Tally Erp9 and Tally Prime. Best simple tdl code prevent entries from deletion.
HOW TO USE:
1. Copy below TDL code and make a text file.
2. Save text file then load in Tally ERP9 or in Tally Prime (Method provided below the code) 3. Now go for delete any voucher, we can not able to delete.
This is best free TDL to have in your Tally . Must have TDL file for Tally ERP9 and Tally Prime that can use for lifetime.
This free TDL Code will perfectly work with Tally Prime.
Watch above video to learn :
1. How to disable or inactive delete option in Tally
2. How to inactive line option and key option of delete button
3. And Many More…….
TDL Code :
[#Key:Form delete]
Inactive:Yes
[#Key:Delete Line Object]
Inactive:Yes
[#Key:Delete Line object Ex]
Inactive:Yes
[#Key:Bottom ToolbarBTn3]
Inactive:Yes
[#Line:Dsp VCH detail]
Delete Key:Delete Line Object
[#Form:Voucher]
[#Key:Bottom ToolbarBTn3_Delete]
Inactive:Yes
HOW TO USE ABOVE CODE:
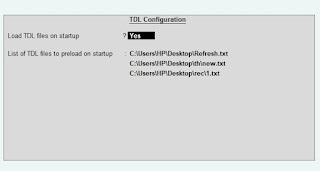
FOLLOW THE BELLOW INSTRUCTIONS TO LOAD TDL FILE IN TALLY:
1. Copy the code and paste in a Text file.
2. Save the text file into your computer.
3. Copy the text file path including Name and extension (as – C:UsersHPDesktoprecParty Detail.txt)
4. Open Tally ERP9 OR Tally Prime
5a. Press F12 and goto Product and Features (for Tally ERP9)
2. Save the text file into your computer.
3. Copy the text file path including Name and extension (as – C:UsersHPDesktoprecParty Detail.txt)
4. Open Tally ERP9 OR Tally Prime
5a. Press F12 and goto Product and Features (for Tally ERP9)
5b. Click on Help and click on TDL & Addon (for Tally Prime)
5. Press F4 (to open a Box)
6. Load TDL file on Startup – Yes
7. Paste The path in blank space
8. Press enter and save
6. Load TDL file on Startup – Yes
7. Paste The path in blank space
8. Press enter and save


