


With this free TDL code we can add Party Mobile Number and Party GST Number in Voucher screen of Sales, Purchase, etc.that will help to communicate with customer and increase productivity and accuracy of our work.
We can modify this TDL code according to our need. We can add some additional fields, we can remove extra fields, and it is very simple to work with Tally Erp9 and Tally Prime. Best simple code to work with party mobile number and GST number at invoice time.
HOW TO USE:
1. Load below Party Mobile and GST TDL code in Tally ERP9 or in Tally Prime (Method provided below the code)
2. Now go for invoicing in sales voucher / purchase voucher and select party to bill.
3. Now we can see Mobile number and GST number of billing Party.
4. No changes in invoice printing.
This is best free TDL to have in your Tally . Must have TDL file for Tally ERP9 and Tally Prime that can use for lifetime.
This free TDL Code will work in all Tally versions. for more detail watch above Video.
TDL Code :
[#Line:EI Consignee]
Field:MobileLWT
Left Fields:MobileLWD,GSTLWD
Border:Thin Bottom
[Field:MobileLWT]
use:Medium Prompt
Set As:”MoNo/GST”
[Field:MobileLWD]
Use:Name field
Set As:$LedgerMobile:Ledger:#EIConsignee
Color:Blue
skip:Yes
[Field:GSTLWD]
Use:Name field
Set As:$PartyGSTIN:Ledger:#EIConsignee
Color:Blue
skip:Yes
HOW TO UPLOAD ABOVE CODE IN TALLY:
FOLLOW THE BELLOW INSTRUCTIONS TO LOAD TDL FILE IN TALLY:
1. Copy the code and paste in a Text file.
2. Save the text file into your computer.
3. Copy the text file path including Name and extension (as – C:UsersHPDesktoprecParty Detail.txt)
4. Open Tally ERP9 OR Tally Prime
5a. Press F12 and goto Product and Features (for Tally ERP9)
2. Save the text file into your computer.
3. Copy the text file path including Name and extension (as – C:UsersHPDesktoprecParty Detail.txt)
4. Open Tally ERP9 OR Tally Prime
5a. Press F12 and goto Product and Features (for Tally ERP9)
5b. Click on Help and click on TDL & Addon (for Tally Prime)
5. Press F4 (to open a Box)
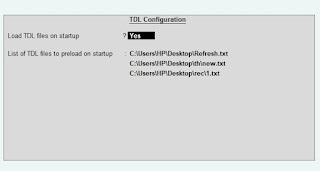
6. Load TDL file on Startup – Yes
7. Paste The path in blank space
8. Press enter and save
6. Load TDL file on Startup – Yes
7. Paste The path in blank space
8. Press enter and save

Now your TDL is ready to use.


