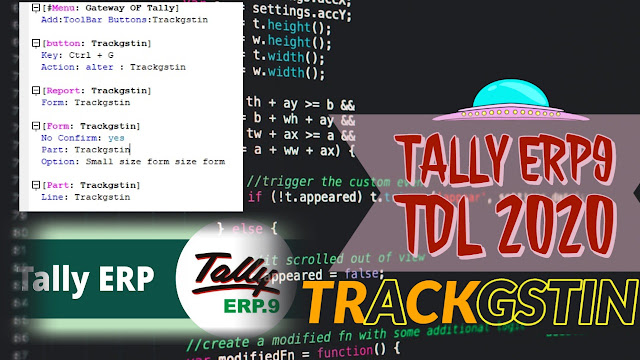
EXCEL 2 TALLY – REGULAR

THIS EXCEL2TALLY-REGULAR SOFTWARE HELP YOU TO EXPORT EXCEL DATA INTO TALLY ERP OR OTHER VERSION OF TALLY LIKE TALLY 7.2, TALLY ERP 9, TALLY ERP, OR GST READY TALLY .. IT IS VERY USEFUL SOFTWARE AND SAVE YOUR LOTS OF TIME. NO RENEWAL REQUIRED- USE LIFETIME WITH MULTI COMPUTER.
NOW YOU CAN GENERATE XML FOR TALLY OF YOUR EXCEL SHEET DATA WITHIN A SECOND WITH BELOW DETAILS:
LEDGER MASTER  – WITH GST NUMBER, FULL ADDRESS, FULL CONTACT DETAILS, OPENING BALANCE, SET CREDIT LIMITS, SET INTEREST,  AND WITH BILL WISE OPENING DETAILS.
STOCK MASTER – WITH HSN CODE, ALIAS, OPENING, MRP RATES, STANDARD RATES, BATCH DETAILS.
A.S-I VOUCHER : – WITH THIS VOUCHER SHEET YOU CAN GENERATE ENTRIES WITH SIMPLE FORMAT. DIRECT COPY PASTE FROM YOUR DATA. CONSIGNEE DETAILS, BUYERS DETAILS. , DISPATCH DETAILS, WITH SINGLE BILL WISE REFERENCE. WITH TAX CLASSIFICATION DETAILS. SUITABLE FOR ADVANCE SALES , PURCHASE VOUCHERS AND CREDIT NOTE , DEBIT NOTES, RECEIPT NOTE, DELIVERY NOTES, SALES ORDER, PURCHASE ORDER VOUCHERS AS PER GST NORMS WITH STOCK ITEM DETAILS INCLUDING GODOWN, MULTIPLE BATCHES FOR EVERY STOCK ITEMS, WITH ITEM DESCRIPTION AND WITH ORDER TRACKING SYSTEM FOR EVERY STOCK ITEM. ALSO CAN USE FOR PHYSICAL STOCK VOUCHERS.
ALL IN ONE VOUCHER SHEET – WITH THIS SHEET YOU CAN IMPORT YOUR ALL VOUCHERS – SALES, PURCHASE, RECEIPT, PAYMENT, CONTRA, JOURNAL ETC WITH MULTIPLE BILL WISE REFERENCE AT A TIME.
.
A.A.-VC H– WITH THIS SHEET YOU CAN IMPORT SALES, PURCHASE, DEBIT NOTE, CREDIT NOTE ETC ENTRIES WITH BILL WISE DETAIL AND WITHOUT INVENTORY WITH SIMPLE FORMAT.
M-TH VOUCHER : – WITH THIS VOUCHER SHEET CAN GENERATE MULTI VOUCHER TYPE WITH THOUSANDS OF LEDGER IN ONE VOUCHER. (FOR EXAMPLE IF YOU GO TO TAKE ENTRIES FOR JOURNAL, SALES, PURCHASE, RECEIPT, CONTRA, PAYMENT, DR. NOTE, CR. NOTE ETC AT A TIME AND YOUR ONE VOUCHER HAS MANY LEDGERS LIKE HUNDRED OR THOUSANDS LEDGERS IN ONE VOUCHER, YOU CAN USE THIS SHEET).
YOU CAN USE IT FOR LIFETIME, NOW RENEWAL REQUIRED
YOU CAN USE IT IN MULTIPLE COMPUTERS.
MO.NO.- 9131810293
EMAIL :- LEARNWELLS@OUTLOOK.COM

FORMAT DOWNLOAD DIRECT LINK : DOWNLOAD FORMAT

DOWNLOAD FULL VERSION CLICK BELOW DOWNLOAD BUTTON :


TRACK GSTIN

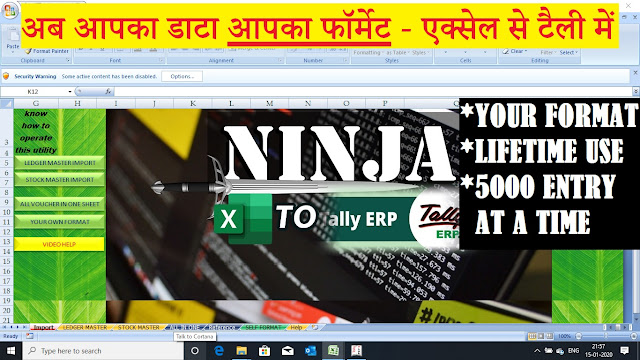
TDL (Tally Definition Language) are very useful for Tally Accounting Software. Today I have something special for your tally software.
This is GSTIN Tracker. Now you can Search Party GST No. with one click.
Just select party name and find GST number of Customer.

The TDL Code is as under :

[#Menu: Gateway OF Tally]
Add:ToolBar Buttons:Trackgstin

[button: Trackgstin]
Key: Ctrl + G
Action: alter : Trackgstin

[Report: Trackgstin]
Form: Trackgstin

[Form: Trackgstin]
No Confirm: yes
Part: Trackgstin
Option: Small size form size form

[Part: Trackgstin]
Line: Trackgstin

[Line: Trackgstin]
Field: Ledgersselect,Short Name field
Local: Field:Short Name field: Set as: $PartyGSTIN:ledger:#Ledgersselect

[Field: Ledgersselect]
Use: Short Name field
Table: Ledger
Show Table: Always

FOLLOW THE BELLOW INSTRUCTIONS TO LOAD TDL FILE IN TALLY:

1. Copy the code and paste in a Text file.
2. Save the text file into your computer.
3. Copy the text file path including Name and extension (as – C:UsersHPDesktoprecParty Detail.txt)
4. Open Tally ERP9 
5. Press F12 and goto Product and Features
5. Press F4 (to open a Box)
6. Load TDL file on Startup – Yes
7. Paste The path in blank space
8. Press enter and save 


Now your TDL is ready to use.


LEDGER CLOSING TDL

TDLs are very useful if you use Tally accounting software. With TDL (Tally Definition Language) files we can modified Tally software and it’s reporting according to our needs. So today I have something special for you.

Sometime when we take ledger print or mail to our debtors or creditors for outstanding collection or payments, we need to fill closing balance in word form also. So this Tally TDL file will help you to add party closing balances in words.

The code is as under : 


[System: Formulae]
IfAmtthenOnlystring : If @@VchClg = 0 Then “” Else $$String:” Only”

[#Line: DSP VchClAmt]
Add : Left Field : ClBalinWord
Local : Field : Default: Style: normal bold
Local : Field : Default: Background: lily white
Local : Field : Default: Color: Blue 
Border: Thin Top Bottom:($$LineNumber = $$LastLineNumber ) AND $$InPrintMode


[#Line: LV FCthree]
Add : Left Field:ClBalinWord1
Local : Field : Default: Style: normal bold
Local : Field : Default: Background: lily white
Local : Field : Default: Color: Blue 
Border: Thin Top Bottom:($$LineNumber = $$LastLineNumber ) AND $$InPrintMode

[Field: ClBalinWord]
Set as: $$InWords:@@VchClg + @@IfAmtthenOnlystring
Color: Blue
Style: Large Bold 

;;www.learnwells.com

[Field: ClBalinWord1]
Set as:$$InWords:@@BalanceVchDrCrAmt + ” Only “
Color: Blue
Style: Large Bold
Print FG:Red
Indent:10
Width:50% Screen
Lines:0


FOLLOW THE BELLOW INSTRUCTIONS TO LOAD TDL FILE IN TALLY:

1. Copy the code and paste in a Text file.
2. Save the text file into your computer.
3. Copy the text file path including Name and extension (as – C:UsersHPDesktoprecParty Detail.txt)
4. Open Tally ERP9 
5. Press F12 and goto Product and Features
5. Press F4 (to open a Box)
6. Load TDL file on Startup – Yes
7. Paste The path in blank space
8. Press enter and save 


Now your TDL is ready to use.


ITEM AND LEDGER SUMMARY

WITH THIS TALLY TDL FILE YOU CAN SEE ITEM WISE SALE SUMMARY AND PARTIES VOUCHER WISE TRANSACTION REPORTS. IT WILL BE VERY USEFUL FOR OUTSTANDING COLLECTION AND FOR STOCK SUMMARY.

[#Menu: Display Menu] Add: Item: Unique Sale Summary : Menu: Unique Sale Summary [Menu: Unique Sale Summary] Key Item: ITEM WISE : T : Display : ProductwiseRpt Item : Blank Key Item: LEDGER SUMMARY : S : Display Collection: TransVchLedgerColl Item : Blank [Report: LWLL] Use : DSP Template Form : LWLL Variable : DoSetAutoColumn, PName Repeat : PName Set : DoSetAutoColumn : Yes Set : DSPRepeatCollection : “LEARN Party” Set : SVFromDate : $$MonthStart:##SVCurrentDate Set : SVToDate : $$MonthEnd:##SVCurrentDate [Form: LWLL] Use : DSP Template Parts : LWLL Background : White, Light Orange Option : Set Auto Vch Option : ##DoSetAutoColumn AND $$SetAutoColumns:PName [!Form: Set Auto Vch Option] [Part: LWLL] Lines : LWLL Title, LWLL Details BottomLines : LWLL Total Repeat : LWLL Details : Smp Stock Item Scroll : Vertical CommonBorder: Yes Total : LWLL Party, LWLL Col Total [Line: LWLL Title] Use : LWLL Details Local : Field : Default : Type : String Local : Field : Default : Align : Center Local : Field : LWLL Name : Set as : “Particulars” Local : Field : LWLL Name : Widespaced: Yes Local : Field : LWLL Party : Set as : ##PName Local : Field : LWLL Party : Lines : 0 Local : Field : LWLL ColTotal : Set as : “Total” Border : Flush Totals [Line: LWLL Details] Fields : LWLL Name, LWLL Party, LWLL Col Total Repeat : LWLL Party Total : LWLL Party [Field: LWLL Name] Use : Name Field Set as : $IName Display : Stock Vouchers Variable : Stock Item Name [Field: LWLL Party] Use : Qty Primary Field Set as : $$ReportObject:$$CollectionFieldByKey:$BilledQty:@MyFormula:LEARNSummVoucher MyFormula : ##PName + #LEARNRepName Format : “NoZero” Border : Thin Left [Field: LWLL Col Total] Use : Qty Primary Field Set as : $$Total:LEARNRepParty Border : Thin Left [Line: LWLL Total] Fields : LWLL Name, LWLL Party, LWLL Col Total Repeat : LWLL Party Local : Field : Default : Type : String Local : Field : Default : Align : Center Local : Field : LWLL Name : Set as : “Total” Local : Field : LWLL Name : Widespaced: Yes Local : Field : LWLL Party : Set as : $$Total:LEARNRepParty Local : Field : LWLL ColTotal : Set as : $$Total:LEARNRepColTotal Border : Thin Top [Collection: LEARN Voucher] Type : Voucher Filter : IsSalesVT [Collection: LEARN Summ Voucher] Source Collection : LEARN Voucher Walk : Inventory Entries By : PName : $PartyLedgerName By : IName : $StockItemName Aggr Compute : BilledQty : SUM : $BilledQty Search Key : $PName + $IName [Collection: Smp Stock Item] Source Collection : LEARN Voucher Walk : Inventory Entries By : IName : $StockItemName Aggr Compute : BilledQty : SUM : $BilledQty Filter : NonEmptyQty [Collection: LEARN Party] Source Collection : LEARN Voucher Walk : Inventory Entries By : PName : $PartyLedgerName Aggr Compute : BilledQty : SUM : $BilledQty Filter : NonEmptyQty [Variable: PName] Type : String Repeat : ##DSPRepeatCollection [System: Formula] IsSalesVT : $$IsSales:$VoucherTypeName NonEmptyQty : NOT $$IsEmpty:$BilledQty [Report: ProductwiseRpt] Use : DSP Template Form : ProductwiseRpt Title : “Product-wise Sales Summary Report” [Form: ProductwiseRpt] Use : DSP Template Parts : ProductwiseRptHdr, ProductwiseRpt Height : 100% Screen Width : 100% Screen Delete : Buttons : ExplodeFlag Delete : Bottom Buttons : DSPAutoColumns, BudgetAnalysis, ReportConfig [Part: ProductwiseRptHdr] Lines : ProductwiseRptHeader [Line: ProductwiseRptHeader] Field : Name Field Right Field : DSP MainDateTitle Local : Field : Name Field : Set as : $$LocaleString:”Inventory Details” Local : Field : Name Field : Style : Normal Bold Space Bottom: 1 [Part: ProductwiseRpt] Lines : ProductwiseRptTitle, ProductwiseRptInfo Repeat : ProductwiseRptInfo : SummaryColl Scrolled : Vertical Common Borders : Yes Border : Thin Bottom Float : No [Line: ProductwiseRptTitle] Use : ProductwiseRptInfo Local : Field : Default : Type : String Local : Field : Default : Lines : 0 Local : Field : Default : Style : Normal Bold Local : Field : ProductTotalAmt : Align : Centre Local : Field : ProductMaxRate : Align : Centre Local : Field : ProductMinRate : Align : Centre Local : Field : ProductName : Set as : “Particulars” Local : Field : ProductTotalAmt : Set as : “Total Quantity” Local : Field : ProductMaxRate : Set as : “Maximum Rate” Local : Field : ProductMinRate : Set as : “Minimum Rate” Border : Thin Column Titles [Line: ProductwiseRptInfo] Fields : ProductName Right Fields : ProductTotalAmt, ProductMaxRate,ProductMinRate Local : Field : Default : Style : Normal [Field: ProductName] Use : Name Field Set as : $StockItemName Display : Stock Vouchers Variable : Stock Item Name [Field: ProductTotalAmt] Use : Qty Primary Field Set as : $StkTotalQty Border : Thin Left Right Width : 10 [Field: ProductMaxRate] Use : Rate Field Set as : $StkMaxRate Border : Thin Right Width : 10 [Field: ProductMinRate] Use : Rate Field Set as : $StkMinRate Border : Thin Right Width : 10 [Collection: SalesVouchersColl] Type : Voucher Filter : OnlySalesCreditNote [Collection: SummaryColl] Source Collection : SalesVouchersColl Walk : Inventory Entries By : StockItemName : $StockItemName Aggr Compute : StkTotalQty : Sum : $BilledQty Aggr Compute : StkMinRate : Min : $Rate Aggr Compute : StkMaxRate : Max : $Rate Keep Source : No Sort : Default : $StockItemName [System: Formula] OnlySalesCreditNote : $$IsSales:$VoucherTypeName OR $$IsCreditNote:$VoucherTypeName [Collection: TransVchLedgerColl] Use : Ledger Report : Transact Report Trigger : Ledger Name Variable : Ledger Name [Report: Transact Report] Use : DSP Template Form : TransVchReport Variable : Ledger Name [Form: TransVchReport] Use : DSP Template Part : LV Title, TransVchTitle, TransVchBody Width : 100% Screen Height : 100% Screen Delete : Buttons : ExplodeFlag Delete : Bottom Buttons : DSPAutoColumns, BudgetAnalysis, ReportConfig Local: Line : LV Title : Local : Field : LV Title : Local : Field: Simple Prompt : Info : $$LocaleString:”Ledger” Local: Line : LV Title : Local : Field : LV Title : Local : Field: Name Field : Set as : #LedgerName [Part: TransVchTitle] Lines : TransVchTitle [Line: TransVchTitle] Use : TransVchLedDetail Local : Field : Default : Type : String Local : Field : Default : Align : Centre Local : Field : Default : Style : Normal Bold Local : Field : TransVchTypeName : Set as : “Voucher Type Name” Local : Field : TransVchDrAmt : Set as : “Debit Amt” Local : Field : TransVchCrAmt : Set as : “Credit Amt” Border : Thin Top Bottom [Part: TransVchBody] Lines : TransVchLedDetail Bottom Lines: TransVchLedTotal Repeat : TransVchLedDetail : TransVchSummaryColl Scroll : Vertical CommonBorder: Yes Total : TransVchDrAmt, TransVchCrAmt [Line: TransVchLedDetail] Fields : TransVchTypeName Right Fields : TransVchDrAmt, TransVchCrAmt Local : Field : Default : Style : Normal [Field: TransVchTypeName] Use : Name Field Set as : $TransVchName [Field: TransVchDrAmt] Use : Amount Forex Field Set as : $TransVchDrAmt Border : Thin Left Right [Field: TransVchCrAmt] Use : Amount Forex Field Set as : $TransVchCrAmt Border : Thin Right [Line: TransVchLedTotal] Use : TransVchLedDetail Local : Field : Default : Style : Normal Bold Local : Field : TransVchTypeName : Set as : “Total” Local : Field : TransVchDrAmt : Set as : $$Total:TransVchDrAmt Local : Field : TransVchCrAmt : Set as : $$Total:TransVchCrAmt Border : Thin Top Bottom [Collection: TransVchColl] Type : Voucher [Collection: TransVchSummaryColl] SourceCollection: TransVchColl Walk : Ledger Entries By : TransVchName : $VoucherTypeName By : TransVchLed : $LedgerName Aggr Compute : TransVchDrAmt : Sum : If $$IsDr:$Amount then $Amount else “” Aggr Compute : TransVchCrAmt : Sum : If NOT $$IsDr:$Amount then $Amount else “” Filter : TransVchFilter ;; Filtering done here to retrieve only values pertaining to the requested Party [System: Formula] TransVchFilter : #LedgerName = $TransVchLed TransVchOpBal : $OpeningBalance:Ledger:#LedgerName TransVchClBal : $ClosingBalance:Ledger:#LedgerName ;;WWW.LEARNWELLS.COM

FOLLOW THE BELLOW INSTRUCTIONS TO LOAD TDL FILE IN TALLY:

1. Copy the code and paste in a Text file.
2. Save the text file into your computer.
3. Copy the text file path including Name and extension (as – C:UsersHPDesktoprecParty Detail.txt)
4. Open Tally ERP9 
5. Press F12 and goto Product and Features
5. Press F4 (to open a Box)
6. Load TDL file on Startup – Yes
7. Paste The path in blank space
8. Press enter and save 

Now your TDL is ready to use.

Bank Daybook

Bank Daybook

Every business maintain bank, and if we do accounting in Tally Software we all need this TDL file.
TDL (Tally Definition Language) files used to modify Tally Software according to your uses. TDL files are very useful to simplify your work.

With this TDL you can see your bank daybook with narration and its cheque number.Also can edit at a time.It is very nice TDL file for Tally and must have tdl for tally.


[#Menu : Gateway of Tally] Add : Item : Bank Daybook : Display : BankDaybookd [Report:BankDaybookd] Use : DSP Template Set : SVfromDate :##SVfromDate Set : GroupName : ##GroupName Variable : IsMultiPage, InNewPages Set : IsMultiPage : yes Set : InNewPages : yes Set : SVToDate : ##SVCurrentdate Set : SVfromDate : $BooksFrom:Company-:##SVCurrentCompany Variable : BankName : string Set : BankName : “” [Form: BankDaybookd] Button : PrintButton, ExportButton, F2 ChangePeriod, SelectBank Parts :LWBnkDetails, BankLDetails Height : 100% screen Width : 100% screen Background : Light Surf Green [Button : SelectBank] Title : “Select Bank” Key : Alt + B Action : Alter : BankSelection [Report : BankSelection] Form :BankSelection ;Title : BankSelection” [Form : BankSelection] Parts : BankSelection Option : Small Size Form Full Width : No Space Left : 0.5 Space Right : 0.5 [Part : BankSelection] Lines : Form SubTitle, BankSelection Local : Field : Form SubTitle : Info : “Bank Selection” [Line : BankSelection] Fields : Long Prompt, BankSelection Local : Field : Long Prompt : Set as : $$String:”Bank Selection:” Local : Field : Default : width: 15 [Field : BankSelection] Use : Name field Table : BankAccounts, End of List Show Table : Always Sort : Yes Modifies : BankName :Yes Variable :BankName [Variable:BankName] Type : String Persistent : Yes [System:Variables] BankName:”” [Collection : BanknameColl] Type : Ledger Include : Group:$$GroupBank, Group:$$GroupBankOD Belongsto : yes Format : $BankName, 15 Fetch : Name Title : “List of Bank” FullHeight : No Filter: Filterbank [System: Formulae] Filterbank:$Ledgername = ##BankName or $$IsSysName:##BankName Filterbank:$IsBelongsTo:$$GroupBank OR $$IsBelongsTo:$$GroupBankOD [Part:LWBnkDetails] Line: LWBnkDetails Name, LWStts [Line:LWBnkDetails Name] Field: Form Sub Title Local : Field : Form Sub Title : Set as : @@CmpMailName Local : Field : Form Sub Title : Align : Center Local : Field : Form Sub Title : Fullwidth : yes Local : Field : Form Sub Title : Color : Blue Local : Field : Form Sub Title : Border: Thin Bottom Local : Field : Form Sub Title : Style: Large Bold Italic Space Bottom:0.2 [Line : LWStts] Field:LWStts Space Bottom:0.2 [Field:LWStts] Use :Name field Set as : $$LocaleString:”Period ” + $$String:##SVFromDate + ” to ” + $$String:##SVToDate Align : Center Full Width : Yes Color :Black Style :Small bold Italic Background : Light Surf Green [Part: BankLDetails] Lines : BnkTts, BnkLns, Repeat : BnkLns : paymentColl CommonBorder: Yes Scroll : Vertical Border : Thin Bottom [Line : BnkTts] Use : BnkLns Local : Field : Default : Color : Black Local : Field : Default : Background : Light Grey Local : Field : Default : Type : String Local : Field : Default : Align : Centre Local : Field : Default : Line : 0 Local : Field : LWvchDt : Set as : “Vch Date” Local : Field : LWldNm : Set as : “Particulars” Local : Field : LWLptm : Set as : “Naration” Local : Field : LWChqno : Set as : “Cheque No.” Local : Field : LWDramt : Set as : “Withdrawl.” Local : Field : LWCramt : Set as : “Deposit” Border : column Titles [Line: BnkLns] Fields : LWvchDt, LWldNm, LWLptm, Right Fields : LWChqno ,LWDramt, LWCramt Option : AlterOnEnter [Field:LWvchDt] Use : Short Date Field Set as : $Date Format : Short Date, Separator:”-” Border : Thin Left Width : 8 Align : Right Alter : Voucher : $$IsVoucher [Field:LWldNm] Use : Name Field Set As : $AllLedgerEntries[1].LedgerName Border : Thin Left full width:Yes Align : left [Field :LWLptm] Use : Name Field Set as : $Narration Border : Thin Left Width : 30 Align : left [Field:LWChqno] Use : Name Field Set As : $AllLedgerEntries[-1].BankAllocations.InstrumentNumber Border : Thin Left Width :15 Align : Right [Field:LWDramt] Use : Amount Field Set as : If $$IsDr:$Amount then $Amount else “” Format : “Cr/Dr” Border : Thin Left Width :15 Align : Right [Field:LWCramt] Use : Amount Field Set as : If not $$IsDr:$Amount then $Amount else “” Format : “Cr/Dr” Border : Thin Left Width :15 Align : Right [Collection:paymentColl] Type : Vouchers : Ledger Child Of:##BankName belongs to : Yes Fetch : Date, Vouchernumber, VoucherTypeName, Amount, MasterID, LedgerName, Parent,ParentFullLis, Narration, LWDramt, LWCramt Compute:DrAmt:If $$IsDr:$Amount then $Amount else “” Compute:CrAmt:If not $$IsDr:$Amount then $Amount else “” Filter:MYVCH Sort : Default : $Date, $LedgerName [System : Formula] MYVCH:$$IsPayment:$VoucherTypeName or $$IsReceipt:$VoucherTypeName or $$IsContra:$VoucherTypeName


FOLLOW THE BELLOW INSTRUCTIONS TO LOAD TDL FILE IN TALLY:

1. Copy the code and paste in a Text file.
2. Save the text file into your computer.
3. Copy the text file path including Name and extension (as – C:UsersHPDesktoprecParty Detail.txt)
4. Open Tally ERP9 
5. Press F12 and goto Product and Features
5. Press F4 (to open a Box)
6. Load TDL file on Startup – Yes
7. Paste The path in blank space
8. Press enter and save 


Now your TDL is ready to use.


TDL for Tally | REMINDER WITH PRAY

With this TDL file you can pray and set a work reminder, or due dates of Taxes

Very Nice TDL for Tally ERP 9 – Reminder with Pray.
You can Change Image Path in TDL file and Save.
You can Set Reminder Dates and Task in TDL file and Save.
[System : Event]
Prayerstart: system start : true : call : prayer
[FUNCTION : Prayer]
01 : DISPLAY : PrayerReport
[FUNCTION : prayerstopf]
01 : Form Reject to Menu:PrayerForm
[REPORT : PrayerReport]
FORM : PrayerForm
TITLE : “Prayer”
[FORM : PrayerForm]
part : PrayerPart
Part:Messagep
Key:pryerquit
[PART : PrayerPart]
Horizontal Alignment:Centre
Vertical:No
Graph Type : “C:UsersHPDesktoplaxmi_ganesh.jpg”
LINE : PrayerLine 
[LINE : PrayerLine]
Field:prayerfield
[Field:prayerfield]
Set as:””
Full Width:Yes
Key:pryerquit
[Key: pryerquit]
Key : Enter
Action : Form Reject
[PART : Messagep]
LINE : Messagel 
[LINE : Messagel]
Field:Messagef
[Field:Messagef]
Set as:”Press Enter”
Align:Center

[System : Event]
appstart: system start : true : call : Reminder
[FUNCTION : Reminder]
01 : DISPLAY : ReminderReport
[REPORT : ReminderReport]
FORM : ReminderForm
TITLE : “Reminder”
[FORM : ReminderForm]
part : ReminderPart
HEIGHT : 20% screen
WIDTH : 100% screen
Background:Jobimon
[PART : ReminderPart]
LINE : ReminderLine 
[LINE : ReminderLine]
FIELD : NAME FIELD
LOCAL : FIELD : NAME FIELD : INFO : if ($$DayOfDate:$$MachineDate< 6 ) then $$LocaleString:(6-($$DayOfDate:$$MachineDate)) + ” more days are to Reconcile Ledger…..”else if ($$DayOfDate:$$MachineDate< 7 ) then $$LocaleString:(7-($$DayOfDate:$$MachineDate)) + ” more days are to make TDS payment” + 
else if ($$DayOfDate:$$MachineDate< 10 ) then $$LocaleString:(10-($$DayOfDate:$$MachineDate)) + ” more days are to File GRTR1″else if ($$DayOfDate:$$MachineDate< 20 ) then $$LocaleString:(20-($$DayOfDate:$$MachineDate)) + ” more days are to File GSTR 3B” + 
else if (($$MonthOfDate:$$machineDate)=3) then $$LocaleString:(($$MonthEnd:$$machineDate)-$$machineDate) +”  days remaining from year end closing”else $$LocaleString:(($$MonthEnd:$$machineDate)-$$machineDate) +” days remaining from month end closing”
LOCAL : FIELD : NAME FIELD : STYLE : r1
LOCAL : FIELD : NAME FIELD : FULL WIDTH : YES
local : field : name field : Color:White
local : field : name field : align : centre
[Color : Jobimon]
RGB : 102, 0, 255
[Style:R1]
Font: Verdana
Height  : 16
Bold:Yes
FOLLOW THE BELLOW INSTRUCTIONS TO LOAD TDL FILE IN TALLY:

1. Copy the code and paste in a Text file.
2. Save the text file into your computer.
3. Copy the text file path including Name and extension (as – C:UsersHPDesktoprecParty Detail.txt)
4. Open Tally ERP9 
5. Press F12 and goto Product and Features
5. Press F4 (to open a Box)
6. Load TDL file on Startup – Yes
7. Paste The path in blank space
8. Press enter and save 


Now your TDL is ready to use.

EXCEL TO TALLY DATA IMPORT – SELF FORMAT

We take all type entries related to sales, purchase, debit note , credit note, payment, receipt etc to maintain our business perfectly. But some time when  our entries were huge and can not do it manually in tally software (Tally ERP9  most usable software in India). In tally it has very nice feature to maintain our business.
But sometime when our entries are so high in quantity and not possible to enter manually, then we can use Excel to Tally software to take bulk entries.

Now you can enter bulk entries with your won excel format. 
Provide me your Excel format, and next day you can able to import your Data into Tally software

THIS EXCEL2TALLY-NINJA WITH SELF FORMAT SOFTWARE HELP YOU TO EXPORT EXCEL DATA INTO TALLY ERP OR OTHER VERSION OF TALLY LIKE TALLY 7.2, TALLY ERP 9, TALLY ERP, OR GST READY TALLY .. IT IS VERY USEFUL SOFTWARE AND SAVE YOUR LOTS OF TIME. NO RENEWAL REQUIRED- USE LIFETIME WITH MULTI COMPUTER.
NOW YOU CAN GENERATE XML FOR TALLY OF YOUR EXCEL SHEET DATA WITHIN A SECOND.
WITH THIS SOFTWARE YOU CAN GENERATE XML ENTRIES FOR TALLY ERP9 , TALLY9, TALLY 7.2 ETC WITH BELOW DETAILS :
  1. LEDGER MASTER WITH GST NUMBER, FULL ADDRESS, OPENING BALANCE, AND WITH BILL WISE DETAILS.
  2. STOCK MASTER WITH HSN CODE, ALIAS, OPENING, MRP RATES, STANDARD RATES, BATCH DETAILS.
  3. ALL IN ONE VOUCHER SHEET – WITH THIS SHEET YOU CAN IMPORT YOUR ALL VOUCHERS – SALES, PURCHASE, RECEIPT, PAYMENT, CONTRA, JOURNAL ETC WITH MULTIPLE BILL WISE REFERENCE AT A TIME.
  4. SELF FORMAT – YOU CAN IMPORT SALES, PURCHASE, DEBIT NOTE, CREDIT NOTEENTRIES WITH YOUR FORMAT AND UPTO 5000 (FIVE THOUSAND) ENTRIES AT A TIME..
  5. YOU CAN USE IT FOR LIFETIME
  6. YOU CAN USE IT IN MULTIPLE COMPUTERS, NO RENEWAL.
  7. NOW WITH MULTIPLE LEDGER VOUCHER FORMAT (ALL GST LEDGERS AND ALL TAXABLE LEDGERS)
  8. NOW WITH MULTI GST VOUCHERS WITH STOCK ITEMS
YOUR FORMAT, OUR WORK
SAVE TIME, LABOUR, MONEY
MO.NO.- +91-9131810293
EMAIL :- LEARNWELLS@OUTLOOK.COM
WEBSITE: WWW.LEARNWELLS.COM
DOWNLOAD THE SOFTWARE WITH BELOW BUTTON
PLEASE CONTACT FOR ANY QUERY.

Tally ERP9 TDL | Unwanted Masters

[CLICK ON IMAGE TO WATCH THE VIDEO]
With This Tally ERP 9 TDL file You can delete unwanted masters that are useless or unused without transactions. You can excess Ledger Master, Ledger Groups, Stock masters, stock Groups, Employee Masters, CostCenterMasters.
This TDL is very helpfull and must have TDL file for Tally.

COPY THE FOLLOWING CODE AND FOLLOW INSTRUCTION


[Menu : LWS Report]
    Title : ” Delete Master”
    Item : Blank
    Item : Ledger : Display : LW Ledger
    Item : Group : Display : LW Group
    Item : Blank
    Item : Employess : Display : LW Employess
    Item : Cost Centre : Display : LW Cost Centre
    Item : Blank
    Item : Stock Item : Display : LW Stock Item
    Item : Stock Group : Display : LW Stock Group

[Report : LW Ledger]
    Title : “Ledger Master”
    Use : LWS Report


[Report : LW Group]
    Title : “Group Master”
    Use : LWS Report
    Local      : Collection : My mastercoll : Delete  : Type
    Local      : Collection : My mastercoll : Add        :  Type: Group

[Report : LW Employess]
    Title : “Employess Master”
    Use : LWS Report
    Local      : Collection : My mastercoll : Delete  : Type
    Local      : Collection : My mastercoll : Add        :  Type: Cost Centre
    Local      : Collection : My mastercoll : Add        :  Filter : EmployeesFilter

[Report : LW Cost Centre]
    Title : “Cost Centre Master”
    Use : LWS Report
    Local      : Collection : My mastercoll : Delete  : Type
    Local      : Collection : My mastercoll : Add      :  Type: Cost Centre
;; Uncommented
   Local      : Collection : My mastercoll : Add        :  Filter :CostCentreFilter

[Report : LW Stock Item]
    Title : “Stock Item”
    Use : LWS Report
    Local      : Collection : My mastercoll : Delete  : Type
    Local      : Collection : My mastercoll : Add        :  Type: StockItem

[Report : LW Stock Group]
    Title : “Stock Group”
    Use : LWS Report
    Local      : Collection : My mastercoll : Delete  : Type
    Local      : Collection : My mastercoll : Add        :  Type: Stock Group

;;www.learnwells.com

[Collection: Payroll Employees11]

    Use          : Alias Collection
    Type      : Cost Centre
    Title    : $$LocaleString:”List of Employees”
    Filter    : EmployeesFilter
    Filter    : PayrollBelongsToCategory
    Filter    : PayrollEmployeesFilter
    Format    : $Parent

[Report : LWS Report]
    Form : LWS Report

[Form : LWS Report]
    Height : 100% Page
    Width  : 100% Page
    Part    : LWS Report
    Bottom Part : LW Note
    Button    : Gr DeleteSelected
    Button    : Gr Btn Select All,Gr DeleteAll
    Key        : Gr Shift Down Select

[Part : LWS Report]
    line :LWS Report Title ,  LWS Report
    Repeat : LWS Report : My mastercoll

    Scroll : vertical
    Common border : yes

[Line : LWS Report Title]
    Field : LWS Report sl, LWS Report, LWS Report g

    Border : thin Top Bottom

    Local : Field : Default : Style : Normal bold
    Local : Field : LWS Report sl : Set as : “SR.”
    Local : Field : LWS Report    : Set as : “Particulars”
    Local : Field : LWS Report g : Set as : “Group”

[Line : LWS Report]
    Field : LWS Report sl, LWS Report, LWS Report g

[Field : LWS Report Sl]
    set as  : $$line
    Width  : 5 
    Align   : Right
    Border  : Thin Left Right

[Field : LWS Report]
    set as  : $Name
    Width  : 35

[Field : LWS Report g]
    set as  : $Parent
    Width  : 40
    Border  : Thin Left Right

[Part : LW Note]
    Line : LW Note

[Line : LW Note]
    Field : LW Note

[Field : LW Note]
    Set as : “Always Take Backup – www.Learnwells.com”
    Color : Red
    Style : Large bold
    Fullwidth : yes

[Collection : My mastercoll]
    Type : Ledger
    Compute    : IsEmptyObject        : $$IsEmptyObject
    Filter : ONlyempty

[Button: gr DeleteSelected]
    Title : “Delete Selected”
    Key        : Alt + D
    Action    : Delete Object
    Mode    : Display

    Scope    : Selected Lines

[Button: Gr DeleteUnselected]

    Title : “Delete All”
    Key        : Ctrl + E
    Action    : Delete Object
    Mode    : Display
    Scope    : Unselected Lines

[Button: Gr DeleteAll]
    Title : “Delete All”

    Key        : Ctrl + D
    Action    : Delete Object
    Mode    : Display
    Scope    : All Lines

[Button: GR Btn Select All]
    Title : “Select All”

    Key        : Ctrl+A
    Action    : Select All
    Mode    : Display

[Button: Gr Btn Select None]
    Title : “Select None”

    Key        : Ctrl + 8
    Action    : Unselect All
    Mode    : Display

[Key: Gr Shift Down Select]
    Title : “Select”
    Key    : Shift + Down
    Action  : Toggle Select
    Mode    : Display

[System : Formula]
    ONlyempty : $$IsEmptyObject

[#Menu: Gateway of Tally]

Add :    Item : before : @@locaccountInfo : Unwanted Masters : Menu : LWS Report

Control : Master Delete : NOT ##SVEducationalMode


;;www.learnwells.com


FOLLOW THE BELLOW INSTRUCTIONS TO LOAD TDL FILE IN TALLY:

1. Copy the code and paste in a Text file.
2. Save the text file into your computer.
3. Copy the text file path including Name and extension (as – C:UsersHPDesktoprecParty Detail.txt)
4. Open Tally ERP9 
5. Press F12 and goto Product and Features
5. Press F4 (to open a Box)
6. Load TDL file on Startup – Yes
7. Paste The path in blank space
8. Press enter and save 


Now your TDL is ready to use.

Also you can download it with below Button:


SIMPLE INVOICE FORMAT

[#Form: Comprehensive Invoice]
Add : Option : LearnWellWT : @@IsSales

[#Form: Simple Printed Invoice]
Add : Option : LearnWellWT : @@IsSales

[! Form : LearnWellWT]
Delete : Parts
Delete : Bottom Parts
Delete : PageBreak

Space Top : 1.5 inch
Space Bottom: 0.15 inch
Space Left : 0.65 inch
Space Right : 0.15 inch


Add : Parts : LearnWellWT Top Part, LearnWellWT Body Part, MI Total, LWTT NARRATION, Abott1,
Add : Bottom Part: LearnWellWT Bottom Part


[Part: LearnWellWT Top Part]

Part : RSTL CustomerAddress
Right Part : LWTT Invoice Details
Border : Thin Box
Common Border : yes


[Part : RSTL CustomerAddress]

Line : MI To, MI PartyName,


[Line : MI To]

Field : Name Field
Local : Field : Name Field : Set as : $$LocaleString:”To”
Local : Field : Name Field : Width : 10
Local : Field : Name Field : Style : Normal bold
Space Bottom  : 0.5

[Line : MI PartyName]

Field : Medium Prompt, Name Field 
Local : Field : Medium Prompt : Set As : $$LocaleString:”M/S:”
Local : Field : Medium Prompt : Width : 12
Local : Field : Medium Prompt : Style : Normal
Local : Field : Name Field    : Set as : $PartyLedgerName
Local : Field : Name Field    : Style : PP3
Space Bottom  : 0.25
indent        : 1


[Part : LWTT Invoice Details]
Part     : LWTT Title, LWTT TAXInvoiceDetails
Vertical : Yes
Border   : Thin Left

[Part : LWTT Title]

Line : LWTT Title

[Line : LWTT Title]

Field : Name Field
Local : Field : Name Field : Set as : ##ReportTitle
Local : Field : Name Field : Width      : yes
Local : Field : Name Field : Style : PP2
Local : Field : Name Field : Align : Center
indent:1
Space Bottom  :  0.3
Space Top     :  0.3

[Part : LWTT TAXInvoiceDetails]

Line : MI VCHNo, MI VCHDate
Border : Thin Top

[Line: MI VCHNo]
Field : Simple Prompt, MI VCHNo
Local : Field : Simple Prompt : Set as : ” Voucher No   :”
Local : Field : Simple Prompt :style : pp1
Space Top     : if $$IsEmpty:$VATTINNumber:Ledger:$partyLedgerName then 0.2 else 1.5
Space Bottom  : if $$IsEmpty:$VATTINNumber:Ledger:$partyLedgerName then 0.3 else 2

[Field: MI VCHNo]
Use : Short Name Field
Set as : $VoucherNumber
style : Large Bold
Indent:2

[Line: MI VCHDate]
Field : Simple Prompt, MI VCHDate
Local : Field : Simple Prompt : Set as : “Voucher Date:”
Local : Field : Simple Prompt :style : pp1


[Field: MI VCHDate]
Use : Large Date Field
Set as : $Date
style : Large Bold
Indent:2


[Part : LearnWellWT Body Part]
Part : MI ColumnTitles, IE Details, LE Details
Vertical : Yes
Scroll : Vertical
Common Border : yes

[Part : MI ColumnTitles]
Line: MI Column Titles

[Line: MI Column Titles]
Use : IE Details

Local : Field : Default : Align : Center
Local : Field : Default : Lines : 1
Local : Field : Default : Type : String
Local : Field : Default : Style : Large Bold
Local : Field : IE SiName : Set as : “Description Of Goods”
Local : Field : IE Qty : Set as : “Quantity”
Local : Field : IE UOM : Set as : “Unit”
Local : Field : IE Rate : Set as : “Rate”
Local : Field : IE Amount : Set as : “Amount”
Border: Column Titles


[Part : IE Details]
Local : Field : Default :Align : Center
Line :IE Details
Repeat : IE Details : Inventory Entries
Total : IE Qty, IE Amount

[Line : IE Details]
Field : IE SiName
Right Field : IE Qty, IE Rate, IE Amount
Explode : Item Desc : $$NumItems:UserDescription > 0

[Part : Item Desc]
Local : Field : Default :Align : Center
Line : Item Desc
Repeat : Item Desc : UserDescription

[Line : Item Desc]
Field : Item Desc

[Field : Item Desc]
Use : Name Field
Width : 40
Indent : 8
Set as : $UserDescription
Style : Normal Italic


[Field : IE SIName]
Use : Name Field
Set as : $StockItemName
Border : Thin Left
FullWIdth : Yes 

[Field : IE Qty]
Use : Qty Field
Set as : $BilledQty
Border : Thin Left
Format : “NoZero”
Align : Right

[Field : IE rate]
Use : Rate Field
Set as : $Rate
Border : Thin Left

[Field : IE Amount]
Use : Amount Field
Set as : $Amount
Border : Thin Left Right
Format : “NoZero”

[Part : LE Details]
Line : LE Details
Repeat : LE Details : Ledger Entries
Scroll : Vertical

[Line : LE Details]
Use : IE Details
Local : Field : IE SiName: Set as : $LedgerName
Local : Field : IE Qty : Set as : “”
Local : Field : IE Rate : Set as : if $$IsEmpty:$RateOfInvoiceTax then “” else $$String:$RateOfInvoiceTax + “%”
Local : Field : IE Amount: Set as : $Amount
Local : Field : IE SiName: Align : Right
Local : Field : IE Qty : Format : “NoZero”
Local : Field : IE Rate : InActive: $RateOfInvoiceTax = 0
Local : Field : IE Rate : Type : String
Empty : $LedgerName = $PartyLedgerName


[Part : MI TOTAL]

Line : MI Total Line, MI AmtInWords

[Line : MI Total Line]
Use : IE Details
Local : Field : Default :Align : right
Local : Field : Default : Style : Large Bold
Local : Field : IE SiName: Set as : “TOTAL”
Local : Field : IE Qty : Set as : $$Total:IEAmount
Local : Field : IE Rate : Set as : “”
Local : Field : IE Amount: Set as : $Amount
Border : Totals

[Line : MI AmtInWords]
Border : Thin Box
Field : Short Prompt, MI AmtInWords
Local : Field : Short Prompt : Set as : “Amount in words : “


[Field : MI AmtInWords]
Use : Name Field
Set as : $$InWords:$Amount + ” Only.”
FullWidth : yes
Style : Normal

[Part : LWTT Narration]
Part : LWTT Recieved VNO, LWTT Narration1, EXPINV VATDetails
Border : Thin Box
space top : 0.25
space bottom : 0.2

[Part : LWTT Recieved VNO]
Line : LWTT Recieved VNO


[Line : LWTT Recieved VNO]
fields : simple field
Local : Field : simple field : info : “Recieved VNO :  “
Local : Field : simple field : STYLE : Normal Bold
;; Local : Field : simple field : Width : 12

[Part : LWTT Narration1]
Line : LWTT Narr

[Line : LWTT Narr]
Line  : EXPINV Narration
Local : Field : EXPINV Narration : Full Width : Yes
Local : Field : Default      : Style  : pp6


[#Part : EXPINV VATDetails]


[Part : Abott1]


    Right Part : LWTT Declaration


[Part : LWTT Declaration]

Line  : EXPINV Declaration
Local : Field : EXPINV Declaration : Full Width : yes
Local : Field : Default      : Style  : pp5
Local : Field : width : 50% page

[Part : LearnWellWT Bottom Part]
Part : Bottom4

[Part : Bottom4]

Part     : LWTT VATTinNo,
Vertical : Yes


[Part : LWTT VATTinNo]

Part       : LWTT VATNo
Right Part : LWTT Sign
    
[Part  : LWTT VATNo]

Line    : LWTT CompanyLTax, LWTT CompanyITax
Space top : 2

[Line: LWTT CompanyLTax]

Fields      : Medium Prompt, Name Field
Local       : Field : Medium Prompt : Set as     : if @@IsIndian then (If @@IsIndianVAT then $$LocaleString:”VAT/TIN No. :” else $$LocaleString:”B.S.T No. :”) else $$LocaleString:”VAT/TIN No.:”
Local       : Field : Medium Prompt : Width      : if NOT $$InPixelMode then 0 else @@NormalWidth
Local     : Field : Medium Prompt : Style  : pp4
Local       : Field : Name Field    : Set as     : @@CMPLTaxNumber
Local       : Field : Name Field    : Full Width : Yes
Local     : Field : Name Field    : Style  : pp4
Invisible   : NOT @@CompanyTax OR $$IsEmpty:@@CMPLTaxNumber
Space Bottom: if @@IsIndian then 0 else 1


[Line: LWTT CompanyITax]

Fields      : Medium Prompt, Name Field
Local       : Field : Medium Prompt : Set as     : If @@IsIndianVAT then $$LocaleString:”C.S.T No. :” else $$LocaleString:”C.S.T No. :”
Local       : Field : Medium Prompt : Width      : if NOT $$InPixelMode then 0 else 14
Local     : Field : Medium Prompt : Style      : pp4
Local       : Field : Name Field    : Set as     : $InterStateSTNumber:Company:##SVCurrentCompany
Local       : Field : Name Field    : Full Width : Yes
Local     : Field : Name Field    : Style  : pp4
Invisible   : NOT @@CompanyTax OR NOT @@IsIndian OR $$IsEmpty:$InterStateSTNumber:Company:##SVCurrentCompany
Space Bottom: If @@IsIndian Then 0 Else 1


[Part : LWTT Sign]

    Line : RSTL ForCompany, RSTL Authorised
    
[Line : RSTL ForCompany]

Right Field  : RSTL ForCompany
Space Bottom : If @@IsSales then 2 else 2
;; Space Top    : If @@IsSales then 0.5 else 0

[Field : RSTL ForCompany]

Use         : Name Field
Set As     : “For “+ @@CmpMailName
Align     : Right
Width     : 40
Style     : pp4

[Line : RSTL Authorised]

Right Field : RSTL Authorised

[Field : RSTL Authorised]

Use         : Name Field
Set As     : “Authorised Signatory”
Align     : Right
Width     : 20
Style     : Normal


[Style  : pp1]

    Use : normal
font : “Times New Roman”
    Height : 14

[Style  : pp2]

    Use : normal
font : “Georgia”
    Height : 18

[Style  : pp3]

    Use : normal
font : “Arial”
    Height : 15

[Style  : pp4]

    Use : normal
font : “Times New Roman”
    Height : 14

[Style  : pp5]

    Use : normal
font : “Arial Narrow”
    Height : 10

[Style  : pp6]

    Use : normal
font : “Times New Roman”
    Height : 10


PARTY FULL DETAIL WITH OUTSTANDING

In Tally we take entries and generate reports to simplify our business.
Sometime we gave goods to our customer in credit and outstanding were generated. Then we need to collect all borrowing and required customer’s all details in one place.

It can be possible with TDL files. And today I have a special TDL for your Tally ERP 9 software.
With this TDL file you will get parties detail at one place with there State, GST Number, PAN Number, Mobile Number, and Outstanding.

It will be very helpful to collect outstanding and there GST details.
And also helpful in GST return filing.

Copy the following code in Tally and enjoy:


[#Menu: Gateway of Tally]

Add : Key Item : Party Details : D : Display Collection : LearnWell


[Collection: LearnWell]

Title : “List of Group”
Type : Group

Belongs To : Yes
Variable : GroupName
Report : Party Details
Trigger : GSTIN Grp Trigger Rep
Align : Centre


[Report : GSTIN Grp Trigger Rep]
 
Use      : Collection Variable 
Local    : Line : Collection Variable : Add : Field : GSTINCGrpListFld
Local    : Field: MV Title            : Info : “GROUPS”

[Field: GSTINCGrpListFld]

Use         : Name Field
Variable : GroupName 
Modifies    : GroupName 
Table : LearnWell
Show Table  : Always


[Report : Party Details]
Variable : SVFromDate, SVToDate
Set      : SVfromDate : ##SVToDate 


Set : GroupName : ##GroupName
Variable    : IsMultiPage, InNewPages
Set         : IsMultiPage       : yes
    Set         : InNewPages        : yes
Set      : SVToDate : ##SVCurrentdate
Form     : LearnWellWT

;;….www.Learnwells.com…,,

[Form : LearnWellWT]
Page Break : Cl Page Break1, Op Page Break1
Height     : 100% Screen
    Width     : 100% Screen
BackGround  : Lily White
Space Top   : If $$InPrintMode Then 0.5 Else 0 inches
Button      : PrintButton, ExportButton,F2 ChangePeriod,Delete Ledge,Form Remove Lin
Parts       : ONC TitGSTIN,ONCinfoReportGSTIN,Develedbyname
[Part : ONC TitGSTIN]

Space Bottom : 0.2 inch
Line : ONC Tit LineGSTIN,ONC Tit LineGSTIN1,ONCDateGSTIN,SDOBCNCToDatedLinGSTIN
    

[Line : ONC Tit LineGSTIN]

Field : ONC Tit FieldGSTIN

[Field : ONC Tit FieldGSTIN]

Use        : Name Field
Set as     : $Name:Company:##SVCurrentCompany
Align      : Center
Full Width : Yes
Style : TextStyleGSTIN

[Style: TextStyleGSTIN]

Font : Algerian
Height : 16
[Line : ONC Tit LineGSTIN1]

Field : ONC Tit FieldGSTIN1
[Field : ONC Tit FieldGSTIN1]

Use        : Name Field
Set as     : $Address:Company:##SVCurrentCompany
Align      : Center
Full Width : Yes
Border    : Thin Box

[Line : ONCDateGSTIN]
Field:Group SDOBNCGSTIN,Group SDOBNCansGSTIN
          
                    Space Bottom    :2 mms

[Field:Group SDOBNCGSTIN]
Use:Name Field
SetAs:”Group Name:”
Width:25 mms
Style:Tiny
Align      : Center
[Field:Group SDOBNCansGSTIN]
Use:Name Field
SetAs:##GroupName 
Width:200 mms
Style:Tiny


 [Line   :SDOBCNCToDatedLinGSTIN] 
                Field :   SDOBCNCfrmdateFldGSTIN
                    [Field  :SDOBCNCfrmdateFldGSTIN]
Use:Medium prompt
                        Setas   :”Detailed Report” 
                       Width  :40 mms
                        Style   :Tiny
                        Align      : Center
                    
Border    : Thin Box

[Part :  ONCInfoReportGSTIN]

Line      : ONCcolumnTitlesGSTIN,ONCInfoGSTIN
Repeat    : ONCInfoGSTIN  : MycollectionGSTIN    
Scroll    : Both
Common Border : Yes
Float     : No
Border    : Thin Box


[Line : ONCColumnTitlesGSTIN]

Border : Column Titles 

Fields : ParticularsGSTIN,SDGroupNameGSTIN1,Op.Bal.GSTIN,SDGroupNameGSTIN,Regtypevaibh,Pan,Mobile,Outstanding
Local : Field : ParticularsGSTIN   : Set as     : “Particulars”
Local : Field : ParticularsGSTIN   : Line       : 0
Local : Field : Op.Bal.GSTIN       : Set as     : “State”
Local : Field : SDGroupNameGSTIN   : Set as     : “GST No.”
Local : Field : SDGroupNameGSTIN1  : Set as     : “Group Name”
Local : Field : Regtypevaibh       : Set as     : “Registration Type”
Local : Field : Pan     : Set as     : “Pan No.”
Local : Field : Mobile    : Set as : “Mobile No”
Local : Field : Outstanding    : Set as : “Outstanding”
Local : Field : Default       : Type     : String
Local : Field : Default       : Style    : Small 
Local : Field : Default       : Align    : Center
Local : Field : Default       : Background    : @@SV_UNYELLOW
[Line : ONCInfoGSTIN]

Fields :ParticularsGSTIN,SDGroupNameGSTIN1,Op.Bal.GSTIN,SDGroupNameGSTIN,Regtypevaibh,Pan,Mobile,Outstanding
Option : AlterOnEnter


[Field : ParticularsGSTIN]
Use : Name Field
Set as : $Name 
Width  : 26% Screen
Border : Thin Bottom
Alter : Ledger

[Field : Op.Bal.GSTIN]

Use    : Name Field
Set as : if $$IsEmpty:$LedStateName then ” ” else $LedStateName + ” (“+ $$getgststatecode:($LedStateName) + “)”
Width  : 12% Screen
Border : Thin Left


[Field : SDGroupNameGSTIN]
Set as :  $PARTYGSTIN
Width : 12% Screen
Border  :  Thin Left


[Field : SDGroupNameGSTIN1]
Set as :  $Parent
Width : 10% Screen
Border  :  Thin Left Right


[Field : Regtypevaibh]

Set as :  $GSTRegistrationType
Width : 11% Screen
Border  :  Thin Left Right


[Field : Pan]
Set as :$IncomeTaxNumber
Width : 9% Screen
Border  :  Thin Left Right

[Field : Mobile]

Set as :$LedgerMobile

Width : 9% Screen
Border  :  Thin Left Right

[Field : Outstanding]

Set as :$ClosingBalance

Width : 11% Screen
Border  :  Thin Left Right


[Part: Develedbyname]
Space Bottom : 0.2 inch
Line: COlTotalsGSTIN
[Line: COlTotalsGSTIN]

Field : ONC Tit FieldGSTIN0
[Field : ONC Tit FieldGSTIN0]

Use        : Name Field
Set as     : “www.Learnwells.com”
Align      : Center
Full Width : Yes
Border    : Thin Box


[Part: Cl Page Break1]
Lines : Cont Line1
[Line: Cont Line1]
Field: Cont Field1
Border: Full Thin Top
[Field: Cont Field1]
Set As : “Continued……..”
Full width : Yes
Align : Right


[Part: Op Page Break1]
Parts : DSP OpCompanyName, DSP OpReportTitle
Vertical: Yes


[Collection : MycollectionGSTIN]

Type : Ledger 
Child Of:##GroupName
Belongs To : Yes


[Button  : Remove LinE]

    Key     : Alt+R
    Action  : Remove Line

    Mode    : Display

FOLLOW THE BELLOW INSTRUCTIONS TO LOAD TDL FILE IN TALLY:

1. Copy the code and paste in a Text file.
2. Save the text file into your computer.
3. Copy the text file path including Name and extension (as – C:UsersHPDesktoprecParty Detail.txt)
4. Open Tally ERP9 
5. Press F12 and goto Product and Features
5. Press F4 (to open a Box)
6. Load TDL file on Startup – Yes
7. Paste The path in blank space
8. Press enter and save 


Now your TDL is ready to use.

Also you can download it with below Button: