

Sometime when we see outstanding report in tally, there is ledger name and its balances, then we feel and need group name in front of ledger name to see clear outstanding report. So With this Tally TDL code we can make our own outstanding report with Ledger Name, Group, and Debit Credit Closing Balances. This is best TDL for Tally Prime and ERP9 and Must have TDL.
This Outstanding Tally TDL will work in all Tally versions. For more detail watch above Video about How to make own outstanding reports with TDL Codes in Tally.
TDL Code :
[#menu:Gateway of tally]
Add:Key item: Before:@@locQuit:Outstanding:T:Display:OutDetails
[Report:OutDetails]
Forms:OutDetails
[Form:OutDetails]
Parts:OutDetails
Button:ExportButton,ChangePeriod
[Part:OutDetails]
Lines:OutDetailsTitle,OutDetailsList
Repeat:OutDetailsList:Ledger
Scroll:Vertical
[Line:OutDetailsTitle]
Use:OutDetailsList
local:field:default:type:string
local:field:Ld Name:Set as:”Ledger Name”
local:field:Group:Set as:”Group”
local:field:ClosingDr:Set as:”Closing Dr.”
local:field:ClosingCr:Set as:”Closing Cr.”
Border:Column Titles
[Line:OutDetailsList]
Field:Ld Name,Group,ClosingDr,ClosingCr
[Field:Ld Name]
Use:Name field
Set as :$Name
width:40
[Field:Group]
Use:Name field
Set as :$Parent
width:30
[Field:ClosingDr]
Use:Amount field
Set as :if $$IsDr:$ClosingBalance then $ClosingBalance else 0
width:30
[Field:ClosingCr]
Use:amount field
Set as :if Not $$IsDr:$ClosingBalance then $ClosingBalance else 0
width:30
HOW TO USE ABOVE CODE:
FOLLOW THE BELLOW INSTRUCTIONS TO LOAD TDL FILE IN TALLY:
1. Copy the code and paste in a Text file.
2. Save the text file into your computer.
3. Copy the text file path including Name and extension (as – C:UsersHPDesktoprecParty Detail.txt)
4. Open Tally ERP9 OR Tally Prime
5a. Press F12 and goto Product and Features (for Tally ERP9)
2. Save the text file into your computer.
3. Copy the text file path including Name and extension (as – C:UsersHPDesktoprecParty Detail.txt)
4. Open Tally ERP9 OR Tally Prime
5a. Press F12 and goto Product and Features (for Tally ERP9)
5b. Click on Help and click on TDL & Addon (for Tally Prime)
5. Press F4 (to open a Box)
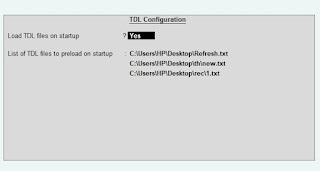
6. Load TDL file on Startup – Yes
7. Paste The path in blank space
8. Press enter and save
6. Load TDL file on Startup – Yes
7. Paste The path in blank space
8. Press enter and save

Now your TDL is ready to use.