Free TDL for Tally ERP9 and Tally Prime | Stop Billing if Item rate exceed

Sometime we made invoices in low price from purchase rate and got loss by mistake. What if Tally stop billing if price goes higher that standard cost. Yes! it is possible. 

With this amazing free Tally ERP9 and Tally Prime TDL code we can stop invoicing while Stock Item price goes higher than standard price in Item Sale Invoice. It calculate Item Batch standard rate in Voucher at Entry Time. This Tally TdL make our work more effective and accurate. This is must have  TDL file for Tally ERP9 and Tally Prime that can use for lifetime. 

It will work in all Tally versions. for more detail watch above Video.

TDL Code : 

[#Field: VCH Batch Rate]
Add : Option : LearnwellSell : @@IsSales

[!Field : LearnwellSell]
Validate : ($$IsEmpty:$$Value OR $$Value >= $Standardprice:StockItem:$StockItemName)

[#Field: VCH Rate]
Add : Option : VCH Sales Rate : @@IsSales

[!Field : VCH Sales Rate]
Validate : ($$IsEmpty:$$Value OR $$Value >= $Standardprice:StockItem:$StockItemName)
 

HOW TO USE ABOVE CODE:

FOLLOW THE BELLOW INSTRUCTIONS TO LOAD TDL FILE IN TALLY:

1. Copy the code and paste in a Text file.
2. Save the text file into your computer.
3. Copy the text file path including Name and extension (as – C:UsersHPDesktoprecParty Detail.txt)
4. Open Tally ERP9  OR Tally Prime
5a. Press F12 and goto Product and Features (for Tally ERP9)
5b. Click on Help and click on TDL & Addon  (for Tally Prime)
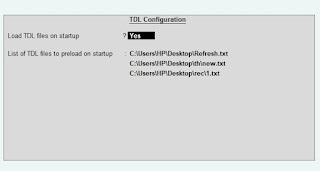
5. Press F4 (to open a Box)
6. Load TDL file on Startup – Yes
7. Paste The path in blank space
8. Press enter and save 


Now your TDL is ready to use.

Item Wise Sale Type with HSN, Godown, Batch TDL for Tally

With this amazing TDL code we can add Item Sale Type, Item HSN Code, Item Godown, Item Batch in Voucher at Entry Time. this Tally TdL make looks our voucher more effective and all required details in one line. This is must have  TDL file can use with Tally Prime and Tally ERP9,

It will work in all Tally versions. for more detail watch above Video.

TDL Code : 

[#Line:EI ColumnOne]
Add : Field : After : VCH ItemTitle:LWNote
[Field : LWNote]
Setas:$$LocaleString:”Sales Type”
SKIP:YES
[#Line:EI invinfo]
Add:Field:After:VCH StockItem:LWNoteDtl
[Field : LWNoteDtl]
Use : Name Field
Width : 15
Table : LWtbl
[Table : LWtbl]
Title : $$LocaleString:”Types of Sale”
List Name : Counter Sale,Marketing Sale, Campaign Sale, SalesMan Sale, � Not Applicable
Format : $Name
show table : always

[#Line:EI ColumnOne]
Add:Field:After:VCH ItemTitle:Learnwells
[Field:Learnwells]
Setas:$$LocaleString:”HSN/SAC”
Width:15
SKIP:YES
[#Line:EI invinfo]
Add:Field:After:VCH StockItem:LearnwellsHSN
[Field:LearnwellsHSN]
Use:Short prompt
Setas:$(StockItem,$stockitem).GSTDetails[Last].HSNCode
[#Line:EI ColumnOne]
Add : Right Field : Before : VCH QtyTitle: Learnwells1
[Field:Learnwells1]
Setas:$$LocaleString:”GODOWN”
Width : 30
SKIP:YES
[#Line:EI invinfo]
Add : Right Field : Before : VCHBilledQty :LearnwellsGDN
[Field:LearnwellsGDN]
Use:Short prompt
Setas:$BatchAllocations[1].GodownName
Width : 30

HOW TO USE ABOVE CODE:

FOLLOW THE BELLOW INSTRUCTIONS TO LOAD TDL FILE IN TALLY:

1. Copy the code and paste in a Text file.
2. Save the text file into your computer.
3. Copy the text file path including Name and extension (as – C:UsersHPDesktoprecParty Detail.txt)
4. Open Tally ERP9  OR Tally Prime
5a. Press F12 and goto Product and Features (for Tally ERP9)
5b. Click on Help and click on TDL & Addon  (for Tally Prime)
5. Press F4 (to open a Box)
6. Load TDL file on Startup – Yes
7. Paste The path in blank space
8. Press enter and save 


Now your TDL is ready to use.

AUTO DATE AND TIME IN VOUCHER NARRATION – TALLY TDL


With this TDL file we can can add date and time in voucher narration field automatically. When you load this tdl file into tally, Tally vouchers will show your computer date and time in narration field.
This Auto Date and Time in Narration TDL file will work in all Tally versions like Tally Prime, Tally Erp9 etc. For more detail watch above Video.

TDL Code : 

[#Field:vch Narration]
Set as:$$String:$MachineDate+” “+$$String:$$MachineTime

HOW TO USE ABOVE CODE:

FOLLOW THE BELLOW INSTRUCTIONS TO LOAD TDL FILE IN TALLY:

1. Copy the code and paste in a Text file.
2. Save the text file into your computer.
3. Copy the text file path including Name and extension (as – C:UsersHPDesktoprecParty Detail.txt)
4. Open Tally ERP9  OR Tally Prime
5a. Press F12 and goto Product and Features (for Tally ERP9)
5b. Click on Help and click on TDL & Addon  (for Tally Prime)
5. Press F4 (to open a Box)
6. Load TDL file on Startup – Yes
7. Paste The path in blank space
8. Press enter and save 


Now your TDL is ready to use.

TDL FOR OUTSTANDING REPORT WITH Ledger Name, Group and Closing Balances

Sometime when we see outstanding report in tally, there is ledger name and its balances, then we feel and need group name in front of ledger name to see clear outstanding report.  So With this Tally TDL code we can make our own outstanding report with Ledger Name, Group, and Debit Credit Closing Balances. This is best TDL for Tally Prime and ERP9 and Must have TDL.

This Outstanding Tally TDL  will work in all Tally versions. For more detail watch above Video about How to make own outstanding reports with TDL Codes in Tally.

TDL Code : 


[#menu:Gateway of tally]
Add:Key item: Before:@@locQuit:Outstanding:T:Display:OutDetails
[Report:OutDetails]

Forms:OutDetails
[Form:OutDetails]

Parts:OutDetails
Button:ExportButton,ChangePeriod
[Part:OutDetails]

Lines:OutDetailsTitle,OutDetailsList
Repeat:OutDetailsList:Ledger
Scroll:Vertical

[Line:OutDetailsTitle]
Use:OutDetailsList
local:field:default:type:string
local:field:Ld Name:Set as:”Ledger Name”
local:field:Group:Set as:”Group”
local:field:ClosingDr:Set as:”Closing Dr.”
local:field:ClosingCr:Set as:”Closing Cr.”
Border:Column Titles
[Line:OutDetailsList]
Field:Ld Name,Group,ClosingDr,ClosingCr

[Field:Ld Name]
Use:Name field
Set as :$Name
width:40

[Field:Group]
Use:Name field
Set as :$Parent
width:30

[Field:ClosingDr]
Use:Amount field
Set as :if $$IsDr:$ClosingBalance then $ClosingBalance else 0
width:30

[Field:ClosingCr]
Use:amount field
Set as :if Not $$IsDr:$ClosingBalance then $ClosingBalance else 0
width:30


HOW TO USE ABOVE CODE:

FOLLOW THE BELLOW INSTRUCTIONS TO LOAD TDL FILE IN TALLY:

1. Copy the code and paste in a Text file.
2. Save the text file into your computer.
3. Copy the text file path including Name and extension (as – C:UsersHPDesktoprecParty Detail.txt)
4. Open Tally ERP9  OR Tally Prime
5a. Press F12 and goto Product and Features (for Tally ERP9)
5b. Click on Help and click on TDL & Addon  (for Tally Prime)
5. Press F4 (to open a Box)
6. Load TDL file on Startup – Yes
7. Paste The path in blank space
8. Press enter and save 


Now your TDL is ready to use.

TDL CODE TO SEE ADDITIONAL FIELDS IN LEDGER DISPLAY


With this TDL code we can add Narration,Reference number,Reference Date in Ledger Display mode in a Line. So we can export, print with  detailed vouchers in one line and save paper and working time. This is best TDL for Tally Prime and ERP9. Must have TDL.

It will work in all Tally versions. For more detail watch above Video.

TDL Code : 


[#line: DSP VchAccTitles]
Add:Right Field:After:DSP VCHNumberTitle:Learnwell Narration
[Field:Learnwell Narration]
use:Name Field
Set as:”Narration”
Style:Normal

[#line: DSP VchDetail]
Add:Right Field:After:DSP VCHNumber:Learnwell Narration1
[Field:Learnwell Narration1]
use:Name Field
Set as:$Narration

[#line: DSP VchAccTitles]
Add:Right Field:After:DSP VCHNumberTitle:Learnwell Reference
[Field:Learnwell Reference]
use:Name Field
Set as:”Reference”
Style:Normal

[#line: DSP VchDetail]
Add:Right Field:After:DSP VCHNumber:Learnwell Reference1
[Field:Learnwell Reference1]
use:Name Field
Set as:$Reference

[#line: DSP VchAccTitles]
Add:Right Field:After:DSP VCHNumberTitle:Learnwell ReferenceD
[Field:Learnwell ReferenceD]
use:Name Field
Set as:”ReferenceDate”
Style:Normal

[#line: DSP VchDetail]
Add:Right Field:After:DSP VCHNumber:Learnwell Reference1D
[Field:Learnwell Reference1D]
use:Date Field
Set as:$ReferenceDate

[#Collection:Vouchers of Ledger]
Fetch:Reference, ReferenceDate

HOW TO USE ABOVE CODE:

FOLLOW THE BELLOW INSTRUCTIONS TO LOAD TDL FILE IN TALLY:

1. Copy the code and paste in a Text file.
2. Save the text file into your computer.
3. Copy the text file path including Name and extension (as – C:UsersHPDesktoprecParty Detail.txt)
4. Open Tally ERP9  OR Tally Prime
5a. Press F12 and goto Product and Features (for Tally ERP9)
5b. Click on Help and click on TDL & Addon  (for Tally Prime)
5. Press F4 (to open a Box)
6. Load TDL file on Startup – Yes
7. Paste The path in blank space
8. Press enter and save 


Now your TDL is ready to use.

TDL CODE TO CHANGE AUTHORISED SIGNATORY IN INVOICE


With this TDL code we can change Autohorised signatory into our company name and Proprietor in Invoice print. Best TDL code for a Professional Invoice Look.

It will work in all Tally versions. For more detail watch above Video.

TDL Code : 

[#Line : EXPSMP Authourity]
Local : Field : Simple Field : Set as : “Proprietor”

[#Part: EXPINV Signature]
Add: Line :Prop
[Line:Prop]
Left Fields : Simple field
Local : Field : Simple Field : Set as : “For, Learnwell”

HOW TO USE ABOVE CODE:

FOLLOW THE BELLOW INSTRUCTIONS TO LOAD TDL FILE IN TALLY:

1. Copy the code and paste in a Text file.
2. Save the text file into your computer.
3. Copy the text file path including Name and extension (as – C:UsersHPDesktoprecParty Detail.txt)
4. Open Tally ERP9  OR Tally Prime
5a. Press F12 and goto Product and Features (for Tally ERP9)
5b. Click on Help and click on TDL & Addon  (for Tally Prime)
5. Press F4 (to open a Box)
6. Load TDL file on Startup – Yes
7. Paste The path in blank space
8. Press enter and save 


Now your TDL is ready to use.

WRITE YOUR COMPANY NAME/WEBSITE DETAIL IN FOOTER – TALLY TDL

 With this TDL code we can write our company name, Website name or can some other detail in footer at printing time, that change invoice look to more attractive.

It will work in all Tally versions. For more detail watch above Video.

TDL Code : 

[#Part: EXPINV InvoiceCompGen]
option:LWinfo:Yes

[!Part:LWinfo]
line:LearnwellLine
border:thick box
hight:0.50 inch
print BG:Light Grey

[line:LearnwellLine]
field:Simple field
Local:Field :Simple Field:set as:”www.Learnwells.com”

HOW TO USE ABOVE CODE:

FOLLOW THE BELLOW INSTRUCTIONS TO LOAD TDL FILE IN TALLY:

1. Copy the code and paste in a Text file.
2. Save the text file into your computer.
3. Copy the text file path including Name and extension (as – C:UsersHPDesktoprecParty Detail.txt)
4. Open Tally ERP9  OR Tally Prime
5a. Press F12 and goto Product and Features (for Tally ERP9)
5b. Click on Help and click on TDL & Addon  (for Tally Prime)
5. Press F4 (to open a Box)
6. Load TDL file on Startup – Yes
7. Paste The path in blank space
8. Press enter and save 


Now your TDL is ready to use.

WRITE YOUR OWN NAME IN VOUCHER ENTRY SCREEN -TALLY TDL

With this TDL code we can write our company name, or our name etc in voucher entry screen and color it.
It will work in all Tally versions. For more detail watch above Video.

TDL Code : 

[#Part : VCH Narration]
Add: Option : LearnwellVC : $$IsSales:$VoucherTypeName

[!Part:LearnwellVC]
Bottom Line : Lws
width : 100% screen

[Line : Lws]
Field : Lws
[Field : Lws]

Set as : “www.Learnwells.com”
width : 100% screen
Alignment : Center
Background : Yellow
Color : Blue
Skip : Yes

HOW TO USE ABOVE CODE:

FOLLOW THE BELLOW INSTRUCTIONS TO LOAD TDL FILE IN TALLY:

1. Copy the code and paste in a Text file.
2. Save the text file into your computer.
3. Copy the text file path including Name and extension (as – C:UsersHPDesktoprecParty Detail.txt)
4. Open Tally ERP9  OR Tally Prime
5a. Press F12 and goto Product and Features (for Tally ERP9)
5b. Click on Help and click on TDL & Addon  (for Tally Prime)
5. Press F4 (to open a Box)
6. Load TDL file on Startup – Yes
7. Paste The path in blank space
8. Press enter and save 


Now your TDL is ready to use.

CHANGE VOUCHER COLOR TALLY TDL

With this TDL file we can change Tally vouchers screen colors. Now all vouchers looks as per your view. This Tally TDL will help you to increase work productivity.
It will work in all Tally versions. For more detail watch above Video.

TDL Code : 

[#form : Contra Color]
Background : White, Light Blue

[#form : Payment Color]
Background : White, Aquamarine

[#form : Receipt Color]
Background : White, Grey

[#form : Journal Color]
Background : White, Yellow

[#form : Sales Color]
Background : White, Surf Green

[#form :purchase Color]
Background : White, Blue

HOW TO USE ABOVE CODE:

FOLLOW THE BELLOW INSTRUCTIONS TO LOAD TDL FILE IN TALLY:

1. Copy the code and paste in a Text file.
2. Save the text file into your computer.
3. Copy the text file path including Name and extension (as – C:UsersHPDesktoprecParty Detail.txt)
4. Open Tally ERP9  OR Tally Prime
5a. Press F12 and goto Product and Features (for Tally ERP9)
5b. Click on Help and click on TDL & Addon  (for Tally Prime)
5. Press F4 (to open a Box)
6. Load TDL file on Startup – Yes
7. Paste The path in blank space
8. Press enter and save 


Now your TDL is ready to use.

CHANGE ITEM INVOICE LOOK

With this TDL file we can print invoice with item different look. It work like a professional business invoices.
It will work in all Tally versions. For more detail watch above Video.

TDL Code : 

[#line : EXPINV invdetails]
option:bg print:@@oddline

[!line:bg print]
local : field : default : print bg : light grey

[system:formulae]
OddLine : $$IsOdd:$$Line

HOW TO USE ABOVE CODE:

FOLLOW THE BELLOW INSTRUCTIONS TO LOAD TDL FILE IN TALLY:

1. Copy the code and paste in a Text file.
2. Save the text file into your computer.
3. Copy the text file path including Name and extension (as – C:UsersHPDesktoprecParty Detail.txt)
4. Open Tally ERP9  OR Tally Prime
5a. Press F12 and goto Product and Features (for Tally ERP9)
5b. Click on Help and click on TDL & Addon  (for Tally Prime)
5. Press F4 (to open a Box)
6. Load TDL file on Startup – Yes
7. Paste The path in blank space
8. Press enter and save 


Now your TDL is ready to use.